Difference between revisions of "Managing Templates for OnePager Live (Portal)"
(Created page with "==About Managing Templates== 24.0.1-OPL 1) The OnePager '''template''' specifies the initial appearance of each new project view. It is the '''template''' from which a new p...") |
(→Related Links) |
||
| (91 intermediate revisions by the same user not shown) | |||
| Line 1: | Line 1: | ||
==About Managing Templates== | ==About Managing Templates== | ||
| − | 24.0.1- | + | 24.0.1-OPL2 7/12/2017 |
| − | 1) The OnePager ''' | + | 1) The OnePager '''Template''' specifies the initial appearance of each new project view. It is the '''Template''' from which a new project view is created and from which all of the settings in the Project-View Properties ('''PVP''') form are initially populated. |
| − | 2) A ''' | + | 2) A '''Template''' is a great way to achieve standardization across projects and across people! If everyone starts with the same '''Template''', then the resulting project views will adhere to standards that make it much easier for your audiences to digest.. |
| − | 3) The ''' | + | 3) The '''Template''' is another place where you have a number of Microsoft Project or Microsoft Excel '''source plan''' fieldss from which to import into OnePager. |
| − | See the article on ''' | + | See the article on '''Field Mappings''' tab at the following links: [[Template Only Features for OnePager Live | Template Only Features]] 24.1.1-OPL for more instructions on how to utilize all Microsoft Project and Microsoft Excel '''source plan''' fields. |
==Accessing the OnePager Template== | ==Accessing the OnePager Template== | ||
| − | OnePager | + | 1) '''Templates''' are accessed from the OnePager Live '''Home''' page also called the '''Getting Started''' page by clicking on the '''Settings''' button at the top of the page as shown below: |
| − | :( | + | <center>[[File:L2-24_0_1-OPL2-(1B)-07122017.png]]</center> |
| + | <center>L2-24_0_1-OPL2-(1B)-07122017.png</center> | ||
| − | + | 2) Clicking the '''Settings''' button takes you to the '''Settings''' page where you'll find the '''Manage Templates''' button as shown here: | |
| − | + | <center>[[File:L2-24_0_1-OPL2-(2A)-07122017.png]]</center> | |
| + | <center>L2-24_0_1-OPL2-(2A)-07122017.png</center> | ||
| − | + | 3) When you click the '''Manage Templates''' button the page below will appear. You may now select the appropriate '''Template''' management option shown: | |
| − | <center>[[File: | + | <center>[[File:L2-24_0_1-OPL2-(3A)-07122017.png]]</center> |
| + | <center>L2-24_0_1-OPL2-(3A)-07122017.png</center> | ||
| − | == | + | ==Creating a New... Template== |
| − | + | 4) Click the '''New...''' button brings up the '''Create a New Template''' form where you specify the name of your '''new Template''' as shown below: | |
| − | : | + | <center>[[File:L2-24_0_1-OPL2-(4A)-07122017.png]]</center> |
| + | <center>L2-24_0_1-OPL2-(4A)-07122017.png</center> | ||
| − | + | 5) After entering your '''new Template's''' name, click the '''Create New Template''' button. | |
| − | + | :a) This brings up the '''Single Project - Permanent (Read Only) template''' shown below. | |
| − | : | + | :b) This '''Template''' will appear with your designated '''Template name''' showing at the top of the form. |
| − | + | :c) At this point make any desired changes. | |
| − | + | :d) After editing and creating the '''new Template''' it will appear in all list of '''Templates''' available to the '''Work Group''' and may be edited once the '''Create New Template''' button is clicked: | |
| − | + | <center>[[File:L2-24_0_1-OPL2-(5A)-07122017.png]]</center> | |
| + | <center>L2-24_0_1-OPL2-(5A)-07122017.png</center> | ||
| − | + | 6) After editing the '''new Template''' you have several options: | |
| + | |||
| + | :(1) You may '''Save''' the '''Template''' using the '''Save''' button in the lower right corner of the form as shown above. | ||
| + | |||
| + | :(2) You may '''Save the Template as''' some other name by clicking on the '''Save As (Change Template Name)''' in the upper right corner. This action gives you the flexibility to change the name of the '''Template''' now or to change the name of the "Template''' later, if desired. | ||
| + | |||
| + | :(3) You may '''Delete''' the '''Template''' altogether from the system by clicking the '''Delete''' button. | ||
| + | |||
| + | :(4) You may '''Export''' the '''Template''' as a .TAT file by clicking the button in the upper right corner of the form so that it may be used with OnePager Pro or Express. | ||
| + | |||
| + | '''Reserve this Space for Screenshot of results from clicking Export Selected Template to .TAT file.''' | ||
| + | |||
| + | :(5) Click the '''Cancel''' button which will prevent the '''Template''' from being saved as is or with its edits and you'll be returned to '''Manage Templates''' option page as shown above. | ||
| + | |||
| + | :(6) You may use the '''Get Enterprise Custom Fields Account:''' controls to access your online '''Enterprise Custom Field''' data for Microsoft Project. | ||
| + | |||
| + | ==Open... A Template== | ||
| + | |||
| + | 7) When you click the '''Open...''' button the form below will appear giving you the option to select a desired '''Template''' from the dropdown menu: | ||
| + | |||
| + | <center>[[File:L2-24_0_1-OPL2-(6A)-07122017.png]]</center> | ||
| + | <center>L2-24_0_1-OPL2-(6A)-07122017.png</center> | ||
| + | |||
| + | 8) Clicking the '''Open Selected Template''' button will immediately display the selected '''Template''' making it available for editing and subsequent saving if desired. | ||
| + | |||
| + | <center>[[File:L2-24_0_1-OPL2-(7A)-07122017.png]]</center> | ||
| + | <center>L2-24_0_1-OPL2-(7A)-07122017.png</center> | ||
| + | |||
| + | ==Import... A Template== | ||
| + | |||
| + | 9) Clicking the '''Import...''' button will bring up the page shown below. | ||
| + | |||
| + | :a) Click the '''Choose File''' button to bring up the Windows '''Open''' form and navigate to the folder where the '''Template''' resides that you want to '''import'''. | ||
| + | |||
| + | :b) Select the .TAT file to '''import''' and click the '''Open''' button on the Windows form. | ||
| + | |||
| + | <center>[[File:L2-24_0_1-OPL2-(8A)-07122017.png]]</center> | ||
| + | <center>L2-24_0_1-OPL2-(8A)-07122017.png</center> | ||
| + | |||
| + | 10) The form will be updated to slow the selected '''Template''' to be uploaded as shown here: | ||
| + | |||
| + | <center>[[File:L2-24_0_1-OPL2-(9A)-07122017.png]]</center> | ||
| + | <center>L2-24_0_1-OPL2-(9A)-07122017.png</center> | ||
| + | |||
| + | 11) Now click the '''Upload Selected Template''' button and the selected '''Template''' will be uploaded into OnePager Live. <!--Currently there is no visible result from this action-Bugzilla 5353--> | ||
| + | |||
| + | ==Help Button== | ||
| + | |||
| + | 12) Clicking the '''Help''' button will return you to the '''What is a Template?''' form at the '''Manage Templates''' option page as shown here: | ||
| + | |||
| + | <center>[[File:L2-24_0_1-OPL2-(10A)-07122017.png]]</center> | ||
| + | <center>L2-24_0_1-OPL2-(10A)-07122017.png</center> | ||
| + | |||
| + | 13) In addition to a description of the OnePager '''Template''' there are also hot links to the OnePager Live Wiki documentation and the email address of OnePager Live's Support Office. | ||
| + | |||
| + | ==Returning to the OnePager Live Home Page== | ||
| + | |||
| + | 14) Click the '''Home''' button on the OnePager Live tool bar as shown below to return to the OnePager Live Home Page also know as the '''Getting Started''' page: | ||
| + | |||
| + | <center>[[File:L2-24_0_1-OPL2-(11A)-07122017.png]]</center> | ||
| + | <center>L2-24_0_1-OPL2-(11A)-07122017.png</center> | ||
==Related Links== | ==Related Links== | ||
| − | + | 15) The article link below should be consulted for '''Template only features''' associated with Microsoft Project, Microsoft Project Server, Microsoft Project Online, and Microsoft Excel within the '''Template Properties''' form’s '''Main''' tab, '''Advanced''' tab, and '''Field Mappings''' tab. | |
| + | <center> | ||
{| class="wikitable" | {| class="wikitable" | ||
| − | | [[Template Only Features for OnePager Live | Template Only Features]] 24.1.1- | + | | [[Template Only Features for OnePager Live (MS Project Source) | Template Only Features-MS Project Source]] 24.1.1-OPL2 |
| + | | [[Template Only Features for OnePager Live (MS Excel Source) | Template Only Features-MS Excel Source]] 24.2.1-OPL2 | ||
|} | |} | ||
| + | </center> | ||
| − | + | 16) The three links below provide specific information on using OnePager Live's '''Enterprise Custom Fields''' feature, '''Column Splitting' and Parsing'' features for both Microsoft Project and Excel source files, and how to '''Manage the current Template'''. | |
{| class="wikitable" | {| class="wikitable" | ||
| − | | [[Using Enterprise Custom Fields from Microsoft Project for OnePager Live | Using Enterprise Custom Fields from Microsoft Project]] 24.3.1- | + | | [[Using Enterprise Custom Fields from Microsoft Project for OnePager Live | Using Enterprise Custom Fields from Microsoft Project with OnePager Live]] 24.3.1-OPL2 |
|- | |- | ||
| − | | [[Splitting and Parsing | + | | [[Splitting and Parsing Fields for OnePager Live (MS Project Source) | Splitting and Parsing Fields-MS Project Source]] 24.4.1-OPL2 |
| + | | [[Splitting and Parsing Fields for OnePager Live (MS Excel Source) | Splitting and Parsing Fields-MS Excel Source]] 24.5.1-OPL2 | ||
|- | |- | ||
| − | | [[Managing the Current Template for OnePager Live | Managing the Current Template]] 24. | + | | [[Managing the Current Template for OnePager Live | Managing the Current Template]] 24.6.1-OPL2 |
|} | |} | ||
| − | (24.0.1- | + | (24.0.1-OPL2) |
[[Category:OnePager Live]] | [[Category:OnePager Live]] | ||
| − | |||
[[Category:Editing a Project View]] | [[Category:Editing a Project View]] | ||
[[Category:Task/Milestone Editing]] | [[Category:Task/Milestone Editing]] | ||
Latest revision as of 20:50, 12 July 2017
Contents
About Managing Templates
24.0.1-OPL2 7/12/2017
1) The OnePager Template specifies the initial appearance of each new project view. It is the Template from which a new project view is created and from which all of the settings in the Project-View Properties (PVP) form are initially populated.
2) A Template is a great way to achieve standardization across projects and across people! If everyone starts with the same Template, then the resulting project views will adhere to standards that make it much easier for your audiences to digest..
3) The Template is another place where you have a number of Microsoft Project or Microsoft Excel source plan fieldss from which to import into OnePager.
See the article on Field Mappings tab at the following links: Template Only Features 24.1.1-OPL for more instructions on how to utilize all Microsoft Project and Microsoft Excel source plan fields.
Accessing the OnePager Template
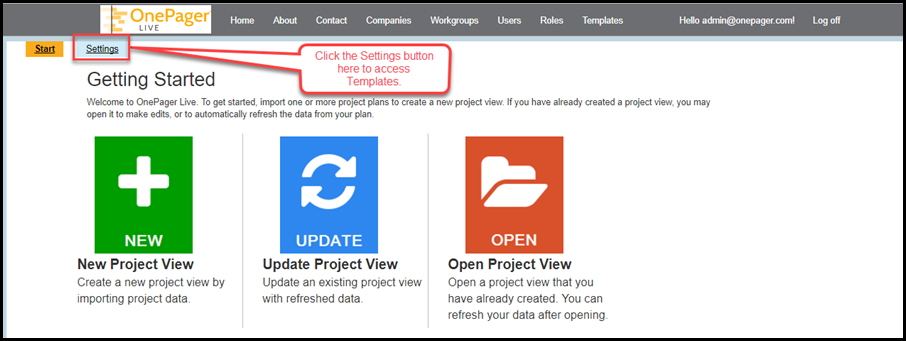
1) Templates are accessed from the OnePager Live Home page also called the Getting Started page by clicking on the Settings button at the top of the page as shown below:
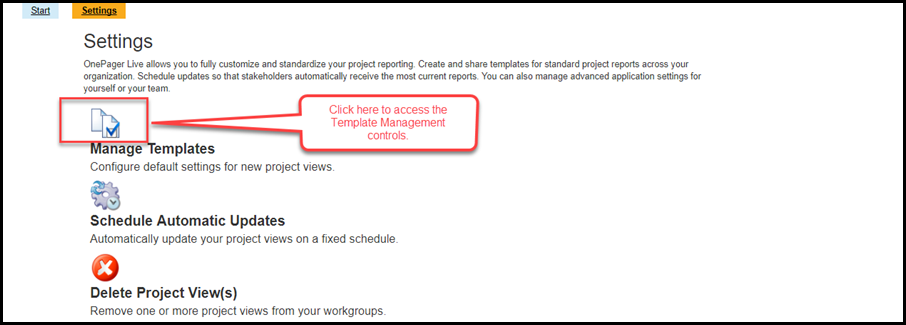
2) Clicking the Settings button takes you to the Settings page where you'll find the Manage Templates button as shown here:
3) When you click the Manage Templates button the page below will appear. You may now select the appropriate Template management option shown:

Creating a New... Template
4) Click the New... button brings up the Create a New Template form where you specify the name of your new Template as shown below:

5) After entering your new Template's name, click the Create New Template button.
- a) This brings up the Single Project - Permanent (Read Only) template shown below.
- b) This Template will appear with your designated Template name showing at the top of the form.
- c) At this point make any desired changes.
- d) After editing and creating the new Template it will appear in all list of Templates available to the Work Group and may be edited once the Create New Template button is clicked:
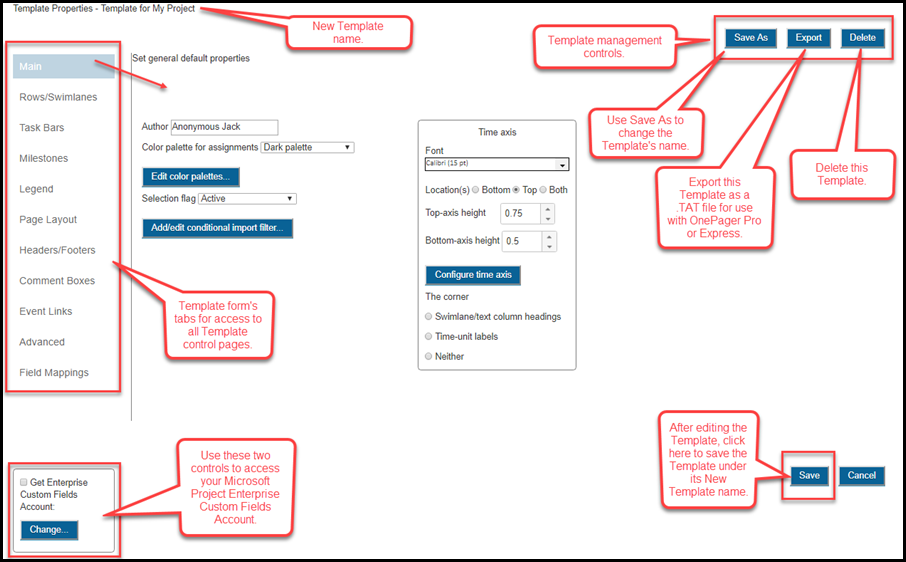
6) After editing the new Template you have several options:
- (1) You may Save the Template using the Save button in the lower right corner of the form as shown above.
- (2) You may Save the Template as some other name by clicking on the Save As (Change Template Name) in the upper right corner. This action gives you the flexibility to change the name of the Template now or to change the name of the "Template later, if desired.
- (3) You may Delete the Template altogether from the system by clicking the Delete button.
- (4) You may Export the Template as a .TAT file by clicking the button in the upper right corner of the form so that it may be used with OnePager Pro or Express.
Reserve this Space for Screenshot of results from clicking Export Selected Template to .TAT file.
- (5) Click the Cancel button which will prevent the Template from being saved as is or with its edits and you'll be returned to Manage Templates option page as shown above.
- (6) You may use the Get Enterprise Custom Fields Account: controls to access your online Enterprise Custom Field data for Microsoft Project.
Open... A Template
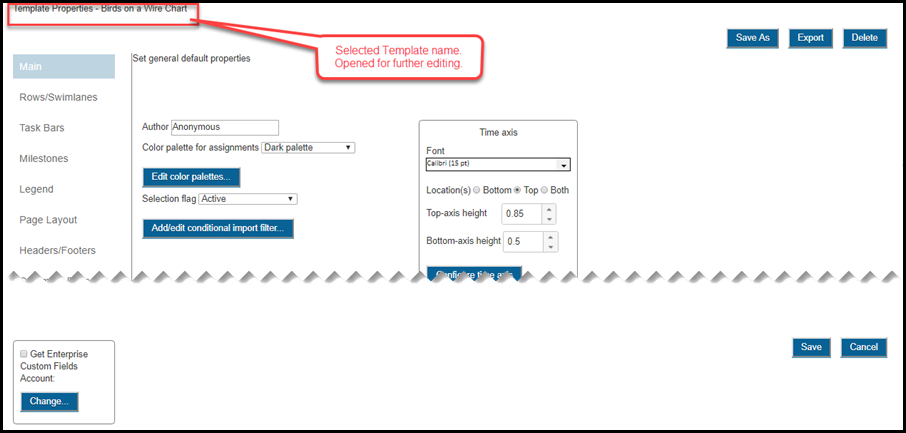
7) When you click the Open... button the form below will appear giving you the option to select a desired Template from the dropdown menu:
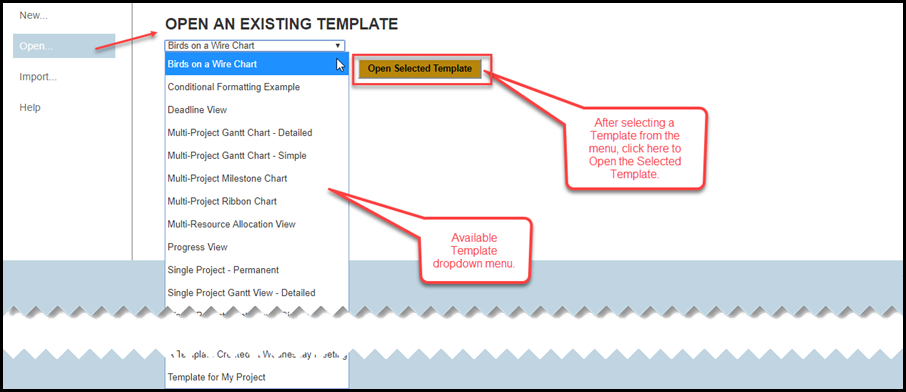
8) Clicking the Open Selected Template button will immediately display the selected Template making it available for editing and subsequent saving if desired.
Import... A Template
9) Clicking the Import... button will bring up the page shown below.
- a) Click the Choose File button to bring up the Windows Open form and navigate to the folder where the Template resides that you want to import.
- b) Select the .TAT file to import and click the Open button on the Windows form.
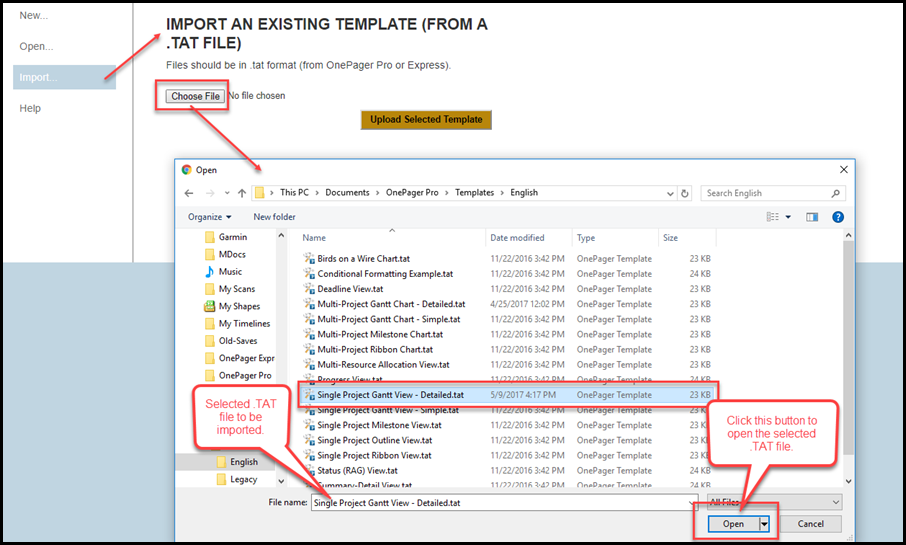
10) The form will be updated to slow the selected Template to be uploaded as shown here:

11) Now click the Upload Selected Template button and the selected Template will be uploaded into OnePager Live.
Help Button
12) Clicking the Help button will return you to the What is a Template? form at the Manage Templates option page as shown here:

13) In addition to a description of the OnePager Template there are also hot links to the OnePager Live Wiki documentation and the email address of OnePager Live's Support Office.
Returning to the OnePager Live Home Page
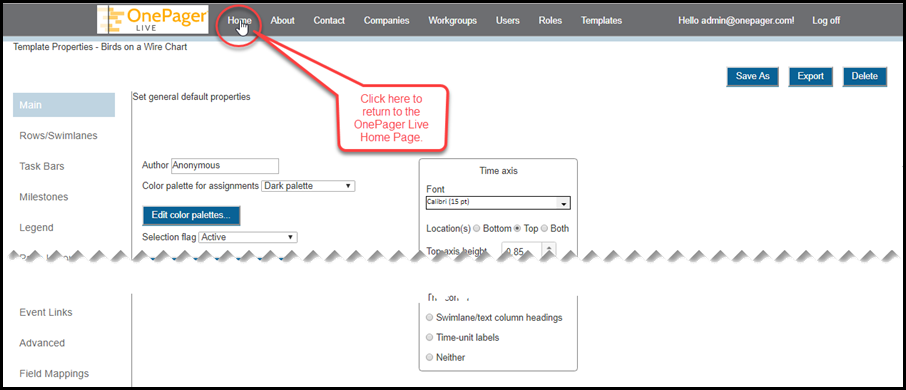
14) Click the Home button on the OnePager Live tool bar as shown below to return to the OnePager Live Home Page also know as the Getting Started page:
Related Links
15) The article link below should be consulted for Template only features associated with Microsoft Project, Microsoft Project Server, Microsoft Project Online, and Microsoft Excel within the Template Properties form’s Main tab, Advanced tab, and Field Mappings tab.
| Template Only Features-MS Project Source 24.1.1-OPL2 | Template Only Features-MS Excel Source 24.2.1-OPL2 |
16) The three links below provide specific information on using OnePager Live's Enterprise Custom Fields' feature, Column Splitting' and Parsing features for both Microsoft Project and Excel source files, and how to Manage the current Template.
| Using Enterprise Custom Fields from Microsoft Project with OnePager Live 24.3.1-OPL2 | |
| Splitting and Parsing Fields-MS Project Source 24.4.1-OPL2 | Splitting and Parsing Fields-MS Excel Source 24.5.1-OPL2 |
| Managing the Current Template 24.6.1-OPL2 |
(24.0.1-OPL2)