Difference between revisions of "Moving and Resizing Images for Version 7.0"
(→Moving and Resizing Background Images in the Graph) |
|||
| Line 1: | Line 1: | ||
==Moving and Resizing Background Images in the Graph== | ==Moving and Resizing Background Images in the Graph== | ||
| − | + | OnePager '''inserts a background image''' into the '''graph''', in the middle of the '''graph''' as a convenient starting point. Once '''inserted''', you can '''edit''' the '''background image''' as described in this article by '''moving''' it to various positions in the chart and by changing its '''size'''. | |
| − | + | ||
| − | + | ||
===Moving a Background Image=== | ===Moving a Background Image=== | ||
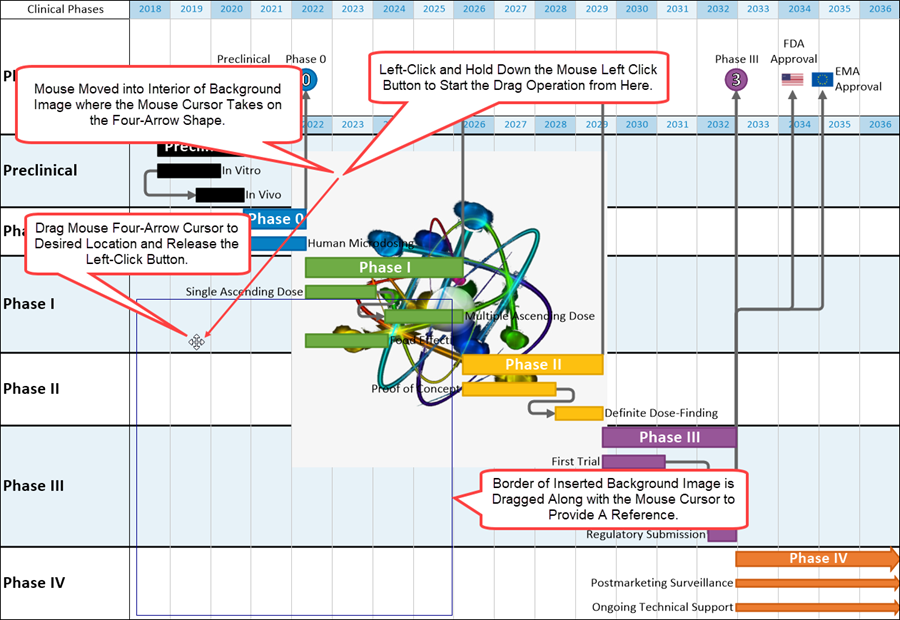
| − | + | To '''move''' a '''background image''', with the '''background image un-selected, move the mouse into the '''background image's interior'''. Once the mouse cursor is in the '''background image's''' interior, the cursor becomes a '''four-arrow''' shape. | |
| − | + | Moving the '''background image''' after this involve left-clicking the mouse and holding down the left-click button as you '''drag''' your mouse to the desired position in the chart, and release the left-click button as shown here: | |
| − | |||
| − | |||
<center>[[File:P70-20_2_1-70-(1)-10292019.png]]</center> | <center>[[File:P70-20_2_1-70-(1)-10292019.png]]</center> | ||
<center>P70-20_2_1-70-(1)-10292019.png</center> | <center>P70-20_2_1-70-(1)-10292019.png</center> | ||
Revision as of 21:59, 5 January 2021
Moving and Resizing Background Images in the Graph
OnePager inserts a background image into the graph, in the middle of the graph as a convenient starting point. Once inserted, you can edit the background image as described in this article by moving it to various positions in the chart and by changing its size.
Moving a Background Image
To move a background image, with the background image un-selected, move the mouse into the background image's interior. Once the mouse cursor is in the background image's interior, the cursor becomes a four-arrow shape.
Moving the background image after this involve left-clicking the mouse and holding down the left-click button as you drag your mouse to the desired position in the chart, and release the left-click button as shown here:

Resizing a Background Image
6) Once the desired position of the inserted background image is determined, you can edit the size of the background image in the graph to either a larger or smaller size.
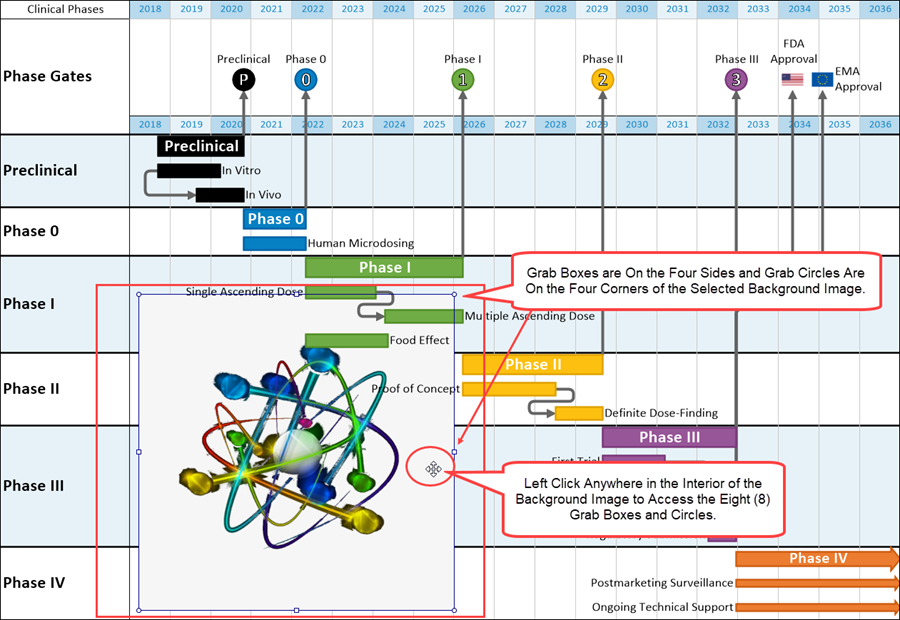
7) To resize the background image, first left-click the image to select it and access the eight grab boxes and circles on the border of the background image as shown below:

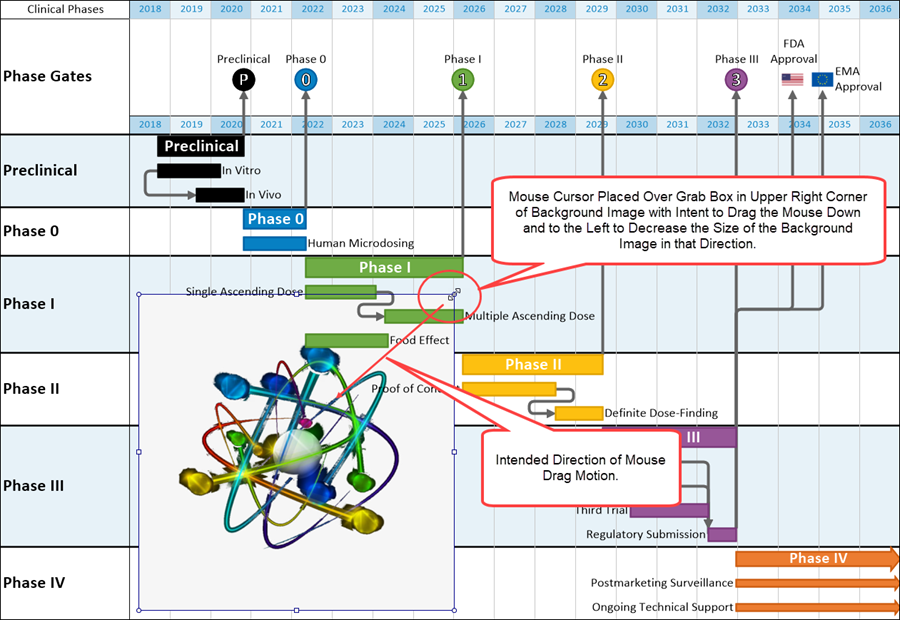
8) With the background image selected, hover the mouse over one of the eight grab boxes or circles and drag the mouse in the desired direction to increase the size or decrease the size of the background image in that direction as shown below:

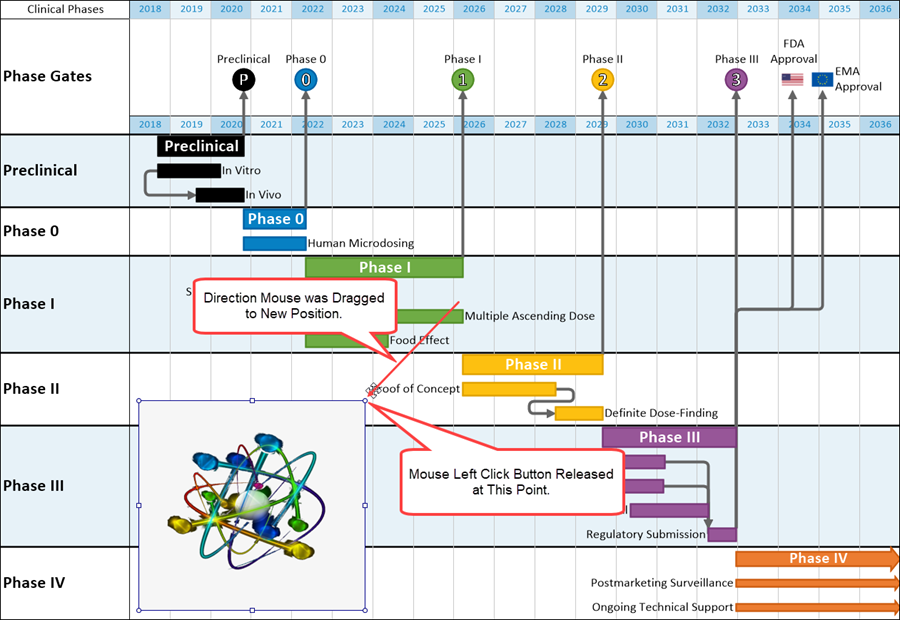
9) When the desired size is reached, release the mouse left-click button to finish the resizing operation as shown below:

10) After the resizing operation is completed, the background image remains selected so that you have to option to do other edits as needed and as described in the articles at:
| Adjusting Image Transparency 20.3.1-70 |
| Deleting, Ordering, and Changing Images 20.4.1-70 |
(20.2.1-70)