Using the OnePager "Data" Tab's "Selected file(s)" Button for Version 7.0
Contents
Overview
1) The purpose of this article is to acquaint you with the features and usage of the Data tab’s Selected file(s) button.
2) The Selected file(s) button is used to verify that the source plan(s) associated with the open chart is/are correct.
3) Once verified, the Pull operation for snapshot replacement or addition can proceed.
4) Additionally, when a problem is detected, the functionality under this button is useful for making fixes.
5) For convenience, the term used henceforth for the set of source plans associated with a chart is source packet.
5) The Data tab is shown below. Please note that this article covers the use of this feature for both OnePager Pro (OPP) and Express (OPX) and applies equally well to the Add-in and Desktop applications of each.
What is a Pull Operation?
1) A Pull operation starts in the Chart Editor.
- a) That is, you already have OnePager running and decide to update the open chart or (rarely) create a new chart.
- b) In contrast, a Push operation begins in the OnePager Pro Start from which you make a new chart or update an existing chart.
2) We added the Pull operation because we found that OnePager users were often creating a chart, finding something in the source plan that they needed to change, going back to the source plan, making the change, and then re-launching OnePager to update the chart.
3) The Pull operation lets you open a chart and update it repeatedly as you edit its source plan.
4) After each set of changes to the source plan(s), you can quickly see the effect on the screen by using OnePager’s Data tab to Pull the source plan changes into the chart.
5) For an explanation of the Pull operation please consult the articles listed in the Related Links section at the end of this article.
Managing Source Plans (Microsoft Project or Microsoft Excel) Using the Data Tab's Select File(s) Feature
Validating a Source Plan
1) To validate source plans in a source packet follow the steps below.
2) All examples in this article use the OPP Add-in application. The feature works the same for the OPP desktop, OPX Add-in, and OPX desktop application as well.
3) Launch OPP from Microsoft Project and use the OnePager Pro Start form to open a chart.
4) For an example, when you are done with this step the Chart Editor looks like this with the Data tab active:
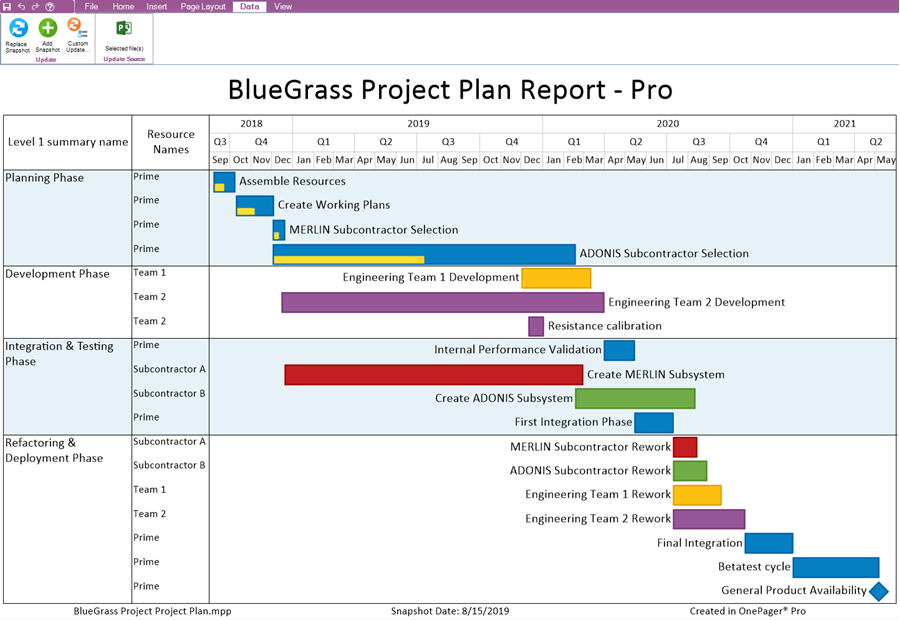
5) Click the Selected file(s) button shown above.
- a) This launches the Data source selection form shown below.
- b) You notices that there is a file name in the window along with the date modified, file type, and size.
- c) If you hover your mouse over the file name, OnePager displays the file’s path name as shown below:
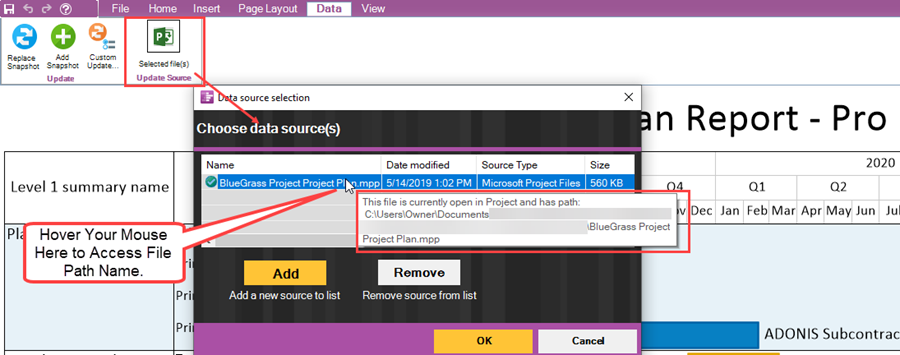
6) By examining the path name you can make sure that the file is the one you want to use for the update. The path name for the source plan and the path name are stored in the .TAM file for all charts created with or updated by OnePager.
Locating a Source Plan
7) On occasion, you might have moved a source plan to another folder.
- a) If you do, the path name stored for the .TAM file for the chart may not match where the relocated .TAM file is actually stored.
- b) The Selected file(s) button, when clicked in this case, returns a message notifying you that OnePager could not locate the .TAM file using the path name stored in the .TAM file.
- c) In this situation, the form looks like this:
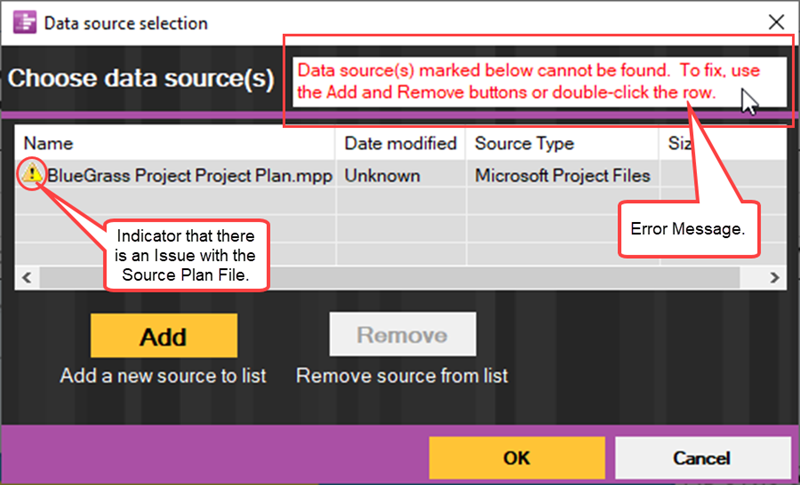
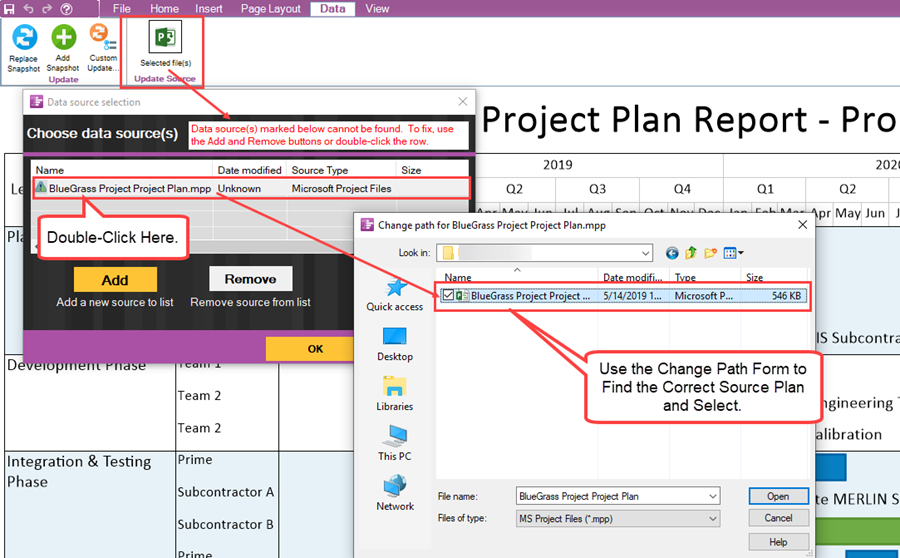
8) The instructions in the form are to double-click on the file name.
- a) This accesses a Change path… form which shows the location of the .TAM file as it is known for the chart.
- b) If the file name in the Change path... form is incorrect, you can search, browse, or go directly to where the desired .TAM file is actually located.
- c) This is shown below:
9) After locating the desired .TAM file, select it from the Change path… form and click Open.
10) This restores the correct path name into the .TAM file and into the Data source selection form. As a result of the action, the Data source selection form is updated to looks like this:
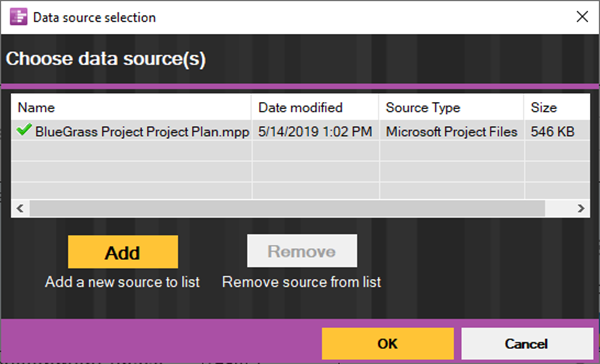
11) The green check mark shown in the Data source selection form above indicates that the .TAM file exists and its file name and path name are stored in the .TAM.
Adding a Source Plan
12) There is an Add button on the Data source selection form. This can be used in two ways:
- (1) To create a multi-file chart.
- (2) Or, as the first step in replacing a source plan followed by the Remove button’s use to remove the unwanted .TAM file.
13) For instructions on creating multiple-project charts please consult the articles at: Creating Various Multi-Charts with OnePager Pro and Express (Portal). 8.0.1-70
Changing a Source Plan
14) You can change a source plan file name for many reasons pertaining to your update processes.
15) The most common reason is because you are maintaining versions of your source plans as separate named source plans but are continuing to use a single OnePager .TAM file to represent the project through time.
- a) Using a series of source plans to record changes in a project at the source plan level is a commonly used technique which preserves the history of the project at the source plan level.
- b) Using OnePager's snapshot capability is a way of recording the progress of the project at in a single location (.TAM file).
- c) However, using this technique requires some caution and a good deal of care to make sure that snapshots, if updated, are done so with the correct source plan.
- d) Using this techniques requires that you change the source plan file name correctly in the Data source selection form.
An Example
16) Changing a source plan entry in the Data source selection form is a matter of adding the new source plan into a new entry in the grid and removing the old source plan from an existing entry in the grid.
17) Suppose we use the Microsoft Project BlueGrass Project Plan as our initial source plan and call it the BlueGrass Project Plan - Baseline.
- a) Our approach in this project is to update the BlueGrass Project Plan - Baseline source plan periodically and save it under a new source plan file name each time it is updated.
- b) For example, after the first reporting period of progress, we update the BlueGrass Project Plan - Baseline source plan with new start/finish dates and percent complete values and save it as BlueGrass Project Plan -Period 1.
- c) This approach is repeated at the end of each project reporting period and a new Microsoft Project source plan file is created and saved with its unique source plan file name that includes the Period number.
18) Our goal is to create a set of snapshots associated with the original BlueGrass Project Plan - Baseline source plan such that the .TAM file contains the snapshots, in one place, for all reporting period.
Establishing the Baseline
19) The first step is to create the baseline source plan that can be done by using the 'BlueGrass Project Plan in its initial state and saving it as a Microsoft Project source plan file under the file name of BlueGrass Project Plan - Baseline.
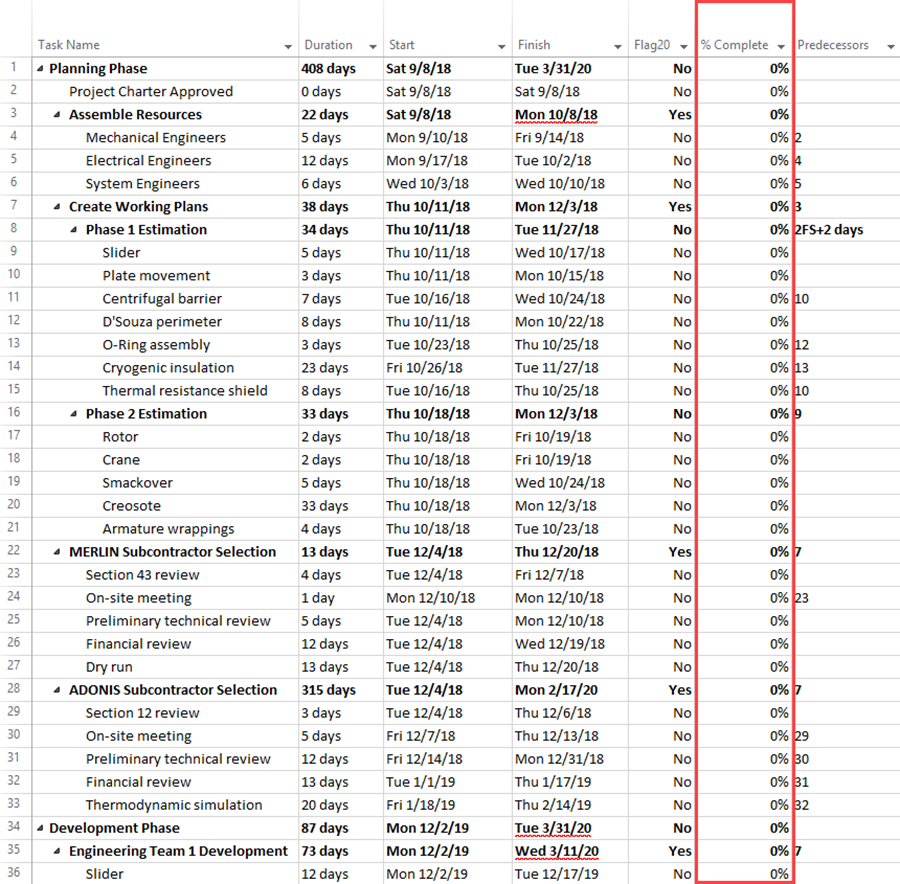
- a) For the purpose of this example, the only changes to the source plan that are made are to the %Complete field.
- b) Starting with the BlueGrass Project Plan - Baseline source plan all %Complete values are 0%.
- c) In successive reporting periods the project administrator updates the %Complete field in successive copies of the original source plan as the project proceeds.
- d) As the starting point, on 9/8/2018 the BlueGrass Project Plan - Baseline source plan looks like this:
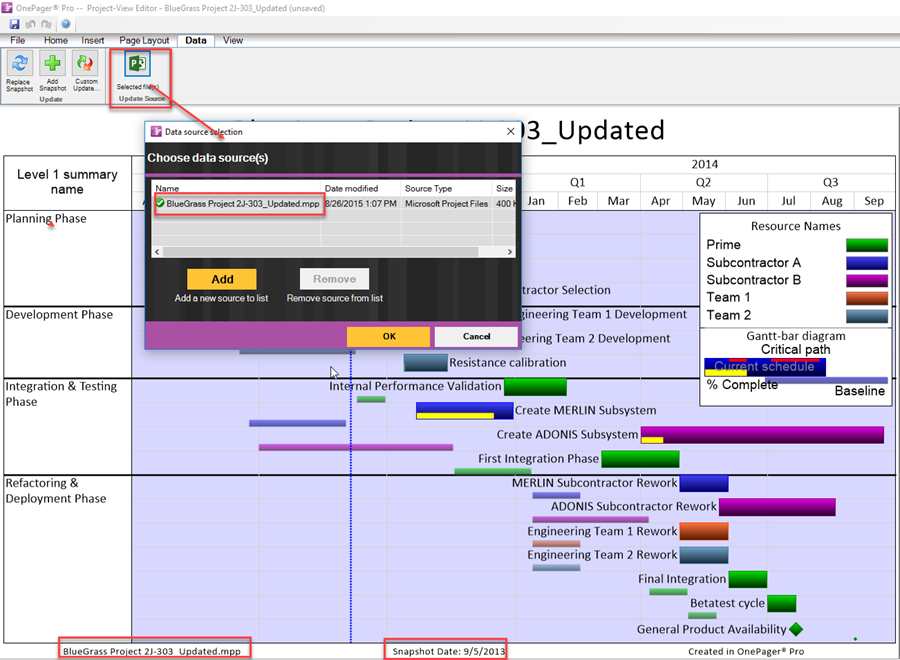
17) Suppose you have a Microsoft Project source plan called BlueGrass Project 2J-303-Updated and created a chart named BlueGrass 2J-303-Working. That chart would have the Microsoft Project name and path name saved in the .TAM file.
18) Now suppose you want to create a second snapshot within the chart called BlueGrass 2J-303-Working with the data from a revision of the original Microsoft Project source plan called BlueGrass Project 2J-303-Revised.
19) When first built, the chart’s source packet looks like this in the Data source selection form:
20) Later on, as our scenario suggests, we want to add a snapshot to the BlueGrass 2J-303-Working from another Microsoft Project source plan called BlueGrass 2J-303-Revised. To do this we first add the BlueGrass Project 2J-303-Revised.mpp file to the second line in the form as shown here:
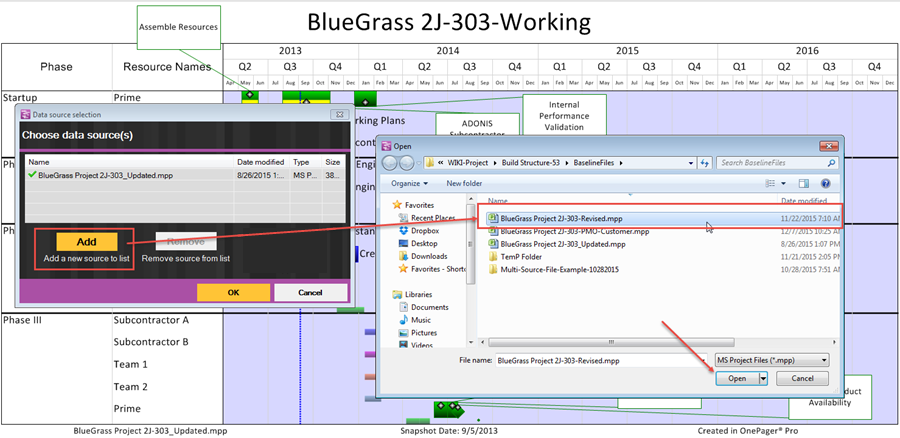
21) When you click the Open button on the Open form, the Data source selection form is updated to look like this:
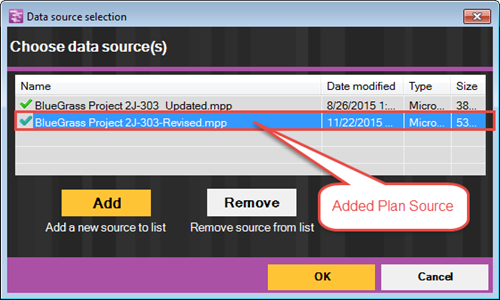
22) Before clicking the yellow OK button, select the top file named BlueGrass Project 2J-303-Updated.mpp and click the Remove button in the form. When that is done the form looks like this:
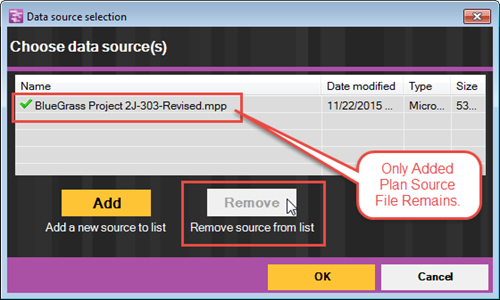
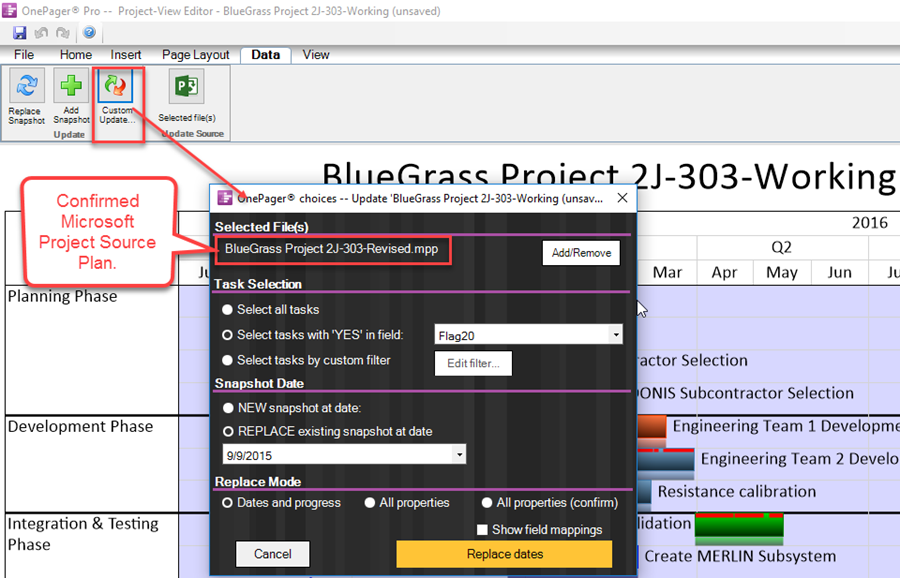
23) Now when you click the yellow OK button the Data source selection form disappears and you are ready to add the new snapshot.
24) To do this, use the Custom Update… button to perform the pull operation to add the new snapshot. This allows you to confirm files and set a snapshot date. So, click on the Custom Update… button and examine the OPC form that’s shown below in its initial state:
25) Now we really want to add a snapshot, so click the NEW snapshot at date radio button and set the snapshot date to 9/5/2015. Doing these two things changes the OPC form to the following:
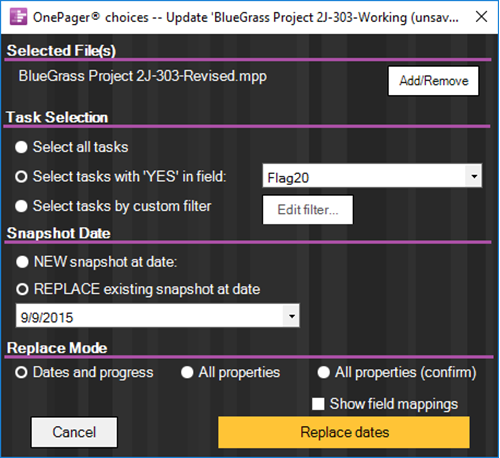
26) After making the above confirmations and changes, click the Next> button on the OPC form and the New button on the next OPC form and OnePager generates the added snapshot which, with a couple of edits (i.e., move the legend) looks like this:
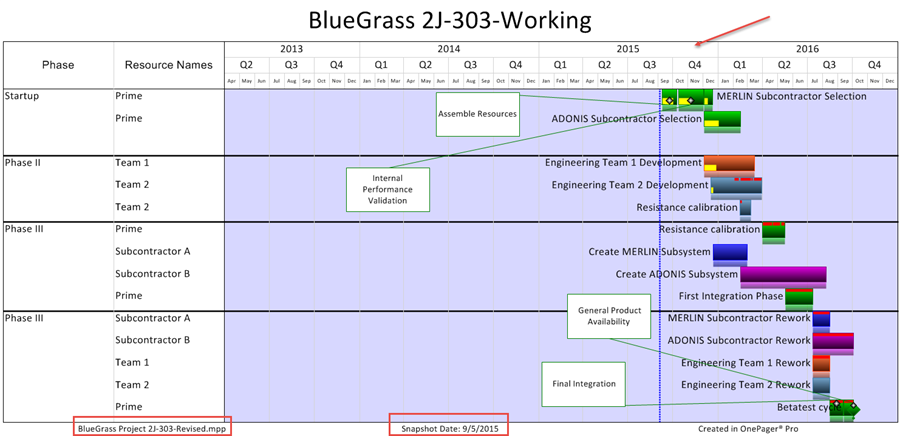
27) Note that in this second snapshot that the timeline range has changed from 2013-2014 to 2013 to 2016, the Microsoft Project source plan is correct, and the snapshot date is correct.
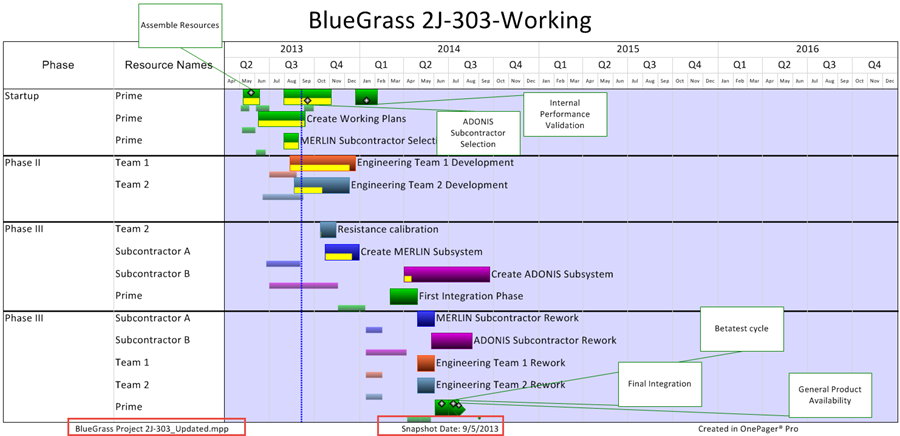
28) Just to add a little finishing touch to the chart’s snapshot, we’ve added a Curtain that shows the time period that was allocated for suspending the project and re-planning it. Using the two snapshots you can see how the project was re-planned from the 2013-2014 time-frame to the 2015-2016 time-frame.

29) The above example shows how the Selected file(s) feature can be used as well. Since we are using the OPP desktop application for this example, it was not necessary to launch Microsoft Project first. As long as you’ve properly prepared your Microsoft Project source plan just launching OPP from the desktop icon is basically all that is necessary.
Related Links
Creating a NEW Chart via Pull Operation - OnePager Pro 7.13.1-70
Creating a NEW Chart via Pull Operation - OnePager Express 7.13.2-70
REPLACING a Snapshot via Pull Operation - OnePager Pro 7.14.1-70
REPLACING a Snapshot via Pull Operation - OnePager Express 7.14.2-70
ADDING a Snapshot via Pull Operation - OnePager Pro 7.15.1-70
ADDING a Snapshot via Pull Operation - OnePager Express 7.15.2-70
Custom Update (Replacing) of a Snapshot via Pull Operation - OnePager Pro7.16.1-70
Custom Update (Replacing) of a Snapshot via Pull Operation - OnePager Express 7.16.2-70
(7.17.1-70)