Creating New, Retrieving Existing, Saving, and Saving As for Version 7.0
Contents
- 1 Creating New, Retrieving Existing, Saving, and Saving As
- 2 Creating NEW Charts
- 3 Retrieving a Chart (OPEN)
- 4 Updating an Existing Chart
- 5 Using OnePager Pro with Server Resident Source Plans
- 6 Updating Using the OnePager Data Tab
- 7 Saving a Chart (Save)
- 8 Saving a Chart to a New .TAM File (Save As)
- 9 Related Links
Creating New, Retrieving Existing, Saving, and Saving As
1) This article provides links to articles which cover the specifics on Creating new chart, Retrieving existing charts, and Saving charts.
2) Please use the links below as they apply to the OnePager products and operations you want to perform.
Creating NEW Charts
1) There are several ways to create NEW charts with OnePager Pro and OnePager Express.
2) OnePager is designed to support these two methods for creating NEW for each product: (1) Push and (2) Pull Operations.
3) Pleases refer to the referenced articles below:
Push Operations
| OnePager Product | Link to Article |
|---|---|
| OnePager Pro Add-in | Creating a NEW Chart - OnePager Pro Add-in 7.1.1-70 |
| OnePager Pro Desktop | Creating a NEW Chart - OnePager Pro Desktop 7.1.2-70 |
| OnePager Express Add-in | Creating a NEW Chart - OnePager Express Add-in 7.2.1-70 |
| OnePager Express Desktop | Creating a NEW Chart - OnePager Express Desktop 7.2.2-70 |
Pull Operations
| OnePager Product | Link to Article |
|---|---|
| OnePager Pro Pull Operation | Creating a NEW Chart via Pull Operation - OnePager Pro 7.13.1-70 |
| OnePager Express Pull Operation | Creating a NEW Chart via Pull Operation - OnePager Express 7.13.2-70 |
Retrieving a Chart (OPEN)
1) Retrieving an existing chart to review it (OPEN), to edit, or to update it with new information from Microsoft Project or Microsoft Excel is covered in the Getting Started (Portal) 3.0.1-70 series of articles.
2) There are also several ways to OPEN existing charts with OnePager Pro and OnePager Express depending on the application used.
3) Please refer to the referenced articles below:
Opening an Existing Chart
| OnePager Product | Link to Article |
|---|---|
| OnePager Pro Add-in | Opening an EXISTING Chart - OnePager Pro Add-in 7.5.1-70 |
| OnePager Pro Desktop | Opening an EXISTING Chart - OnePager Pro Desktop 7.5.2-70 |
| OnePager Express Add-in | Opening an EXISTING Chart - OnePager Express Add-in 7.6.1-70 |
| OnePager Express Desktop | Opening an EXISTING Chart - OnePager Express Desktop 7.6.2-70 |
Updating an Existing Chart
1) Updating a chart involves either ADDING a snapshot or REPLACING a snapshot and each can be done by either a Push or Pull Operation.
2) Please see the links that immediately follow:
ADDING a Snapshot Using the Push Operation
| OnePager Product | Link to Article |
|---|---|
| OnePager Pro Add-in | ADDING a Snapshot via Push Update - OnePager Pro Add-in 7.7.1-70 |
| OnePager Pro Desktop | ADDING a Snapshot via Push Update - OnePager Pro Desktop 7.7.2-70 |
| OnePager Express Add-in | ADDING a Snapshot via Push Update - OnePager Express Add-in 7.8.1-70 |
| OnePager Express Desktop | ADDING a Snapshot Via Push Update - OnePager Express Desktop 7.8.2-70 |
ADDING a Snapshot Using the Pull Operation
| OnePager Product | Link to Article |
|---|---|
| OnePager Pro | ADDING a Snapshot via Pull Operation - OnePager Pro 7.15.1-70 |
| OnePager Express | ADDING a Snapshot via Pull Operation - OnePager Express 7.15.2-70 |
REPLACING a Snapshot Using the Push Operation
| OnePager Product | Link to Article |
|---|---|
| OnePager Pro Add-in | REPLACING a Snapshot via Push Update - OnePager Pro Add-in 7.9.1-70 |
| OnePager Pro Desktop | REPLACING a Snapshot via Push Update - OnePager Pro Desktop 7.9.2-70 |
| OnePager Express Add-in | REPLACING a Snapshot via Push Update - OnePager Express Add-in 7.10.1-70 |
| OnePager Express Desktop | REPLACING a Snapshot via Push Update - OnePager Express Desktop 7.10.2-70 |
REPLACING a Snapshot Using the Pull Operation
| OnePager Product | Link to Replacing Snapshot Article | Link to Custom Update Article |
|---|---|---|
| OnePager Pro | REPLACING a Snapshot via Pull Operation - OnePager Pro 7.14.1-70 | Custom Update (Replacing) of a Snapshot via Pull Operation - OnePager Pro 7.16.1-70 |
| OnePager Express | REPLACING a Snapshot via Pull Operation - OnePager Express 7.14.2-70 | Custom Update (Replacing) of a Snapshot via Pull Operation - OnePager Express 7.16.2-70 |
Using OnePager Pro with Server Resident Source Plans
1) OnePager Pro has the capability to create, retrieve, save, and update charts from Microsoft Project source plans that are server resident.
2) For more general information on using server resident source plans, please see the article at: Using OnePager Pro with Server Resident Project Plans (Portal) 8.5.1-70.
3) Please use the links that follow for specific product information related to using server resident source plans:
| OnePager Product | Link to Article |
|---|---|
| OnePager Pro Add-in | Using OnePager Pro Add-In with Server Resident Project Plans 8.5.1.1-70 |
| OnePager Pro Desktop | Using OnePager Pro Desktop with Server Resident Project Plans 8.5.1.2-70 |
Updating Using the OnePager Data Tab
1) The OnePager Data ribbon tool bar tab’s Selected file(s) button, shown below, is useful in verifying that you have the correct source plans associated with the open chart is/are correct.

2) For more information on the Data tab's Selected file(s) button, please see the article at: Using the OnePager "Data" Tab's "Selected file(s)" Button 7.17.1-70.
Saving a Chart (Save)
1) When a chart is created, opened, or updated, as with other Microsoft Windows applications, the chart can be saved in four (4) ways:
Using the Save Icon
2) Above the OnePager tool bar and ribbon is a Save icon shown below:

3) When the Save icon is clicked, OnePager automatically saves the open chart in the .TAM file you named when the chart was first created (NEW).
4) If the chart has not yet been saved, you are prompted to create a .TAM file name for it.
Using File Tab's Save Button
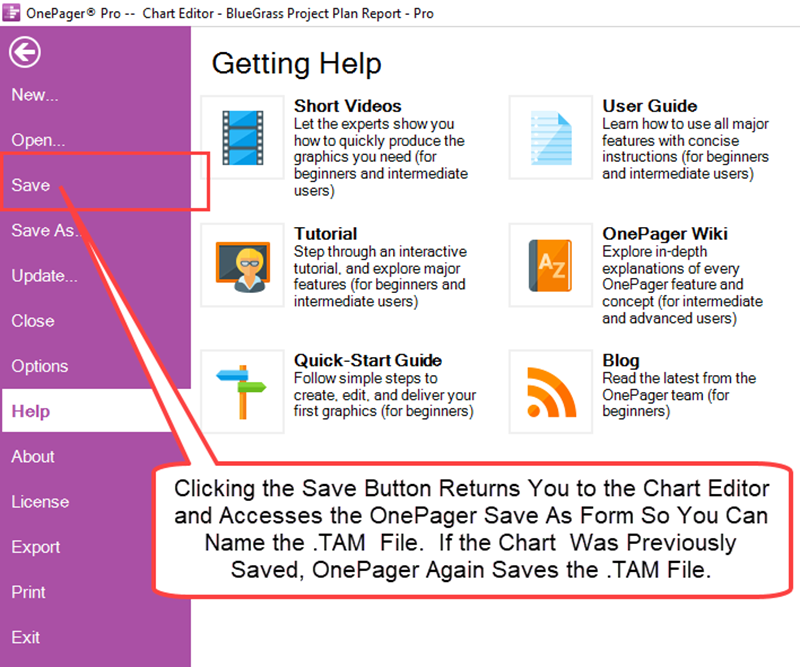
5) A second way to save an open chart is to click the File tab as shown below:

6) If the .TAM was not previously saved, OnePager returns to the Chart Editor and opens the OnePager Save As form so you can create a name for the .TAM.
7) If the .TAM was previously saved using this method, OnePager again saves the .TAM under the previously created file name.
Prompting the Save Operation By Clicking the File Tab's Close Button
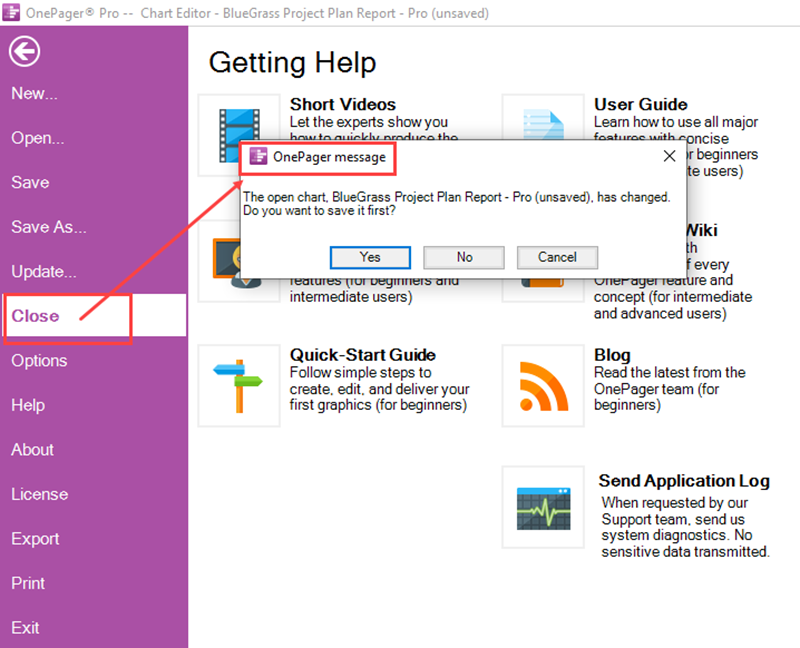
8) A third way to cause the chart to be saved is to click the Close tab shown above which is the typical Microsoft Windows method for closing the application.
9) If no changes were made to an open chart that was previously saved or opened from a named .TAM, the application is closed without re-saving the open .TAM.
10) However, if changes were made to the chart during the session, a Chronicle Graphics message form is displayed giving you the option to save the chart:

Prompting the Save Operation by Clicking the X in the Upper Right-Most Corner of the Chart Editor
11) Finally, you can always force the saving of the chart if changes were made by clicking the red highlighted X in the upper-most right corner of the Chart Editor.
12) Again, if no changes were made the application is close.
13) If changes were made to the chart, the above message is displayed with the options shown.
Saving a Chart to a New .TAM File (Save As)
1) At some point, you want to create one or more additional charts that show the same imported data in a different way.
2) For example, you want to assign colors based on a different source plan data fields. Or you want to show critical path segments in one chart and not in another.
3) Please note Saving a chart as a new .TAM file is not the same as creating a Template.
4) For more information on using Templates, please see the article at: Managing Templates (Portal). 24.0.1-70
Using Save As
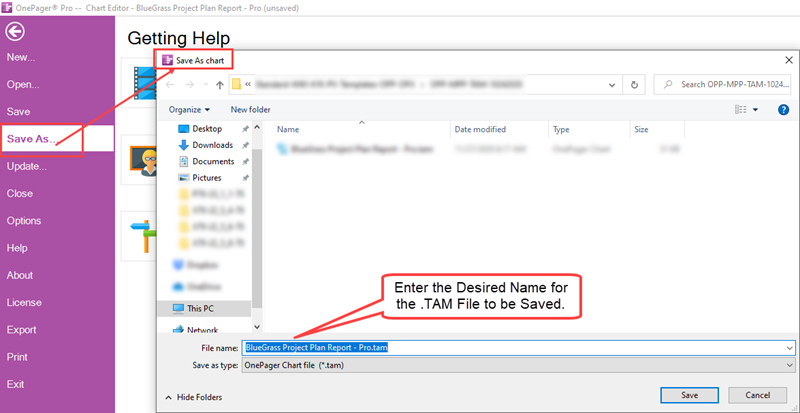
5) To create a new chart name and .TAM file from an existing one, go to the OnePager ribbon, click the File button, and click the Save as… command.
6) This action accesses the Save As chart form as shown below:

Retrieving a Saved As File
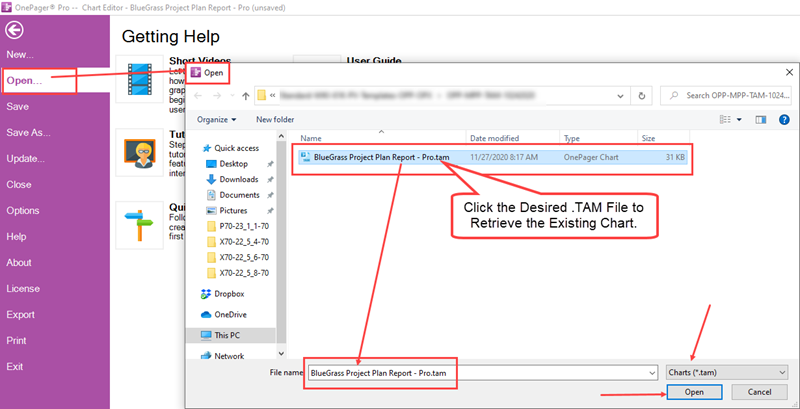
7) Whenever you launch OnePager again and want to OPEN this file, it can be found by clicking the OPEN button in the OnePager Pro Start form, then clicking BROWSE FILES button and looking up the file in the Microsoft Windows Open form as shown below:

8) Selecting the file with a single left click and then clicking the Open button loads the file.
Related Links
Getting Started (Portal) 3.0.1-70
Using the OnePager "Data" Tab's "Selected file(s)" Button 7.17.1-70
Using OnePager Pro with Server Resident Project Plans (Portal) 8.5.1-70
Managing Templates (Portal). 24.0.1-70
(23.1.1-70)