Difference between revisions of "TEMPzz3"
(→Related Links) |
|||
| Line 1: | Line 1: | ||
| − | == | + | ==Managing Background Images== |
| − | + | For more information on '''inserting background images''', please see the article at: [[Inserting Background Images for Version 7.0 | Inserting Background Images]] <!--20.1.1-70--> | |
| − | + | Also, for more information on '''re-positioning and resizing an inserted background image''', please see the article at: [[Moving and Resizing Images for Version 7.0 | Moving and Resizing Images]] <!--20.2.1-70--> | |
| − | + | Finally, for more information on '''editing the transparency of an inserted background image''' and some other '''editing''' options, please see the article at: [[Adjusting Image Transparency for Version 7.0 | Adjusting Image Transparency]] <!--20.3.1-70--> | |
| − | + | Once a '''background image''' is '''inserted''' into the '''graph''', you have the controls necessary to mange the '''background image''' with respect to '''deleting, ordering, or changing''' to a different '''image''' as explained below. | |
| − | + | ===Deleting Background Images=== | |
| − | + | You have the option to '''delete''' a '''background image''' from the '''current snapshot''' or '''all snapshots''' by first right-clicking on the '''background image''' to access the '''background image''' right-click '''context menu''' and then making a selection from the '''Delete''' command and its sub-command as shown in the '''context menu''' below: | |
| − | : | + | <center>[[File:P70-20_4_1-70-(1)-10292019.png]]</center> |
| + | <!--<center>P70-20_4_1-70-(1)-10292019.png</center>--> | ||
| − | + | ====From Individual Snapshots==== | |
| − | + | You have the option, as noted in the discussion above, to '''delete background images''' from '''individual snapshots'''. To do this requires going to the desired '''snapshot''' and specifically using the '''Delete''' command with the '''From this snapshot''' sub-command to achieve the desired result. This option works in the same way as '''deleting curtains''' from specific '''snapshots'''. | |
| − | + | ||
| − | + | For more information on '''Creating and managing curtains''', please see the article at: [[Creating and Managing Curtains for Version 7.1 | Creating and Managing Curtains]] 16.0.1-71 | |
| − | + | ====From All Snapshots==== | |
| − | + | ||
| − | + | You can also '''delete background images''' from '''all snapshots''' in one operation from any snapshot. To do this '''select''' the '''background image''' to access the '''background image''' right-click '''context menu''', click the '''Delete''' command and the '''From all snapshots''' sub-command. This option also works the same way as '''deleting curtains''' from '''all snapshots''' and you can use the reference links above for more information. | |
| − | === | + | ===Ordering Background Images=== |
| − | + | '''Background images''' are always in the '''background''', while task bars/milestone symbols and other visual data represented are in the '''foreground'''. However, '''background images''' can be '''ordered''' within the '''background Z-Level layer'''. To control the '''Order''' of a '''background image''', right-click the '''background image''' and select '''Order''' command from the '''background image''' right-click '''context menu'''. | |
| − | <center>[[File:P70- | + | <center>[[File:P70-20_4_1-70-(2)-10292019.png]]</center> |
| − | <!--<center>P70- | + | <!--<center>P70-20_4_1-70-(2)-10292019.png</center>--> |
| − | + | The following '''order''' options are available: | |
| − | + | :1) '''Bring to the front'''. Position the '''background image''' in '''front of all others''' in the '''background layer'''. | |
| − | + | :2) '''Send to back'''. Position the '''background image''' '''behind all others''' in the '''background layer'''. | |
| − | + | :3) '''Bring forward'''. Incrementally, move the '''background image''' one '''Z-Level''' interval at a time '''forward'''. This action brings the '''background image''' toward the '''front''' of the '''background layer'''. This action is not very useful. | |
| − | + | ||
| − | + | :4) '''Send backward'''. Incrementally, move the '''background image''' one '''Z-Level''' interval at a time '''backward'''. This action moves the '''background image''' toward the '''back''' of the '''background layer'''. This action is also not very useful. | |
| − | + | ===Change to a Different Background Image=== | |
| − | + | ||
| − | + | Once you’ve placed a '''background image''' into the '''graph''', you have the option to change the '''background image''' to a different '''background image''' by following these steps. Right-click on the '''background image''' to access the '''background image''' right-click '''context menu''' as shown above. Click the '''Change to a different image…''' command (as seen in the figure above of the '''context menu''') which accesses the '''Open picture file''' form as shown below: | |
| − | <center>[[File:P70- | + | <center>[[File:P70-20_4_1-70-(3)-10292019.png]]</center> |
| − | <!--<center>P70- | + | <!--<center>P70-20_4_1-70-(3)-10292019.png</center>--> |
| − | + | Alternatively, you can navigate to the folder where the desired '''background image''' is stored. Select the replacement '''background image''' you want to '''insert''' and click the '''Open''' button. OnePager '''replaces''' the current '''background image''' in the '''snapshot''' with the '''selected replacement background image''' retaining the '''size''' and '''other properties''' of the former '''background image'''. | |
| − | <center>[[File:P70- | + | <center>[[File:P70-20_4_1-70-(4)-10292019.png]]</center> |
| − | <!--<center>P70- | + | <!--<center>P70-20_4_1-70-(4)-10292019.png</center>--> |
| − | + | Normally, as show above, '''inserting''' a '''background image''' places it into '''all snapshots'''. However, when you purposely '''Change to a different image…''' the '''change''' applies '''only''' to the '''currently snapshot'''. | |
| − | + | Other '''snapshots''' with '''background images''' retain the original '''background image'''. | |
| − | + | ===Putting Background Image in all Snapshots=== | |
| − | + | ||
| − | + | To apply the '''background image change''' to '''all snapshots''', right-click on the '''replaced background image''' to access the '''background image''' right-click '''context menu''' shown below and click the '''Put image at all snapshots''' command. This action '''applies''' the '''changed background image''' to '''all snapshots''': | |
| − | <center>[[File:P70- | + | <center>[[File:P70-20_4_1-70-(5)-10292019.png]]</center> |
| − | <!--<center>P70- | + | <!--<center>P70-20_4_1-70-(5)-10292019.png</center>--> |
| − | == | + | ==Related Link== |
| − | + | [[Creating and Managing Curtains for Version 7.1 | Creating and Managing Curtains]] 16.0.1-71 | |
| − | + | (20.4.1-71) | |
| − | + | ||
| − | + | ||
| − | + | ||
| − | + | ||
| − | + | ||
| − | + | ||
| − | + | ||
| − | + | ||
| − | + | ||
| − | + | ||
| − | + | ||
| − | + | ||
| − | + | ||
| − | + | ||
| − | + | ||
| − | + | ||
| − | + | ||
| − | + | ||
| − | + | ||
| − | + | ||
| − | + | ||
| − | + | ||
| − | + | ||
| − | + | ||
| − | + | ||
| − | + | ||
| − | + | ||
| − | + | ||
| − | + | ||
| − | + | ||
| − | + | ||
| − | + | ||
| − | + | ||
| − | + | ||
| − | + | ||
| − | + | ||
| − | + | ||
| − | + | ||
| − | + | ||
| − | + | ||
| − | + | ||
| − | + | ||
| − | + | ||
| − | + | ||
| − | + | ||
| − | + | ||
| − | + | ||
| − | + | ||
| − | + | ||
| − | + | ||
| − | + | ||
| − | + | ||
| − | + | ||
| − | + | ||
| − | + | ||
| − | + | ||
| − | + | ||
[[Category:Version 7.1]] | [[Category:Version 7.1]] | ||
[[Category:Editing the Chart]] | [[Category:Editing the Chart]] | ||
| − | [[Category: | + | [[Category:Backgrounds, Images, and Logos]] |
| − | + | ||
| − | + | ||
| − | + | ||
[[Category:Ribbon]] | [[Category:Ribbon]] | ||
[[Category:Snapshots]] | [[Category:Snapshots]] | ||
| Line 144: | Line 80: | ||
[[Category:Templates]] | [[Category:Templates]] | ||
[[Category:Chart Properties Form]] | [[Category:Chart Properties Form]] | ||
| − | |||
[[Category:OnePager Pro]] | [[Category:OnePager Pro]] | ||
[[Category:OnePager Express]] | [[Category:OnePager Express]] | ||
Revision as of 16:49, 17 February 2021
Contents
Managing Background Images
For more information on inserting background images, please see the article at: Inserting Background Images
Also, for more information on re-positioning and resizing an inserted background image, please see the article at: Moving and Resizing Images
Finally, for more information on editing the transparency of an inserted background image and some other editing options, please see the article at: Adjusting Image Transparency
Once a background image is inserted into the graph, you have the controls necessary to mange the background image with respect to deleting, ordering, or changing to a different image as explained below.
Deleting Background Images
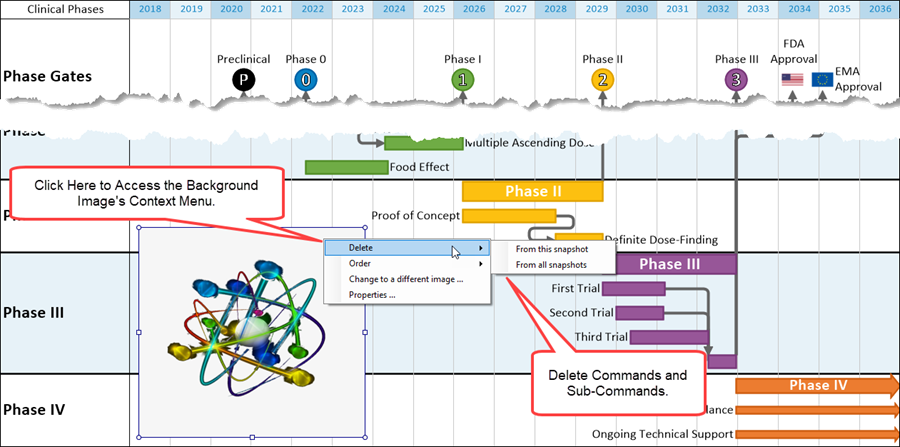
You have the option to delete a background image from the current snapshot or all snapshots by first right-clicking on the background image to access the background image right-click context menu and then making a selection from the Delete command and its sub-command as shown in the context menu below:
From Individual Snapshots
You have the option, as noted in the discussion above, to delete background images from individual snapshots. To do this requires going to the desired snapshot and specifically using the Delete command with the From this snapshot sub-command to achieve the desired result. This option works in the same way as deleting curtains from specific snapshots.
For more information on Creating and managing curtains, please see the article at: Creating and Managing Curtains 16.0.1-71
From All Snapshots
You can also delete background images from all snapshots in one operation from any snapshot. To do this select the background image to access the background image right-click context menu, click the Delete command and the From all snapshots sub-command. This option also works the same way as deleting curtains from all snapshots and you can use the reference links above for more information.
Ordering Background Images
Background images are always in the background, while task bars/milestone symbols and other visual data represented are in the foreground. However, background images can be ordered within the background Z-Level layer. To control the Order of a background image, right-click the background image and select Order command from the background image right-click context menu.
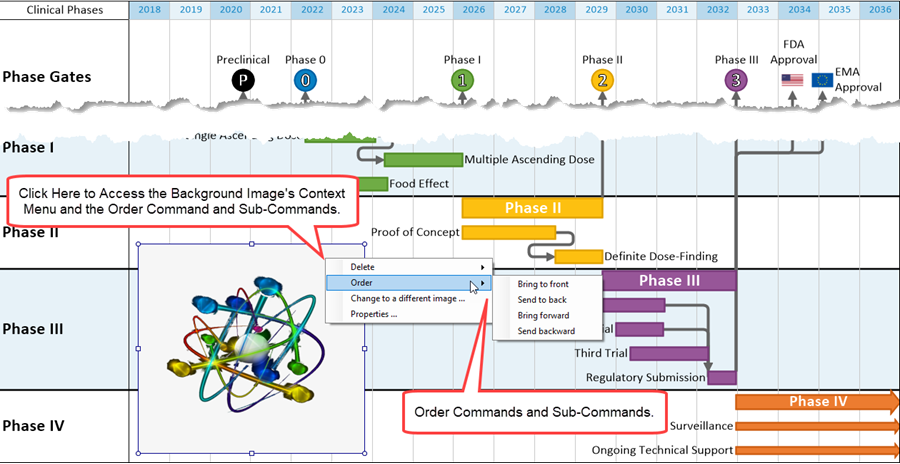
The following order options are available:
- 1) Bring to the front. Position the background image in front of all others in the background layer.
- 2) Send to back. Position the background image behind all others in the background layer.
- 3) Bring forward. Incrementally, move the background image one Z-Level interval at a time forward. This action brings the background image toward the front of the background layer. This action is not very useful.
- 4) Send backward. Incrementally, move the background image one Z-Level interval at a time backward. This action moves the background image toward the back of the background layer. This action is also not very useful.
Change to a Different Background Image
Once you’ve placed a background image into the graph, you have the option to change the background image to a different background image by following these steps. Right-click on the background image to access the background image right-click context menu as shown above. Click the Change to a different image… command (as seen in the figure above of the context menu) which accesses the Open picture file form as shown below:
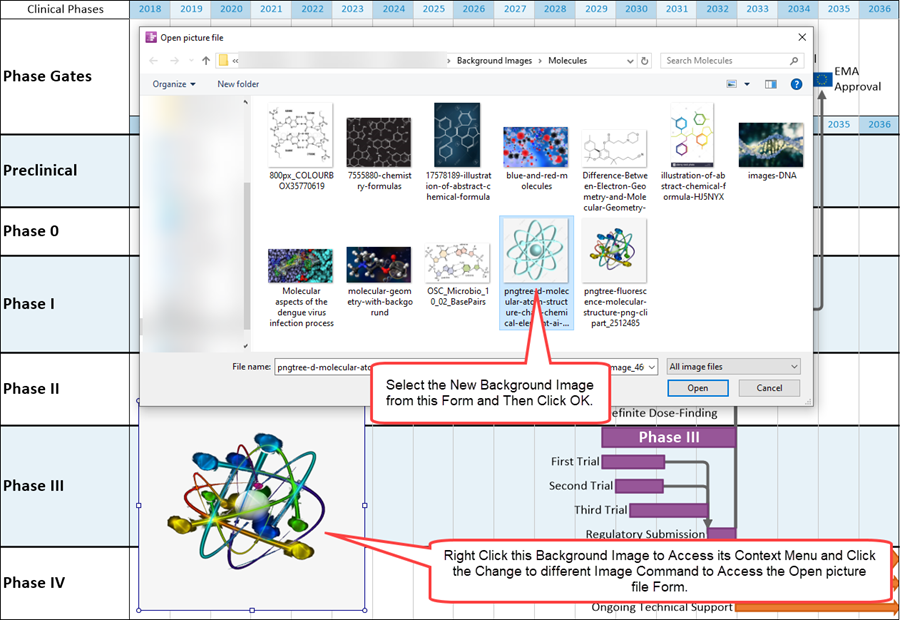
Alternatively, you can navigate to the folder where the desired background image is stored. Select the replacement background image you want to insert and click the Open button. OnePager replaces the current background image in the snapshot with the selected replacement background image retaining the size and other properties of the former background image.
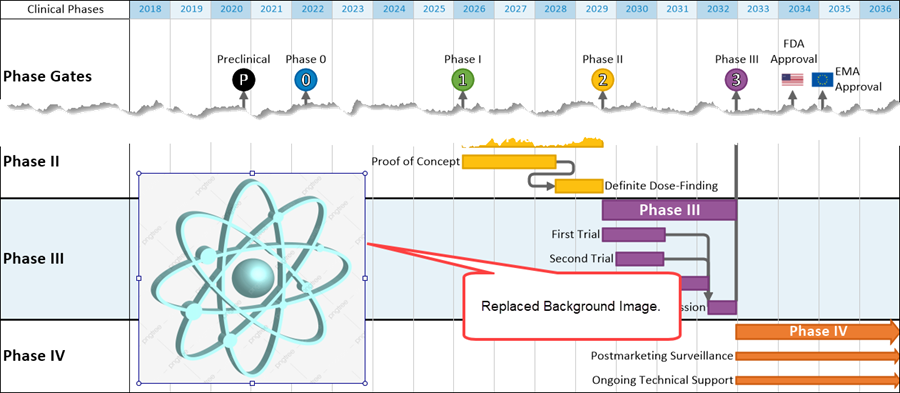
Normally, as show above, inserting a background image places it into all snapshots. However, when you purposely Change to a different image… the change applies only to the currently snapshot.
Other snapshots with background images retain the original background image.
Putting Background Image in all Snapshots
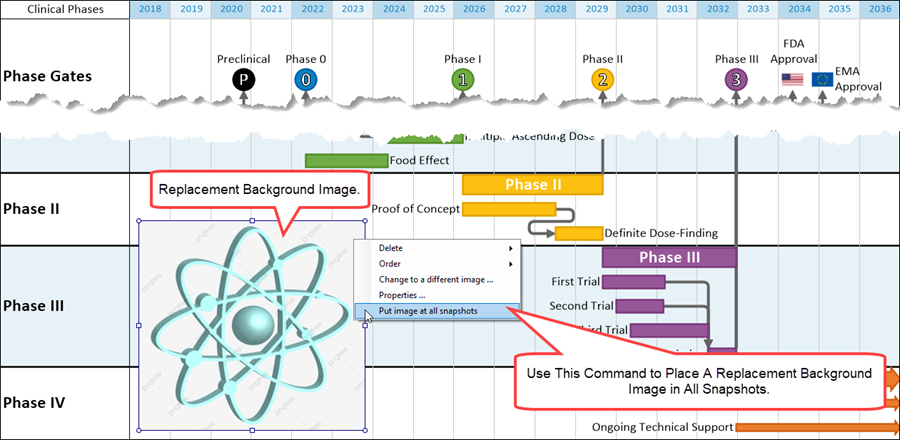
To apply the background image change to all snapshots, right-click on the replaced background image to access the background image right-click context menu shown below and click the Put image at all snapshots command. This action applies the changed background image to all snapshots:
Related Link
Creating and Managing Curtains 16.0.1-71
(20.4.1-71)