Creating New, Retrieving Existing, Saving, and Saving As for OnePager Live
Contents
- 1 Creating New, Retrieving Existing, Saving, and Saving A
- 2 Creating a NEW Project View with OnePager Live
- 3 Creating Another New Project View with OnePager Live
- 4 Opening an EXISTING Project View with OnePager Live
- 5 ADDING a Snapshot with OnePager Live
- 6 REPLACING a Snapshot with OnePager Live
- 7 Using the OnePager Live Data Tab's Select file(s) Button
- 8 Merging the Wrong Tasks into OnePager Live
- 9 Saving a Project View (Save)
- 10 Saving a Project View to a New .TAM File (Save As)
Creating New, Retrieving Existing, Saving, and Saving A
23.1.1-OPL Not Edited Beyond this Point.
This article provides links to articles which cover the main topics. Please use the links in the sections below as they apply to the operations you want to perform.
Creating a NEW Project View with OnePager Live
| Creating a NEW Project View - OnePager Live 7.1.1-OPL |
| Creating a NEW Project View from Microsoft Project Server/Online 7.13.1-OPL |
Creating Another New Project View with OnePager Live
| Creating Another New Project View - OnePager LIve 7.3.1-OPL |
Opening an EXISTING Project View with OnePager Live
| Opening an EXISTING Project View - OnePager LIve 7.5.1-OPL |
ADDING a Snapshot with OnePager Live
| ADDING a Snapshot - OnePager Live 7.7.1-OPL |
| ADDING a Snapshot from Microsoft Project Server/Online 7.15.1-OPL |
REPLACING a Snapshot with OnePager Live
Using the OnePager Live Data Tab's Select file(s) Button
| Using the OnePager Live Data Tab's Selected file(s) Button 7.17.1-OPL |
Merging the Wrong Tasks into OnePager Live
In addition, it is recommended that users review the following articles related to merging new tasks from Microsoft Project and Microsoft Excel into existing project views for OnePager Live:
| Merging the Wrong Tasks into a Project View from Microsoft Project 7.11.1-OPL | Merging the Wrong Tasks into a Project View from Microsoft Excel 7.12.1-OPL |
Saving a Project View (Save)
When a project view is created, opened, or updated, as with other Windows applications, the project view can be saved in several ways:
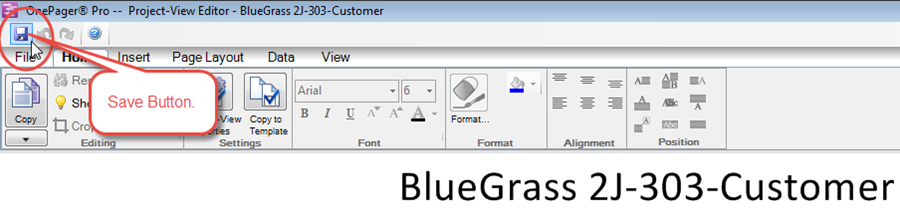
1) Above the OnePager tool bar and ribbon is a Save icon as shown below. When this icon is clicked, OnePager will automatically save the open project view in the .TAM file you named when the project view was first created (NEW). If the project view has not yet been saved, then you will be prompted to create a .TAM file name for it.
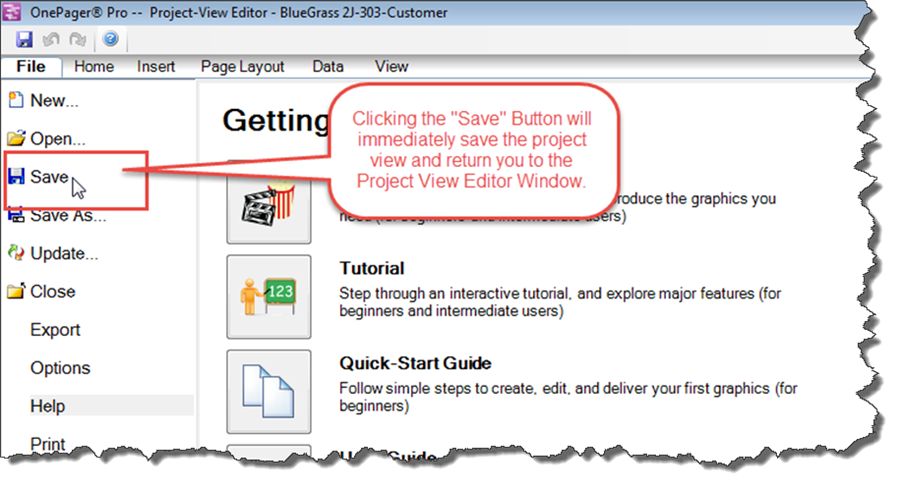
2) A second way to save an open project view is to click the File' tab as shown below. When the File tab is displayed, click the Save tab and the open project view will be saved:
3) A third way to cause the project view to be saved is to click the Close tab shown above which is the typical Windows method for closing the application. If no changes were made to the open project view, the application will be closed without saving. However, if changes were made to the project view during the session, a Chronicle Graphics message form is displayed giving you the option to save the project view:
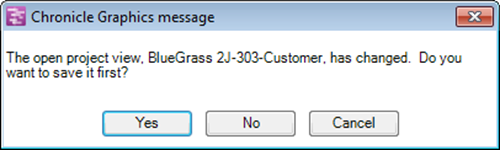
4) Finally, you can always force the saving of the project view if changes were made by clicking the white X in the upper right corner of the screen. Again, if no changes were made the application will close. If changes were made to the project view, the above Chronicle Graphics message will be displayed with the options shown.
Saving a Project View to a New .TAM File (Save As)
At some point, you may want to create one or more additional project views that show the same imported data in a different way. For example, you may want to assign colors based on a different column. Or you may want to show critical path segments in one project view and not in another.
Please note Saving a project view as a new .TAM file is not the same as creating a template. Please review the articles involving Templates using this link: Managing Templates (Portal).
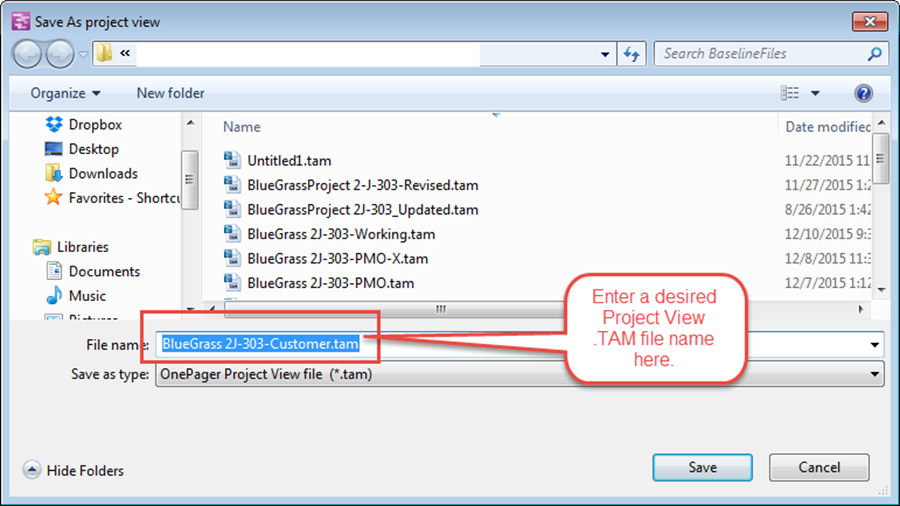
1) To create a new project view name and .TAM file from an existing one, go to the ribbon, click the File button, and then click the Save as… command. This brings up the Save As project view form as shown below:
2) Whenever you launch OnePager again and want to OPEN this file, it can be found by clicking the OPEN button in the OnePager Pro Start form, then clicking BROWSE FILES button and looking up the file in the Windows Open form as shown below:

3) Selecting the file with a single left click and then clicking the Open button will load the file.
(23.1.1-OPL)