OnePager's Ribbon Tool Bar Data Tab for Version 7.2
Contents
Overview
Illustrations used or referenced in this article are from OnePager Pro using data from Microsoft Project but the features, function, controls, and manual edits apply equally to other OnePager editions that import from data sources like Microsoft Excel, Oracle Primavera P6, Smartsheet, Planisware Enterprise, Project for the Web, Asana, and Wrike.
OnePager's Ribbon Tool Bar Data Tab
The OnePager Ribbon Tool Bar Data tab is shown in detail below:

The Data tab contains two (2) sub-sections and is used to control chart updates for Replacing a snapshot, Adding a snapshot to the chart, performing a Custom Update of a snapshot, or changing source plan files. These two (2) sub-sections are described below:
Data Tab – Update Sub-Section
The Data tab’s Update sub-section contains three (3) buttons for managing snapshot updates to the chart. The sub-section is shown below:

Replace Snapshot Button
Clicking the Replace Snapshot button, shown below, tells OnePager to immediately access the current source plan packet and update the current chart with the data imported. When this is done, the current chart reflects any changes that were made in the current source plan packet. This technique allows you to make changes to your current source plan or plans and see the results in the current OnePager chart. The snapshot date is not changed using this operation.

Add Snapshot Button
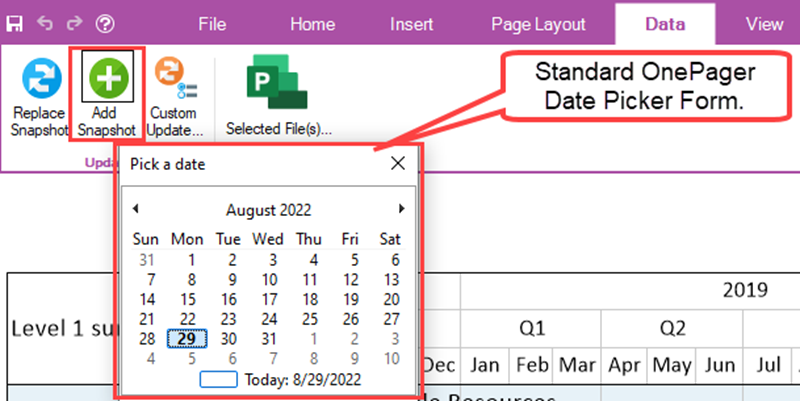
The Add Snapshot button is used to add a snapshot to the current chart with a new date established as the new snapshot date. This operation is used after the current chart is OPENED, when the source plan packet is updated, and you need to add a snapshot to reflect the current source plan packet’s new status or date change information. Clicking the Add Snapshot button accessed the OnePager Standard Date Picker form shown below:

Use the Standard Date Picker form to establish the date for the new added snapshot. This operation pulls in the source plan packet’s data and creates a new snapshot with a new snapshot date. At the end of the operation, the Chart Editor displays a chart that reflects the changes made in the source plan packet.
Custom Update… Button
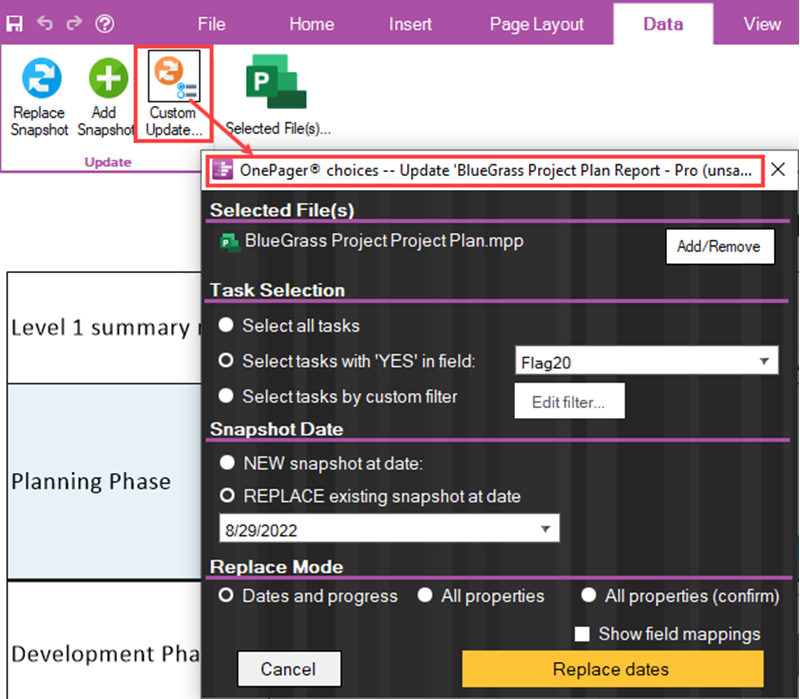
The Custom Update… button is used to perform a more complex snapshot update. Clicking the Custom Update… button causes OnePager to re-access the current source plan packet and access a modified version of the OnePager choices form as shown here:

You can use the Custom Update… to perform more complex updates to the chart because the OnePager choices form provides the controls for adding, changing, or removing source plans from a packet, changing the method of Task Selection, opting to create a new snapshot at a specific date (not shown above), or replacing a snapshot at a date with a choice of one (1) of three (3) replacement modes.
Selected File(s)… Button
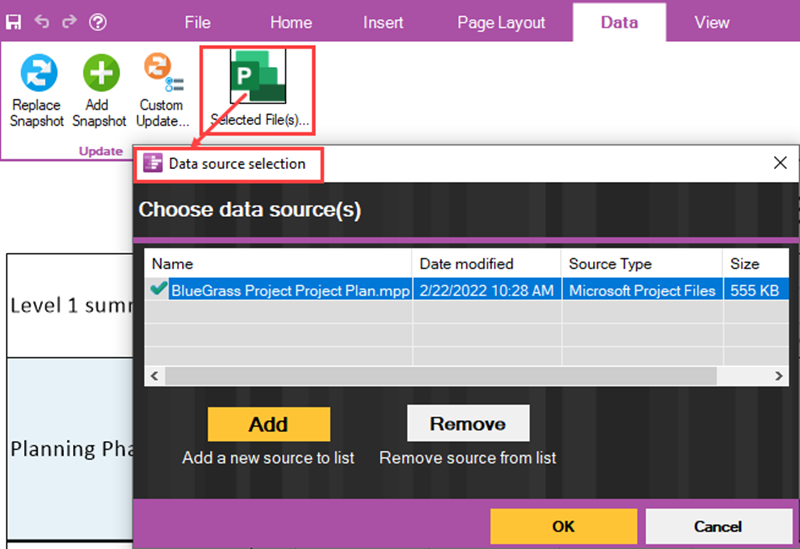
The Select File(s)… button access the Data source selection form shown below which displays the current source plan or plans that were used to create the current chart:

You can used the Data source selection form to change the current source plan file in the packet via the Remove and Add buttons in the form or choose to add a new source plan to the packet. Once the update to the source plans is completed, you can use the features in the Update sub-section to update your chart in the manner desired. At least one (1) source plan file must appear in the Data source select form’s grid.
Related Links
| Ribbon Tool Bar - Home Tab | Ribbon Tool Bar - Insert Tab |
| Ribbon Tool Bar - Page Layout Tab | Ribbon Tool Bar - View Tab |
| Ribbon Tool Bar - File Page | Ribbon Tool Bar - Supporting Controls |
(4.0.2.2.7-72)