Difference between revisions of "OnePager's Ribbon Tool Bar Insert Tab for Version 7.2"
(→Free Box Button) |
|||
| Line 8: | Line 8: | ||
<center>[[File:P72-4_0_2_2-72-(22)-08252022.png]]</center> | <center>[[File:P72-4_0_2_2-72-(22)-08252022.png]]</center> | ||
| − | <center>P72-4_0_2_2-72-(22)-08252022.png</center> | + | <!--<center>P72-4_0_2_2-72-(22)-08252022.png</center>--> |
The '''Insert''' tab has three (3) sub-sections and a total of five (3) buttons that are discussed below: | The '''Insert''' tab has three (3) sub-sections and a total of five (3) buttons that are discussed below: | ||
| Line 21: | Line 21: | ||
<center>[[File:P72-4_0_2_2-72-(23)-08252022.png]]</center> | <center>[[File:P72-4_0_2_2-72-(23)-08252022.png]]</center> | ||
| − | <center>P72-4_0_2_2-72-(23)-08252022.png</center> | + | v<center>P72-4_0_2_2-72-(23)-08252022.png</center>--> |
The form shows settings that are established by the current '''Template Properties''' form within its '''Comment Boxes '''tab. Using the controls in the '''Create or edit comment box '''form you can establish the '''properties''' of the '''Comment Box''' and when you click the '''OK '''button, the '''Comment Box '''is attached to the '''selected''' task bar or milestone symbol. | The form shows settings that are established by the current '''Template Properties''' form within its '''Comment Boxes '''tab. Using the controls in the '''Create or edit comment box '''form you can establish the '''properties''' of the '''Comment Box''' and when you click the '''OK '''button, the '''Comment Box '''is attached to the '''selected''' task bar or milestone symbol. | ||
| Line 30: | Line 30: | ||
<center>[[File:P72-4_0_2_2-72-(24)-08252022.png]]</center> | <center>[[File:P72-4_0_2_2-72-(24)-08252022.png]]</center> | ||
| − | <center>P72-4_0_2_2-72-(24)-08252022.png</center> | + | <!--<center>P72-4_0_2_2-72-(24)-08252022.png</center>--> |
Using the controls in the '''Curtain Properties''' form you can establish the extent and other '''properties''' of the desired '''Curtain'''. When you click the '''OK '''button, the '''Curtain''' with its defined '''properties''' is placed in the '''graph'''. | Using the controls in the '''Curtain Properties''' form you can establish the extent and other '''properties''' of the desired '''Curtain'''. When you click the '''OK '''button, the '''Curtain''' with its defined '''properties''' is placed in the '''graph'''. | ||
| Line 39: | Line 39: | ||
<center>[[File:P72-4_0_2_2-72-(25)-08252022.png]]</center> | <center>[[File:P72-4_0_2_2-72-(25)-08252022.png]]</center> | ||
| − | <center>P72-4_0_2_2-72-(25)-08252022.png</center> | + | <!--<center>P72-4_0_2_2-72-(25)-08252022.png</center>--> |
When the '''enabled Task Link '''button is clicked, a manual '''Finish-to-Start (FS) Task Link''' is placed in the chart between the two (2) '''selected''' task bars as shown below: | When the '''enabled Task Link '''button is clicked, a manual '''Finish-to-Start (FS) Task Link''' is placed in the chart between the two (2) '''selected''' task bars as shown below: | ||
<center>[[File:P72-4_0_2_2-72-(26)-08252022.png]]</center> | <center>[[File:P72-4_0_2_2-72-(26)-08252022.png]]</center> | ||
| − | <center>P72-4_0_2_2-72-(26)-08252022.png</center> | + | <!--<center>P72-4_0_2_2-72-(26)-08252022.png</center>--> |
'''Selecting''' more than two(2) task bars or milestone symbols and then clicking the '''enabled Task Link''' button creates a '''series''' of '''Finish-to-Start Task Links '''from the upper left of the chart to the lower right of the chart connecting the '''selected''' task bars and/or milestone symbols into a '''Daisy Chain '''of manual '''Task Links.''' | '''Selecting''' more than two(2) task bars or milestone symbols and then clicking the '''enabled Task Link''' button creates a '''series''' of '''Finish-to-Start Task Links '''from the upper left of the chart to the lower right of the chart connecting the '''selected''' task bars and/or milestone symbols into a '''Daisy Chain '''of manual '''Task Links.''' | ||
| Line 53: | Line 53: | ||
<center>[[File:P72-4_0_2_2-72-(27)-08252022.png]]</center> | <center>[[File:P72-4_0_2_2-72-(27)-08252022.png]]</center> | ||
| − | <center>P72-4_0_2_2-72-(27)-08252022.png</center> | + | <!--<center>P72-4_0_2_2-72-(27)-08252022.png</center>--> |
====Picture Button==== | ====Picture Button==== | ||
| Line 60: | Line 60: | ||
<center>[[File:P72-4_0_2_2-72-(28)-08252022.png]]</center> | <center>[[File:P72-4_0_2_2-72-(28)-08252022.png]]</center> | ||
| − | <center>P72-4_0_2_2-72-(28)-08252022.png</center> | + | <!--<center>P72-4_0_2_2-72-(28)-08252022.png</center>--> |
Using the '''Open picture file''' window, '''select''' the desired image/picture and click '''Open'''. OnePager then places the '''select''' image/picture into the middle of the '''graph'''. At this point in the process you can '''select''' the image or picture by clicking on it and use available '''editing tools''' to '''move''' it around in the '''graph''' or '''resize''' it. | Using the '''Open picture file''' window, '''select''' the desired image/picture and click '''Open'''. OnePager then places the '''select''' image/picture into the middle of the '''graph'''. At this point in the process you can '''select''' the image or picture by clicking on it and use available '''editing tools''' to '''move''' it around in the '''graph''' or '''resize''' it. | ||
| Line 69: | Line 69: | ||
<center>[[File:P72-4_0_2_2-72-(29)-08252022.png]]</center> | <center>[[File:P72-4_0_2_2-72-(29)-08252022.png]]</center> | ||
| − | <center>P72-4_0_2_2-72-(29)-08252022.png</center> | + | <!--<center>P72-4_0_2_2-72-(29)-08252022.png</center>--> |
====Free Box Button==== | ====Free Box Button==== | ||
| Line 76: | Line 76: | ||
<center>[[File:P72-4_0_2_2-72-(30)-08252022.png]]</center> | <center>[[File:P72-4_0_2_2-72-(30)-08252022.png]]</center> | ||
| − | <center>P72-4_0_2_2-72-(30)-08252022.png</center> | + | <!--<center>P72-4_0_2_2-72-(30)-08252022.png</center>--> |
With the mouse cursor in the “'''Plus'''” sign mode, position the cursor to where you want the '''upper left corner''' of the '''Free Box '''to be and hold down the left-click mouse button. Then '''drag''' the mouse to expand the point position of the mouse cursor into a square or rectangle as shown here: | With the mouse cursor in the “'''Plus'''” sign mode, position the cursor to where you want the '''upper left corner''' of the '''Free Box '''to be and hold down the left-click mouse button. Then '''drag''' the mouse to expand the point position of the mouse cursor into a square or rectangle as shown here: | ||
<center>[[File:P72-4_0_2_2-72-(31)-08252022.png]]</center> | <center>[[File:P72-4_0_2_2-72-(31)-08252022.png]]</center> | ||
| − | <center>P72-4_0_2_2-72-(31)-08252022.png</center> | + | <center>P72-4_0_2_2-72-(31)-08252022.png</center>--> |
When you release the left-click mouse button the '''Free Box’s position''' and '''size''' in the '''graph''' is established as shown below: | When you release the left-click mouse button the '''Free Box’s position''' and '''size''' in the '''graph''' is established as shown below: | ||
<center>[[File:P72-4_0_2_2-72-(32)-08252022.png]]</center> | <center>[[File:P72-4_0_2_2-72-(32)-08252022.png]]</center> | ||
| − | <center>P72-4_0_2_2-72-(32)-08252022.png</center> | + | <!--<center>P72-4_0_2_2-72-(32)-08252022.png</center>--> |
From this position, the '''Free Box '''can be '''selected''', '''moved''' to any position in the chart, '''resized''', or have its '''properties''' changed as required. Changing the '''properties''' of a selected '''Free Box''' is done by accessing its right-click '''context menu''' and clicking the '''Properties''' '''…''' command to access the '''Shape Properties''' form for the select '''Free Box'''. | From this position, the '''Free Box '''can be '''selected''', '''moved''' to any position in the chart, '''resized''', or have its '''properties''' changed as required. Changing the '''properties''' of a selected '''Free Box''' is done by accessing its right-click '''context menu''' and clicking the '''Properties''' '''…''' command to access the '''Shape Properties''' form for the select '''Free Box'''. | ||
| Line 93: | Line 93: | ||
{| class="wikitable" | {| class="wikitable" | ||
| − | | [[OnePager's Ribbon Tool Bar Home Tab for Version 7.2 | Ribbon Tool Bar - Home Tab]] 4.0.2.2.1-72 | + | | [[OnePager's Ribbon Tool Bar Home Tab for Version 7.2 | Ribbon Tool Bar - Home Tab]] <!--4.0.2.2.1-72--> |
| − | | [[OnePager's Ribbon Tool Bar Page Layout Tab for Version 7.2 | Ribbon Tool Bar - Page Layout Tab]] | + | | [[OnePager's Ribbon Tool Bar Page Layout Tab for Version 7.2 | Ribbon Tool Bar - Page Layout Tab]] v4.0.2.2.5-72--> |
|- | |- | ||
| − | | [[OnePager's Ribbon Tool Bar Data Tab for Version 7.2 | Ribbon Tool Bar - Data Tab]] 4.0.2.2.7-72 | + | | [[OnePager's Ribbon Tool Bar Data Tab for Version 7.2 | Ribbon Tool Bar - Data Tab]] <!--4.0.2.2.7-72--> |
| − | | [[OnePager's Ribbon Tool Bar View Tab for Version 7.2 | Ribbon Tool Bar - View Tab]] 4.0.2.2.9-72 | + | | [[OnePager's Ribbon Tool Bar View Tab for Version 7.2 | Ribbon Tool Bar - View Tab]] <!--4.0.2.2.9-72--> |
|- | |- | ||
| − | | [[OnePager's Ribbon Tool Bar File Page for Version 7.2 | Ribbon Tool Bar - File Page]] 4.0.2.2.11-72 | + | | [[OnePager's Ribbon Tool Bar File Page for Version 7.2 | Ribbon Tool Bar - File Page]] <!--4.0.2.2.11-72--> |
| − | | [[OnePager's Ribbon Tool Bar Supporting Controls for Version 7.2 | Ribbon Tool Bar - Supporting Controls]] 4.0.2.2.13-72 | + | | [[OnePager's Ribbon Tool Bar Supporting Controls for Version 7.2 | Ribbon Tool Bar - Supporting Controls]] <!--4.0.2.2.13-72--> |
|} | |} | ||
Revision as of 18:32, 10 January 2024
Contents
Overview
Illustrations used or referenced in this article are from OnePager Pro using data from Microsoft Project but the features, function, controls, and manual edits apply equally to other OnePager editions that import from data sources like Microsoft Excel, Oracle Primavera P6, Smartsheet, Planisware Enterprise, Project for the Web, Asana, and Wrike.
OnePager's Ribbon Tool Bar Insert Tab
The OnePager Ribbon Tool Bar Insert tab is shown in detail below:

The Insert tab has three (3) sub-sections and a total of five (3) buttons that are discussed below:
Insert Tab – Annotations Sub-Section
The Annotations sub-section contains three (3) buttons for adding features to the created, opened, or updated OnePager chart. These three (3) Annotation buttons are discussed below:
Comment Box Button
The Comment Box button is enabled whenever a single task bar/milestone symbol is selected as Comment Boxes are only attached to task bars and/or milestone symbols. When enabled and the Comment Box button is clicked, OnePager accesses the Create or edit comment box form as shown below:
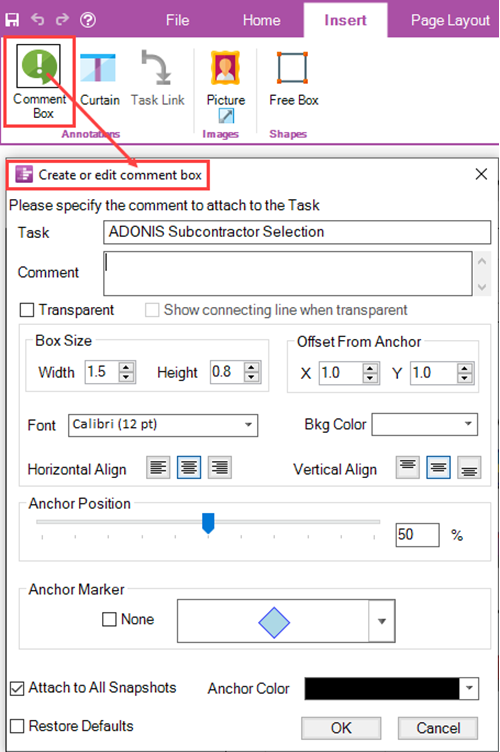
The form shows settings that are established by the current Template Properties form within its Comment Boxes tab. Using the controls in the Create or edit comment box form you can establish the properties of the Comment Box and when you click the OK button, the Comment Box is attached to the selected task bar or milestone symbol.
Curtain Button
The Curtain Button is always enabled and when clicked accesses the Curtain properties form as shown below:
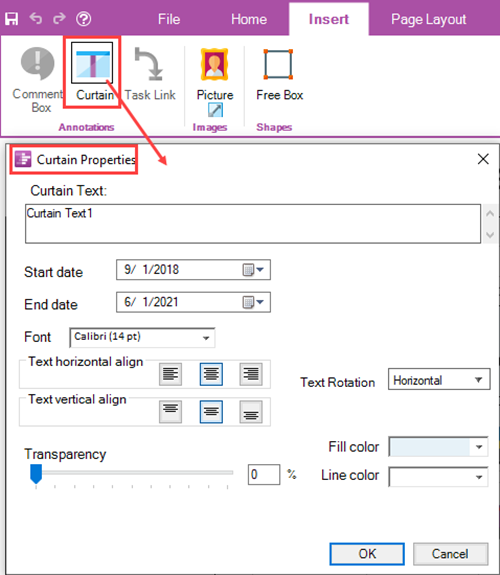
Using the controls in the Curtain Properties form you can establish the extent and other properties of the desired Curtain. When you click the OK button, the Curtain with its defined properties is placed in the graph.
Task Link Button
The Task Link Button is used to insert manual Task Links between any two (2) task bar/milestone symbols in the chart. At least two (2) task bars or milestone symbols must first be selected in order for the Task Link button to be enabled as shown here:
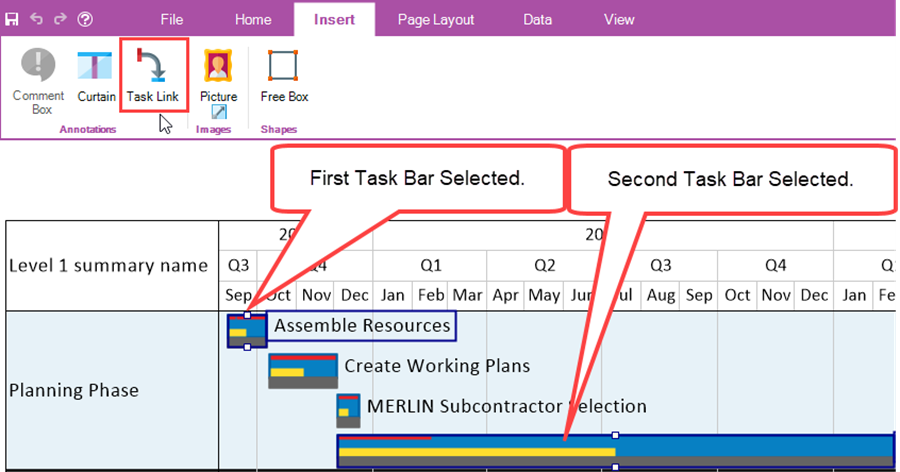
When the enabled Task Link button is clicked, a manual Finish-to-Start (FS) Task Link is placed in the chart between the two (2) selected task bars as shown below:
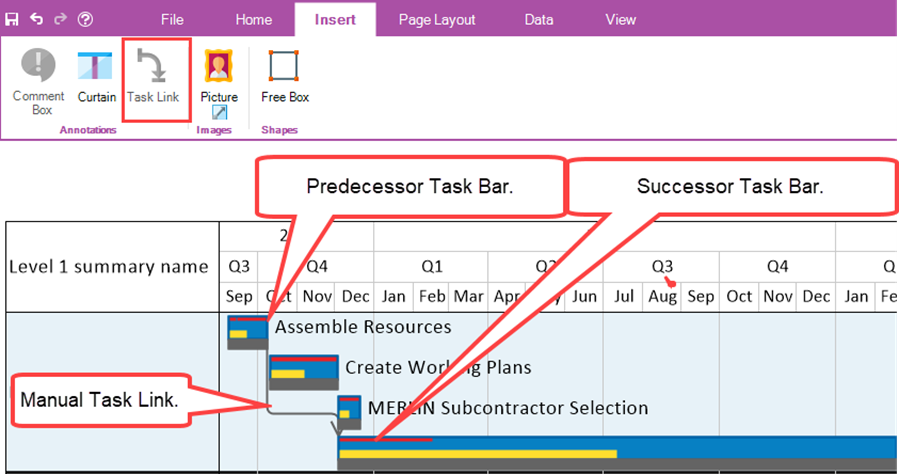
Selecting more than two(2) task bars or milestone symbols and then clicking the enabled Task Link button creates a series of Finish-to-Start Task Links from the upper left of the chart to the lower right of the chart connecting the selected task bars and/or milestone symbols into a Daisy Chain of manual Task Links.
Insert Tab – Images Sub-Section
The Images sub-section contains only one (1) button – the Picture Button as shown here:

Picture Button
The Picture Button is always enabled and when clicked, OnePager accesses an Open picture file window where you have designated your pictures are stored as shown below:
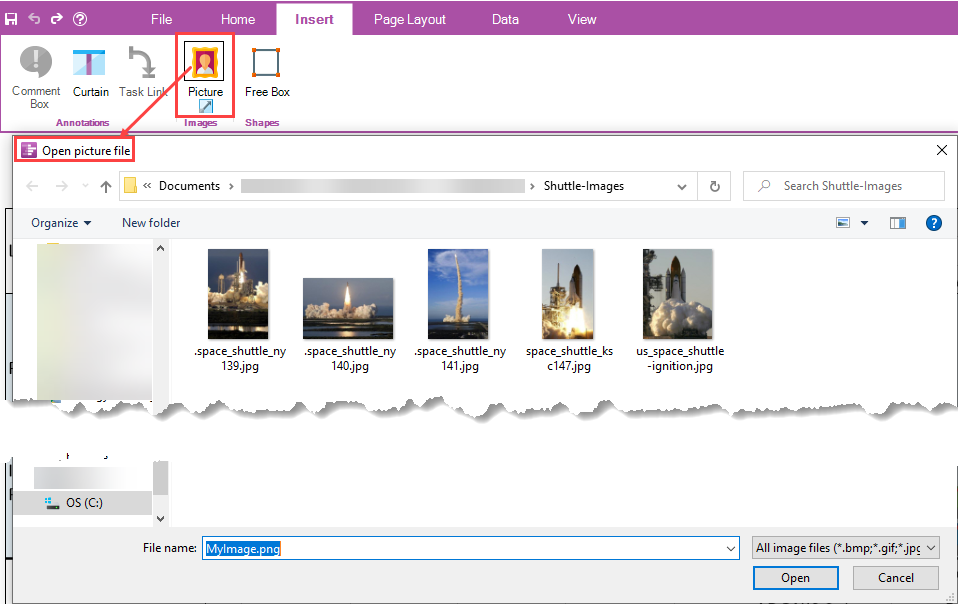
Using the Open picture file window, select the desired image/picture and click Open. OnePager then places the select image/picture into the middle of the graph. At this point in the process you can select the image or picture by clicking on it and use available editing tools to move it around in the graph or resize it.
Insert Tab – Shapes Sub-Section
The Shapes sub-section contains only the Free Box Button as shown below:

Free Box Button
The Free Box Button is always enabled and when clicked OnePager changes the mouse cursor to a “Plus” sign in the graph as shown below:
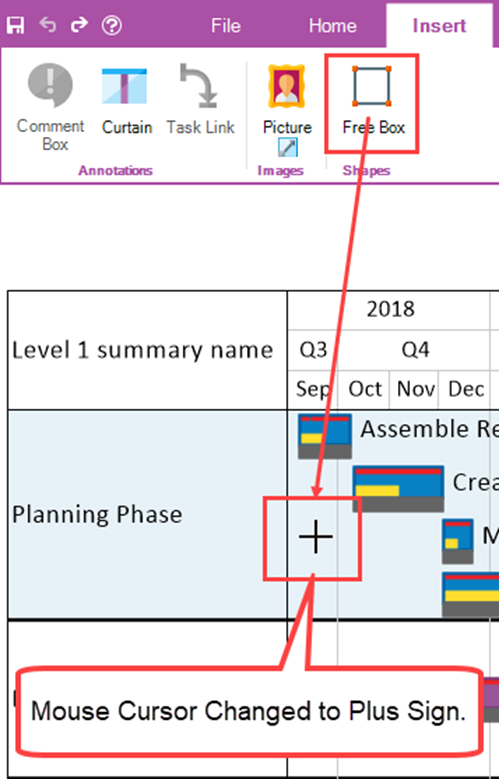
With the mouse cursor in the “Plus” sign mode, position the cursor to where you want the upper left corner of the Free Box to be and hold down the left-click mouse button. Then drag the mouse to expand the point position of the mouse cursor into a square or rectangle as shown here:
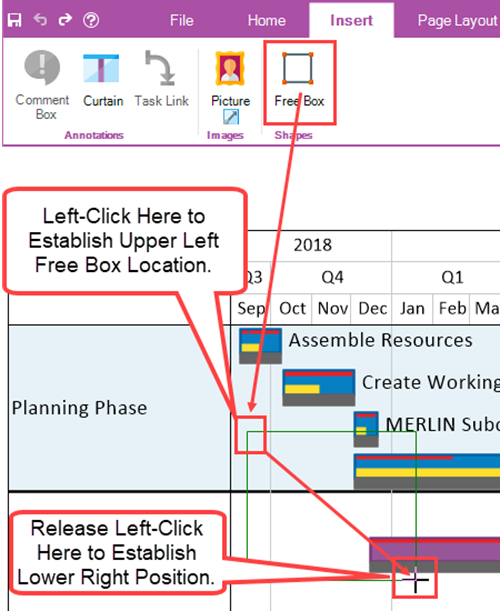
When you release the left-click mouse button the Free Box’s position and size in the graph is established as shown below:
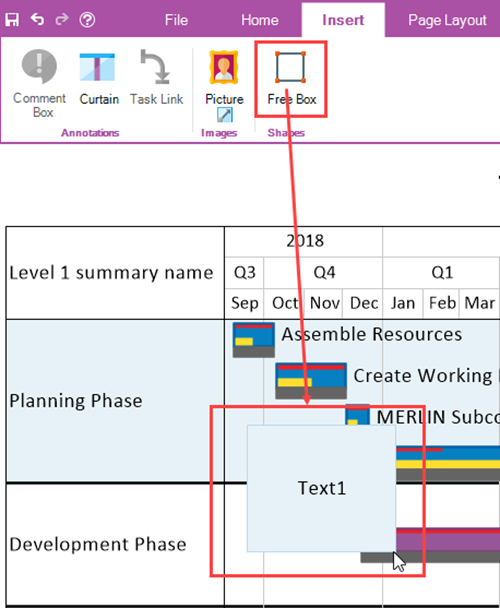
From this position, the Free Box can be selected, moved to any position in the chart, resized, or have its properties changed as required. Changing the properties of a selected Free Box is done by accessing its right-click context menu and clicking the Properties … command to access the Shape Properties form for the select Free Box.
Related Links
| Ribbon Tool Bar - Home Tab | Ribbon Tool Bar - Page Layout Tab v4.0.2.2.5-72--> |
| Ribbon Tool Bar - Data Tab | Ribbon Tool Bar - View Tab |
| Ribbon Tool Bar - File Page | Ribbon Tool Bar - Supporting Controls |
(4.0.2.2.3-72)