Difference between revisions of "Time Axis Upgrades for OnePager 6.1"
(→Managing Working Hours and Non-Working Hours) |
(→Saving Time Axis Level Cell Settings in the Template Form) |
||
| (28 intermediate revisions by the same user not shown) | |||
| Line 1: | Line 1: | ||
| − | |||
| − | |||
==Introduction to the OnePager 6.1 Time Axis Upgrade== | ==Introduction to the OnePager 6.1 Time Axis Upgrade== | ||
| Line 15: | Line 13: | ||
:c) More graphic capabilities for tailoring '''Time Axis Levels''' and '''Cells '''with user defined variable '''text formats''', '''background colors''' and '''fill patterns''', variable '''Time Axis Level heights''', and '''border formats properties'''. | :c) More graphic capabilities for tailoring '''Time Axis Levels''' and '''Cells '''with user defined variable '''text formats''', '''background colors''' and '''fill patterns''', variable '''Time Axis Level heights''', and '''border formats properties'''. | ||
| − | :d) A capability for ''' | + | :d) A capability for '''Re-ordering''' the positions of '''Time Axis Levels''' within the project view’s '''Time Axis '''areas. |
:e) A new feature called the '''Non-Linear Time Axis '''that provides the capability to manually '''stretch '''or''' compress''' the '''width''' of '''Time Axis Level Cells''' on all '''Time Axis Levels '''and thereby use more or less horizontal space in the '''Graph''' to cover the same '''timespans'''. | :e) A new feature called the '''Non-Linear Time Axis '''that provides the capability to manually '''stretch '''or''' compress''' the '''width''' of '''Time Axis Level Cells''' on all '''Time Axis Levels '''and thereby use more or less horizontal space in the '''Graph''' to cover the same '''timespans'''. | ||
| Line 21: | Line 19: | ||
:f) A '''Floating Time Axis''' feature and associated controls for you to place one, two, or three''' Time Axis Levels''' within the project view and edit its properties. | :f) A '''Floating Time Axis''' feature and associated controls for you to place one, two, or three''' Time Axis Levels''' within the project view and edit its properties. | ||
| − | :g) Capabilities for you to define, edit, and use your own '''Custom Date Formats'''. | + | :g) Capabilities for you to define, '''edit''', and use your own '''Custom Date Formats'''. |
| − | :h) Manual editing controls within the '''Graph''' for you to edit '''Time Axis Level''' and '''Cell format properties''', '''Floating Time Axis Level''' and '''Cell '''properties, and the properties''' '''of all '''Daily '''and''' Non-Working Hour Curtains'''. | + | :h) Manual '''editing''' controls within the '''Graph''' for you to''' edit''' '''Time Axis Level''' and '''Cell format properties''', '''Floating Time Axis Level''' and '''Cell '''properties, and the properties''' '''of all '''Daily '''and''' Non-Working Hour Curtains'''. |
:i) Controls for '''showing '''and '''hiding''' '''Time Axis Levels''' and '''Cells'''. | :i) Controls for '''showing '''and '''hiding''' '''Time Axis Levels''' and '''Cells'''. | ||
| Line 29: | Line 27: | ||
:j) Consolidated controls for specifying/updating the project view’s '''Start '''and''' Finish Date boundaries''', '''Fiscal Year''' settings, '''Count Up/Down '''settings, and placing '''Time Axis Levels '''on top and/or bottom of the project view and in '''output documents'''. | :j) Consolidated controls for specifying/updating the project view’s '''Start '''and''' Finish Date boundaries''', '''Fiscal Year''' settings, '''Count Up/Down '''settings, and placing '''Time Axis Levels '''on top and/or bottom of the project view and in '''output documents'''. | ||
| − | :k) New controls on the OnePager 6.1 ribbon’s '''View''' tab for | + | :k) New controls on the OnePager 6.1 ribbon’s '''View''' tab for '''editing''' the project view’s '''Start/Finish Date boundaries'''. |
:l) Consolidated and enhanced controls for you to specify''' Curtains''' related to '''Days of the Week''', '''Working Hours''', and '''Non-Working''' '''Hours'''. | :l) Consolidated and enhanced controls for you to specify''' Curtains''' related to '''Days of the Week''', '''Working Hours''', and '''Non-Working''' '''Hours'''. | ||
| − | :m) A central '''Curtains and Timespans Grid''' that lists all '''Curtains''' and '''stretched''' or '''compressed timespans''' in the project view and its snapshots. | + | :m) A central '''Curtains and Timespans Grid (The Grid)''' that lists all '''Curtains''' and '''stretched''' or '''compressed timespans''' in the project view and its snapshots. |
:n) An upgrade to the presentation of '''%Complete '''so that you can accurately display '''%Complete''' bars in your project views that match the '''%Complete''' bars in Microsoft Project’s Gantt Charts when you configure the Microsoft Project Calendar with appropriate '''Working '''and '''Non-Working Time'''. | :n) An upgrade to the presentation of '''%Complete '''so that you can accurately display '''%Complete''' bars in your project views that match the '''%Complete''' bars in Microsoft Project’s Gantt Charts when you configure the Microsoft Project Calendar with appropriate '''Working '''and '''Non-Working Time'''. | ||
| Line 50: | Line 48: | ||
<center>[[File:P61-0_4_1_9-61-(3)-05082018.png]]</center> | <center>[[File:P61-0_4_1_9-61-(3)-05082018.png]]</center> | ||
| − | <center><P61-0_4_1_9-61-(3)-05082018.png></center> | + | <!--center><P61-0_4_1_9-61-(3)-05082018.png></center--> |
====Middle Level Sub-Tab==== | ====Middle Level Sub-Tab==== | ||
| Line 57: | Line 55: | ||
<center>[[File:P61-0_4_1_9-61-(3A)-05082018.png]]</center> | <center>[[File:P61-0_4_1_9-61-(3A)-05082018.png]]</center> | ||
| − | <center><P61-0_4_1_9-61-(3A)-05082018.png></center> | + | <!--center><P61-0_4_1_9-61-(3A)-05082018.png></center--> |
====Format Sub-Tab==== | ====Format Sub-Tab==== | ||
| Line 64: | Line 62: | ||
<center>[[File:P61-0_4_1_9-61-(3B)-05082018.png]]</center> | <center>[[File:P61-0_4_1_9-61-(3B)-05082018.png]]</center> | ||
| − | <center><P61-0_4_1_9-61-(3B)-05082018.png></center> | + | <!--center><P61-0_4_1_9-61-(3B)-05082018.png></center--> |
===The Reorganized Template and Project-View Properties Main Tab=== | ===The Reorganized Template and Project-View Properties Main Tab=== | ||
| Line 71: | Line 69: | ||
<center>[[File:P61-0_4_1_9-61-(3C)-05082018.png]]</center> | <center>[[File:P61-0_4_1_9-61-(3C)-05082018.png]]</center> | ||
| − | <center><P61-0_4_1_9-61-(3C)-05082018.png></center> | + | <!--center><P61-0_4_1_9-61-(3C)-05082018.png></center--> |
===The Reorganized Template and Project-View Properties Advanced Tab=== | ===The Reorganized Template and Project-View Properties Advanced Tab=== | ||
| Line 77: | Line 75: | ||
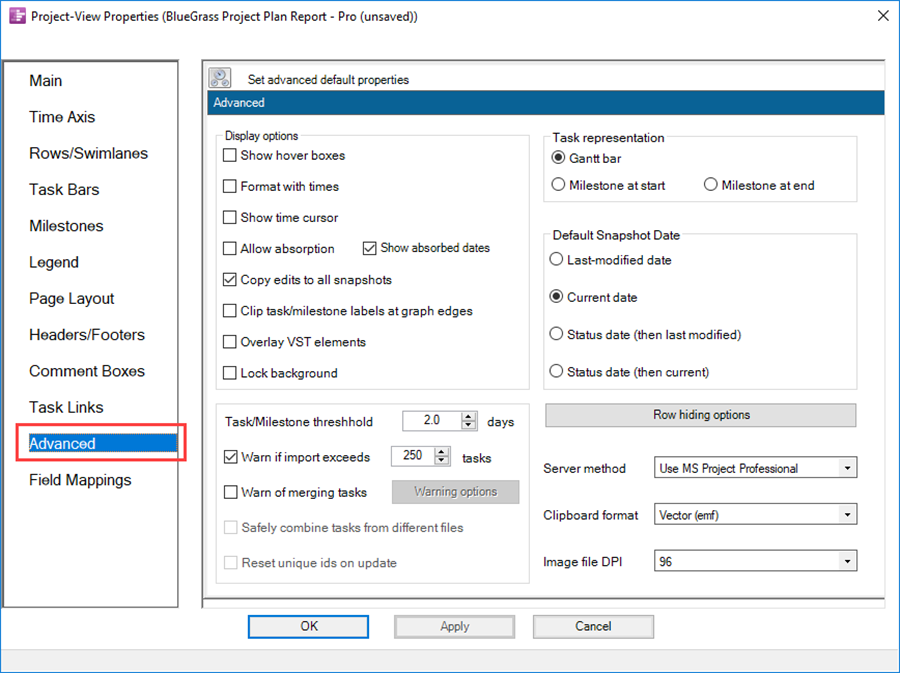
9) Since the updated '''Template '''and '''PVP''' form’s '''Advanced '''tabs are almost identical, the reorganized '''PVP '''form’s '''Advanced '''tab is used in the illustration below: | 9) Since the updated '''Template '''and '''PVP''' form’s '''Advanced '''tabs are almost identical, the reorganized '''PVP '''form’s '''Advanced '''tab is used in the illustration below: | ||
| − | <center>[[File:P61-0_4_1_9-61-(3D)-05082018.png]]</center> | + | <center>[[File:P61-0_4_1_9-61-(3D-1)-05082018.png]]</center> |
| − | <center><P61-0_4_1_9-61-(3D)-05082018.png></center> | + | <!--center><P61-0_4_1_9-61-(3D-1)-05082018.png></center--> |
===Globally Editing Project View Time Axis Levels and Cells=== | ===Globally Editing Project View Time Axis Levels and Cells=== | ||
| − | 10) Global edits are made in the '''Template '''form for all project views created with that '''Template'''. Project views can be edited with the '''Project-View Properties''' ('''PVP''') form for all editable graphic elements. The examples that follow can be made in either form but most use the '''PVP''' form.''' ''' | + | 10) Global '''edits''' are made in the '''Template '''form for all project views created with that '''Template'''. Project views can be '''edited''' with the '''Project-View Properties''' ('''PVP''') form for all '''editable''' graphic elements. The examples that follow can be made in either form but most use the '''PVP''' form.''' ''' |
| − | 11) Below is a sample project view showing some edits in the three '''Time Axes''' for '''level height''', '''cell text color''', '''background colors,''' and '''fill patterns''': | + | 11) Below is a sample project view showing some '''edits''' in the three '''Time Axes''' for '''level height''', '''cell text color''', '''background colors,''' and '''fill patterns''': |
<center>[[File:P61-0_4_1_9-61-(3E)-05082018.png]]</center> | <center>[[File:P61-0_4_1_9-61-(3E)-05082018.png]]</center> | ||
| − | <center><P61-0_4_1_9-61-(3E)-05082018.png></center> | + | <!--center><P61-0_4_1_9-61-(3E)-05082018.png></center--> |
====Editing the Project View’s Start/Finish Date Boundaries==== | ====Editing the Project View’s Start/Finish Date Boundaries==== | ||
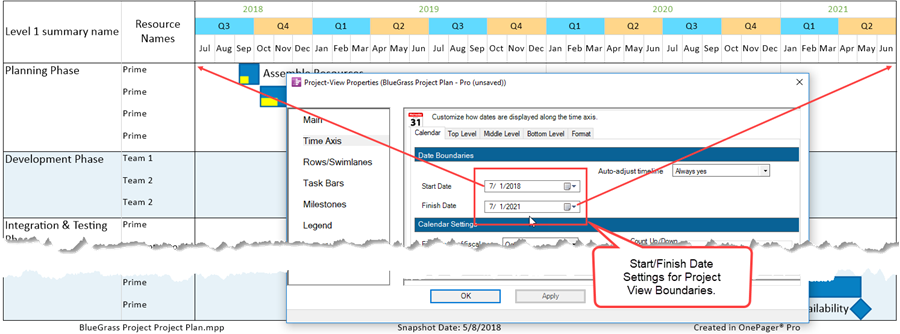
| Line 94: | Line 92: | ||
<center>[[File:P61-0_4_1_9-61-(3F)-05082018.png]]</center> | <center>[[File:P61-0_4_1_9-61-(3F)-05082018.png]]</center> | ||
| − | <center><P61-0_4_1_9-61-(3F)-05082018.png></center> | + | <!--center><P61-0_4_1_9-61-(3F)-05082018.png></center--> |
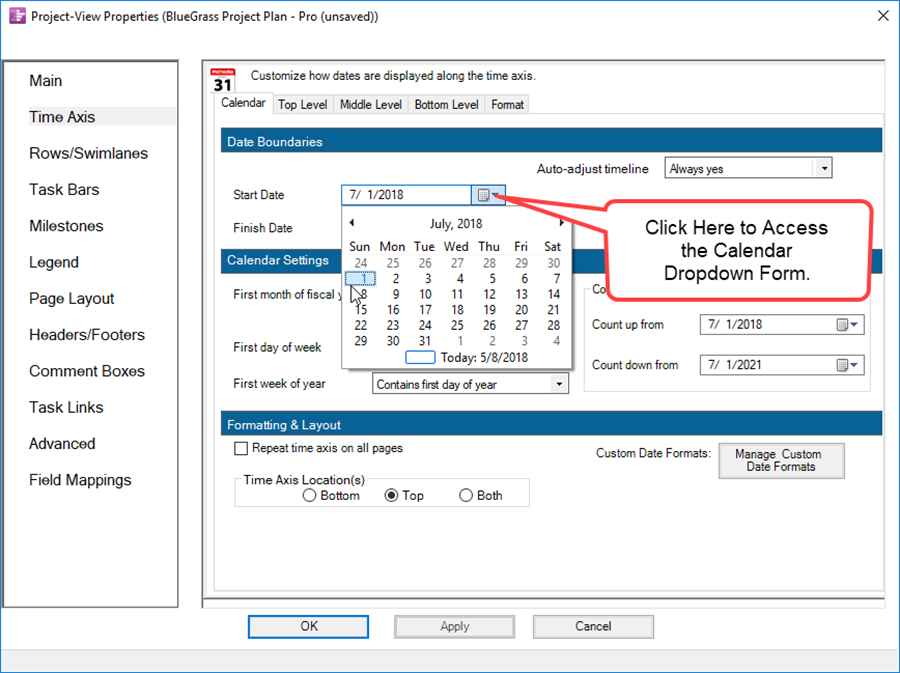
| − | :a) The '''Start Date''' and '''Finish Date''' '''boundaries''' can be edited by accessing the '''Date Picker '''dropdown as shown below: | + | :a) The '''Start Date''' and '''Finish Date''' '''boundaries''' can be '''edited''' by accessing the '''Date Picker '''dropdown as shown below: |
<center>[[File:P61-0_4_1_9-61-(3G)-05082018.png]]</center> | <center>[[File:P61-0_4_1_9-61-(3G)-05082018.png]]</center> | ||
| − | <center><P61-0_4_1_9-61-(3G)-05082018.png></center> | + | <!--center><P61-0_4_1_9-61-(3G)-05082018.png></center--> |
| − | :b) Making edits to the '''Start Date '''and/or''' Finish Date boundaries''' resets the '''Date Boundaries '''for the project view. | + | :b) Making '''edits''' to the '''Start Date '''and/or''' Finish Date boundaries''' resets the '''Date Boundaries '''for the project view. |
| − | :c) Another way to edit the project view’s '''Date Boundaries''' is to use the '''Start '''and '''Finish Date''' '''Calendars''' now available on the OnePager 6.1 ribbon’s '''View '''tab in the '''Dates''' group as shown here: | + | :c) Another way to '''edit''' the project view’s '''Date Boundaries''' is to use the '''Start '''and '''Finish Date''' '''Calendars''' now available on the OnePager 6.1 ribbon’s '''View '''tab in the '''Dates''' group as shown here: |
<center>[[File:P61-0_4_1_9-61-(3H)-05082018.png]]</center> | <center>[[File:P61-0_4_1_9-61-(3H)-05082018.png]]</center> | ||
| − | <center><P61-0_4_1_9-61-(3H)-05082018.png></center> | + | <!--center><P61-0_4_1_9-61-(3H)-05082018.png></center--> |
====Showing and Hiding Time Axis Levels and Cells==== | ====Showing and Hiding Time Axis Levels and Cells==== | ||
| Line 115: | Line 113: | ||
<center>[[File:P61-0_4_1_9-61-(3I)-05082018.png]]</center> | <center>[[File:P61-0_4_1_9-61-(3I)-05082018.png]]</center> | ||
| − | <center><P61-0_4_1_9-61-(3I)-05082018.png></center> | + | <!--center><P61-0_4_1_9-61-(3I)-05082018.png></center--> |
:b) You can manually select the months of September through November of 2019 (with a '''CTL+Left-Click''') and '''hide''' the cells by a right-click on a selected '''Cell''' to get to the '''context menu''' and the '''Hide cell''' command as shown below: | :b) You can manually select the months of September through November of 2019 (with a '''CTL+Left-Click''') and '''hide''' the cells by a right-click on a selected '''Cell''' to get to the '''context menu''' and the '''Hide cell''' command as shown below: | ||
<center>[[File:P61-0_4_1_9-61-(3J)-05082018.png]]</center> | <center>[[File:P61-0_4_1_9-61-(3J)-05082018.png]]</center> | ||
| − | <center><P61-0_4_1_9-61-(3J)-05082018.png></center> | + | <!--center><P61-0_4_1_9-61-(3J)-05082018.png></center--> |
:c) Clicking the '''Hide cell '''command results in the project view looking like this: | :c) Clicking the '''Hide cell '''command results in the project view looking like this: | ||
<center>[[File:P61-0_4_1_9-61-(3K)-05082018.png]]</center> | <center>[[File:P61-0_4_1_9-61-(3K)-05082018.png]]</center> | ||
| − | <center><P61-0_4_1_9-61-(3K)-05082018.png></center> | + | <!--center><P61-0_4_1_9-61-(3K)-05082018.png></center--> |
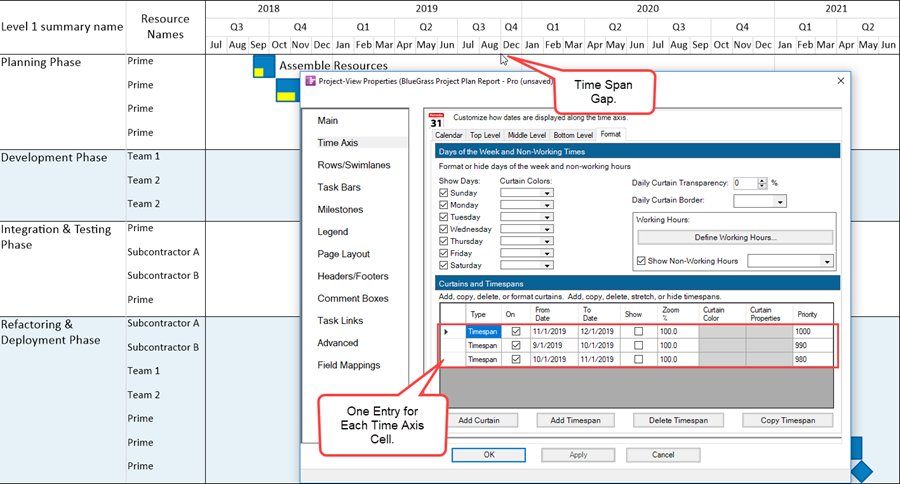
:d) As the illustration above shows, a '''three month timespan''' is '''hidden '''in the '''gap'''. OnePager 6.1 retains a record of this in the table found in the '''PVP '''form '''Time Axis '''tab '''Format '''sub-tab’s '''Curtains and Timespans '''control group as shown below: | :d) As the illustration above shows, a '''three month timespan''' is '''hidden '''in the '''gap'''. OnePager 6.1 retains a record of this in the table found in the '''PVP '''form '''Time Axis '''tab '''Format '''sub-tab’s '''Curtains and Timespans '''control group as shown below: | ||
<center>[[File:P61-0_4_1_9-61-(3L)-05082018.png]]</center> | <center>[[File:P61-0_4_1_9-61-(3L)-05082018.png]]</center> | ||
| − | <center><P61-0_4_1_9-61-(3L)-05082018.png></center> | + | <!--center><P61-0_4_1_9-61-(3L)-05082018.png></center--> |
:e) If, in the course of '''hiding Time Axis Level Cells''', tasks/milestones become '''hidden''', entries are made in the '''Where’s My Stuff!? '''form as shown in the sequence below: | :e) If, in the course of '''hiding Time Axis Level Cells''', tasks/milestones become '''hidden''', entries are made in the '''Where’s My Stuff!? '''form as shown in the sequence below: | ||
| Line 137: | Line 135: | ||
<center>[[File:P61-0_4_1_9-61-(4)-05082018.png]]</center> | <center>[[File:P61-0_4_1_9-61-(4)-05082018.png]]</center> | ||
| − | <center><P61-0_4_1_9-61-(4)-05082018.png></center> | + | <!--center><P61-0_4_1_9-61-(4)-05082018.png></center--> |
::ii) After '''hiding '''the two '''Quarterly Time Axis Level Cells''' the project view looks like this in the '''Where’s My Stuff!? '''form: | ::ii) After '''hiding '''the two '''Quarterly Time Axis Level Cells''' the project view looks like this in the '''Where’s My Stuff!? '''form: | ||
<center>[[File:P61-0_4_1_9-61-(4A)-05082018.png]]</center> | <center>[[File:P61-0_4_1_9-61-(4A)-05082018.png]]</center> | ||
| − | <center><P61-0_4_1_9-61-(4A)-05082018.png></center> | + | <!--center><P61-0_4_1_9-61-(4A)-05082018.png></center> |
::iii) To restore the '''Time Axis Level Cells''',''' '''select the five entries by checking each checkbox in the '''Select''' column (or clicking the''' Select All''' button) in the '''Where’s My Stuff!?''' form as is shown in the example below: | ::iii) To restore the '''Time Axis Level Cells''',''' '''select the five entries by checking each checkbox in the '''Select''' column (or clicking the''' Select All''' button) in the '''Where’s My Stuff!?''' form as is shown in the example below: | ||
<center>[[File:P61-0_4_1_9-61-(4F)-05082018.png]]</center> | <center>[[File:P61-0_4_1_9-61-(4F)-05082018.png]]</center> | ||
| − | <center><P61-0_4_1_9-61-(4F)-05082018.png></center> | + | <center><P61-0_4_1_9-61-(4F)-05082018.png></center--> |
::iv) Clicking the '''Fix Selected '''button updates the '''Where’s My Stuff!?''' form to look like this: | ::iv) Clicking the '''Fix Selected '''button updates the '''Where’s My Stuff!?''' form to look like this: | ||
<center>[[File:P61-0_4_1_9-61-(4G)-05082018.png]]</center> | <center>[[File:P61-0_4_1_9-61-(4G)-05082018.png]]</center> | ||
| − | <center><P61-0_4_1_9-61-(4G)-05082018.png></center> | + | <!--center><P61-0_4_1_9-61-(4G)-05082018.png></center--> |
::v) The action restores the five selected tasks to visibility along with their associated '''Quarterly Time Axis Level Cells''' as shown below: | ::v) The action restores the five selected tasks to visibility along with their associated '''Quarterly Time Axis Level Cells''' as shown below: | ||
<center>[[File:P61-0_4_1_9-61-(4B)-05082018.png]]</center> | <center>[[File:P61-0_4_1_9-61-(4B)-05082018.png]]</center> | ||
| − | <center><P61-0_4_1_9-61-(4B)-05082018.png></center> | + | <!--center><P61-0_4_1_9-61-(4B)-05082018.png></center--> |
| − | ::vi) For more information on the '''Where’s My Stuff!? '''form, see the article at: [[Managing Hidden Tasks and Milestones Using "Where's My Stuff?!" for Version 6.1 | Managing Hidden Tasks and Milestones Using "Where's My Stuff?!"]] 9.4.1-61. | + | ::vi) For more information on the '''Where’s My Stuff!? '''form, see the article at: [[Managing Hidden Tasks and Milestones Using "Where's My Stuff?!" for Version 6.1 | Managing Hidden Tasks and Milestones Using "Where's My Stuff?!"]]. <!--9.4.1-61.--> |
:f) '''Hidden Time Axis Level Cells''' can be restored by using the controls on the OnePager 6.1 ribbon '''Home''' tab’s '''Show/Hide '''dropdown menu by clicking the '''Show All Time Axis Cells''' command as seen here: | :f) '''Hidden Time Axis Level Cells''' can be restored by using the controls on the OnePager 6.1 ribbon '''Home''' tab’s '''Show/Hide '''dropdown menu by clicking the '''Show All Time Axis Cells''' command as seen here: | ||
<center>[[File:P61-0_4_1_9-61-(4C)-05082018.png]]</center> | <center>[[File:P61-0_4_1_9-61-(4C)-05082018.png]]</center> | ||
| − | <center><P61-0_4_1_9-61-(4C)-05082018.png></center> | + | <!--center><P61-0_4_1_9-61-(4C)-05082018.png></center--> |
:g) After clicking the '''Show All Time Axis Cells''' command, the five '''hidden''' month '''Time Axis Level Cells '''become '''shown'''. | :g) After clicking the '''Show All Time Axis Cells''' command, the five '''hidden''' month '''Time Axis Level Cells '''become '''shown'''. | ||
| − | 14) The dates used in the ''' | + | 14) The dates used in the '''The Grid''' to define the '''hidden''' '''timespan''' include not only the date for '''From/To Dates''' but the time of day as well. |
:a) If you just specify '''dates''', OnePager 6.1 assumes that the '''From Date''' starts at midnight on that day and the '''To Date''' ends a minute before midnight on that day. | :a) If you just specify '''dates''', OnePager 6.1 assumes that the '''From Date''' starts at midnight on that day and the '''To Date''' ends a minute before midnight on that day. | ||
| Line 177: | Line 175: | ||
<center>[[File:P61-0_4_1_9-61-(4D)-05242018.png]]</center> | <center>[[File:P61-0_4_1_9-61-(4D)-05242018.png]]</center> | ||
| − | <center><P61-0_4_1_9-61-(4D)-05242018.png></center> | + | <!--center><P61-0_4_1_9-61-(4D)-05242018.png></center--> |
15) '''Hiding Time Axis Level Cells''' overrides all other settings that you specify by way of '''Flagging '''tasks for '''import''' or any specified '''Conditional Import rules''' you defined. Although the '''import''' takes place, '''hidden''' '''Time Axis Level Cells''' govern what is '''shown''' after '''import'''. | 15) '''Hiding Time Axis Level Cells''' overrides all other settings that you specify by way of '''Flagging '''tasks for '''import''' or any specified '''Conditional Import rules''' you defined. Although the '''import''' takes place, '''hidden''' '''Time Axis Level Cells''' govern what is '''shown''' after '''import'''. | ||
| − | ==== | + | ====Re-ordering Time Axis Levels==== |
| − | 16) In addition to being able to now easily '''hide Time Axis Levels Cells''', you can also ''' | + | 16) In addition to being able to now easily '''hide Time Axis Levels Cells''', you can also '''Re-order''' '''Time Axis Level''' positions. The following example illustrates this: |
| − | :a) Given the project view below where the '''Top''', '''Middle''', and '''Bottom Time Axis Levels '''in Year, Quarter, and Month are ordered from top to bottom, you can ''' | + | :a) Given the project view below where the '''Top''', '''Middle''', and '''Bottom Time Axis Levels '''in Year, Quarter, and Month are ordered from top to bottom, you can '''Re-order '''the '''Middle Level''' to the '''Top Level''' by clicking the '''up arrow '''in the '''Re-Order Levels''' control group: |
<center>[[File:P61-0_4_1_9-61-(5)-05082018.png]]</center> | <center>[[File:P61-0_4_1_9-61-(5)-05082018.png]]</center> | ||
| − | <center><P61-0_4_1_9-61-(5)-05082018.png></center> | + | <!--center><P61-0_4_1_9-61-(5)-05082018.png></center--> |
| − | :b) When you click the '''Apply''' or '''OK '''button in the '''PVP '''form the '''Top''' and '''Middle Levels '''are ''' | + | :b) When you click the '''Apply''' or '''OK '''button in the '''PVP '''form the '''Top''' and '''Middle Levels '''are '''Re-ordered''' as shown here: |
<center>[[File:P61-0_4_1_9-61-(5A)-06042018.png]]</center> | <center>[[File:P61-0_4_1_9-61-(5A)-06042018.png]]</center> | ||
| − | <center><P61-0_4_1_9-61-(5A)-06042018.png></center> | + | <!--center><P61-0_4_1_9-61-(5A)-06042018.png></center--> |
====Saving Time Axis Level Cell Settings in the Template Form==== | ====Saving Time Axis Level Cell Settings in the Template Form==== | ||
| Line 202: | Line 200: | ||
<center>[[File:P61-0_4_1_9-61-(4D)-05082018.png]]</center> | <center>[[File:P61-0_4_1_9-61-(4D)-05082018.png]]</center> | ||
| − | <center><P61-0_4_1_9-61-(4D)-05082018.png></center> | + | <!--center><P61-0_4_1_9-61-(4D)-05082018.png></center--> |
| − | :b) For more information on the '''Copy to Template''' function, please see the article at: [[Managing the Current Template for Version 6.1 | Managing the Current Template]] 24.6.1-61. | + | :b) For more information on the '''Copy to Template''' function, please see the article at: [[Managing the Current Template for Version 6.1 | Managing the Current Template]]. <!--24.6.1-61.--> |
18) If your project view contains '''hidden Time Axis Level Cells''', these settings are '''copied''' to the new '''Template''' form and saved. | 18) If your project view contains '''hidden Time Axis Level Cells''', these settings are '''copied''' to the new '''Template''' form and saved. | ||
| Line 210: | Line 208: | ||
19) When the '''Template '''form you previously saved is used to create a '''NEW''' project view, that project view reflects the '''hidden Time Axis Level Cells''' you previously created. | 19) When the '''Template '''form you previously saved is used to create a '''NEW''' project view, that project view reflects the '''hidden Time Axis Level Cells''' you previously created. | ||
| − | :a) In the saved '''Template '''form, the '''hidden Time Axis Level Cells''' are represented in the ''' | + | :a) In the saved '''Template '''form, the '''hidden Time Axis Level Cells''' are represented in the '''The Grid''' as shown in the example below: |
<center>[[File:P61-0_4_1_9-61-(4E)-05082018.png]]</center> | <center>[[File:P61-0_4_1_9-61-(4E)-05082018.png]]</center> | ||
| − | <center><P61-0_4_1_9-61-(4E)-05082018.png></center> | + | <!--center><P61-0_4_1_9-61-(4E)-05082018.png></center--> |
:b) When the above '''Template '''form is again used, any '''Time Axis Level Cells''' that are between the '''From Date''' and '''To Date''' are treated as '''hidden Time Axis Level Cells'''. | :b) When the above '''Template '''form is again used, any '''Time Axis Level Cells''' that are between the '''From Date''' and '''To Date''' are treated as '''hidden Time Axis Level Cells'''. | ||
| − | :c) You can also edit the '''Zoom% '''value in a project view that is copied to become a new '''Template'''. When the saved '''Template '''is used again to create a project view, these saved '''Zoom% '''values are used on the new project view’s '''Time Axis Levels'''. | + | :c) You can also '''edit''' the '''Zoom% '''value in a project view that is copied to become a new '''Template'''. When the saved '''Template '''is used again to create a project view, these saved '''Zoom% '''values are used on the new project view’s '''Time Axis Levels'''. |
| − | :d) Subsequent editing any of the corresponding settings in the '''PVP '''form’s '''Time Axis '''tab’s '''Format '''sub-tab does not change the corresponding settings in the '''Template''' form. | + | :d) Subsequent '''editing''' any of the corresponding settings in the '''PVP '''form’s '''Time Axis '''tab’s '''Format '''sub-tab does not change the corresponding settings in the '''Template''' form. |
| − | :e) Settings can be edited in the '''Template '''form but the form must be | + | :e) Settings can be edited in the '''Template '''form but the form must be re-saved so that the '''edited''' settings are available for subsequent use the next time this '''Template''' form is used to represent '''Hidden Time Axis Level Cells'''. |
===The New Non-Linear Time Axis Feature=== | ===The New Non-Linear Time Axis Feature=== | ||
| Line 230: | Line 228: | ||
<center>[[File:P61-0_4_1_9-61-(6)-05082018.png]]</center> | <center>[[File:P61-0_4_1_9-61-(6)-05082018.png]]</center> | ||
| − | <center><P61-0_4_1_9-61-(6)-05082018.png></center> | + | <1--center><P61-0_4_1_9-61-(6)-05082018.png></center--> |
:b) After '''stretching''' the January 2020 '''Time Axis Level Cell '''to the right with a '''drag and drop''' action, the project view looks like this: | :b) After '''stretching''' the January 2020 '''Time Axis Level Cell '''to the right with a '''drag and drop''' action, the project view looks like this: | ||
<center>[[File:P61-0_4_1_9-61-(6A)-05082018.png]]</center> | <center>[[File:P61-0_4_1_9-61-(6A)-05082018.png]]</center> | ||
| − | <center><P61-0_4_1_9-61-(6A)-05082018.png></center> | + | <!--center><P61-0_4_1_9-61-(6A)-05082018.png></center--> |
:c) Note that the '''stretching''' of the '''bottom level Time Axis '''is accompanied by a '''stretching''' of the '''Middle Level''' and '''Top Level '''as shown in the example above. | :c) Note that the '''stretching''' of the '''bottom level Time Axis '''is accompanied by a '''stretching''' of the '''Middle Level''' and '''Top Level '''as shown in the example above. | ||
| Line 246: | Line 244: | ||
<center>[[File:P61-0_4_1_9-61-(8)-05082018.png]]</center> | <center>[[File:P61-0_4_1_9-61-(8)-05082018.png]]</center> | ||
| − | <center><P61-0_4_1_9-61-(8)-05082018.png></center> | + | <!--center><P61-0_4_1_9-61-(8)-05082018.png></center--> |
:b) Selecting multiple '''Time Axis Level Cells '''in any '''Time Axis Level''' and right-clicking on any selected '''Cells '''also accesses the '''context menu '''where most of the '''context menu’s''' command can be used. | :b) Selecting multiple '''Time Axis Level Cells '''in any '''Time Axis Level''' and right-clicking on any selected '''Cells '''also accesses the '''context menu '''where most of the '''context menu’s''' command can be used. | ||
| Line 261: | Line 259: | ||
<center>[[File:P61-0_4_1_9-61-(7)-05082018.png]]</center> | <center>[[File:P61-0_4_1_9-61-(7)-05082018.png]]</center> | ||
| − | <center><P61-0_4_1_9-61-(7)-05082018.png></center> | + | <!--center><P61-0_4_1_9-61-(7)-05082018.png></center--> |
:a) Creating a '''Floating Time Axis '''is done by right-clicking in any '''Row''' to access the '''context menu '''where you want the '''Floating Time Axis Level''' to appear either '''ABOVE''' or '''BELOW '''the selected '''Row '''as shown here: | :a) Creating a '''Floating Time Axis '''is done by right-clicking in any '''Row''' to access the '''context menu '''where you want the '''Floating Time Axis Level''' to appear either '''ABOVE''' or '''BELOW '''the selected '''Row '''as shown here: | ||
| − | <center>[[File:P61-0_4_1_9-61-(7C)- | + | <center>[[File:P61-0_4_1_9-61-(7C)-09062018.png]]</center> |
| − | <center><P61-0_4_1_9-61-(7C)- | + | <!--center><P61-0_4_1_9-61-(7C)-09062018.png></center--> |
:b) If you click the '''Insert floating time axis level''' sub-command to place the '''Top Level Time Axis ABOVE''' the selected '''row''', the project view looks like this: | :b) If you click the '''Insert floating time axis level''' sub-command to place the '''Top Level Time Axis ABOVE''' the selected '''row''', the project view looks like this: | ||
| − | <center>[[File:P61-0_4_1_9-61-(7A)- | + | <center>[[File:P61-0_4_1_9-61-(7A)-09062018.png]]</center> |
| − | <center><P61-0_4_1_9-61-(7A)- | + | <!--center><P61-0_4_1_9-61-(7A)-09062018.png></center--> |
:c) Repeating the process for '''Inserting the''' '''Middle Level Floating Time Axis''' '''ABOVE''' the selected '''Row '''creates '''two levels '''shown below: | :c) Repeating the process for '''Inserting the''' '''Middle Level Floating Time Axis''' '''ABOVE''' the selected '''Row '''creates '''two levels '''shown below: | ||
| − | <center>[[File:P61-0_4_1_9-61-(7B)- | + | <center>[[File:P61-0_4_1_9-61-(7B)-09062018.png]]</center> |
| − | <center><P61-0_4_1_9-61-(7B)- | + | <!--center><P61-0_4_1_9-61-(7B)-09062018.png></center--> |
:d) When the repeated action above is completed, all '''three levels''' of the '''Floating Time Axis '''appear. | :d) When the repeated action above is completed, all '''three levels''' of the '''Floating Time Axis '''appear. | ||
| Line 292: | Line 290: | ||
:c) When you do this, the '''PVP''' form '''Time Axis '''tab is accessed at the '''Time Axis Level '''sub-tab belonging to the '''Floating Time Axis Level''' you originally right-clicked. | :c) When you do this, the '''PVP''' form '''Time Axis '''tab is accessed at the '''Time Axis Level '''sub-tab belonging to the '''Floating Time Axis Level''' you originally right-clicked. | ||
| − | 25) Any manual edits made to a '''Time Axis Level Cell''' is reflected in the corresponding '''Floating Time Axis Level Cell''' with respect to the '''Cell’s format properties''' that can be edited in the '''PVP''' form '''Time Axis '''tab’s three '''Level '''sub-tab property setting controls or using the right-click '''context menu’s Format cell…''' command. | + | 25) Any manual '''edits''' made to a '''Time Axis Level Cell''' is reflected in the corresponding '''Floating Time Axis Level Cell''' with respect to the '''Cell’s format properties''' that can be '''edited''' in the '''PVP''' form '''Time Axis '''tab’s three '''Level '''sub-tab property setting controls or using the right-click '''context menu’s Format cell…''' command. |
| − | 26) Manual edits made to a '''Time Axis Level '''such as editing its '''height''' in the '''PVP''' form '''Time Axis Level '''tabs are not made to the corresponding '''Floating Time Axis Level'''. | + | 26) Manual '''edits''' made to a '''Time Axis Level '''such as editing its '''height''' in the '''PVP''' form '''Time Axis Level '''tabs are not made to the corresponding '''Floating Time Axis Level'''. |
| − | :a) To edit the '''height '''of a '''Time Axis Level''',''' '''use the '''Size '''sub-group control in the '''Formatting '''sub-group controls of the desired '''PVP '''form’s '''Level '''sub-tabs. | + | :a) To '''edit''' the '''height '''of a '''Time Axis Level''',''' '''use the '''Size '''sub-group control in the '''Formatting '''sub-group controls of the desired '''PVP '''form’s '''Level '''sub-tabs. |
| − | :b) To edit the '''height''' of a '''Floating Time Axis Level''', right-click in the desired '''Floating Time Axis Level’s Row Label''', click the '''context menu’s Row height … '''command to access the '''Row height '''form, and use the controls to edit the '''row height '''setting. | + | :b) To '''edit''' the '''height''' of a '''Floating Time Axis Level''', right-click in the desired '''Floating Time Axis Level’s Row Label''', click the '''context menu’s Row height … '''command to access the '''Row height '''form, and use the controls to '''edit''' the '''row height '''setting. |
:c) '''Floating Time Axis Levels '''can differ in '''height''' from each other and from '''Time Axis Levels''' to meet your visualization needs. | :c) '''Floating Time Axis Levels '''can differ in '''height''' from each other and from '''Time Axis Levels''' to meet your visualization needs. | ||
| − | 27) Performing edits on the '''Row''' in which a '''Floating Time Axis Level '''resides either by using the '''Row’s context menu '''commands or the '''Edit Row properties '''form does not make corresponding edits to the properties of the corresponding '''Time Axis Level'''. | + | 27) Performing '''edits''' on the '''Row''' in which a '''Floating Time Axis Level '''resides either by using the '''Row’s context menu '''commands or the '''Edit Row properties '''form does not make corresponding '''edits''' to the properties of the corresponding '''Time Axis Level'''. |
28) Only '''format property '''edits to individual or multiple '''Time Axis Level Cells''' are mirrored in their corresponding '''Floating Time Axis Level Cells''' and vice versa. | 28) Only '''format property '''edits to individual or multiple '''Time Axis Level Cells''' are mirrored in their corresponding '''Floating Time Axis Level Cells''' and vice versa. | ||
| Line 308: | Line 306: | ||
===Enhanced Manual Editing of Timespans (Time Axis Level Cells)=== | ===Enhanced Manual Editing of Timespans (Time Axis Level Cells)=== | ||
| − | 29) By right-clicking on a '''Time Axis''' '''Level Cell''' it can be edited by using the commands in the '''context menu''' as shown here: | + | 29) By right-clicking on a '''Time Axis''' '''Level Cell''' it can be '''edited''' by using the commands in the '''context menu''' as shown here: |
<center>[[File:P61-0_4_1_9-61-(8)-05082018.png]]</center> | <center>[[File:P61-0_4_1_9-61-(8)-05082018.png]]</center> | ||
| − | <center><P61-0_4_1_9-61-(8)-05082018.png></center> | + | <!--center><P61-0_4_1_9-61-(8)-05082018.png></center--> |
| − | 30) Right-click in the '''text label '''column''' '''of a '''Floating Time Axis Level''' to edit the '''Row '''occupied by a '''Floating Time Axis Level '''using the commands in the '''context menu '''as shown below: | + | 30) Right-click in the '''text label '''column''' '''of a '''Floating Time Axis Level''' to '''edit''' the '''Row '''occupied by a '''Floating Time Axis Level '''using the commands in the '''context menu '''as shown below: |
<center>[[File:P61-0_4_1_9-61-(8A)-05082018.png]]</center> | <center>[[File:P61-0_4_1_9-61-(8A)-05082018.png]]</center> | ||
| − | <center><P61-0_4_1_9-61-(8A)-05082018.png></center> | + | <!--center><P61-0_4_1_9-61-(8A)-05082018.png></center--> |
| − | 31) Right-clicking in a '''Floating Time Axis Level Cell '''selects the '''Cell '''and accesses the '''context menu''' to edit the '''Cell''' as shown below: | + | 31) Right-clicking in a '''Floating Time Axis Level Cell '''selects the '''Cell '''and accesses the '''context menu''' to '''edit''' the '''Cell''' as shown below: |
<center>[[File:P61-0_4_1_9-61-(8B)-05082018.png]]</center> | <center>[[File:P61-0_4_1_9-61-(8B)-05082018.png]]</center> | ||
| − | <center><P61-0_4_1_9-61-(8B)-05082018.png></center> | + | <!--center><P61-0_4_1_9-61-(8B)-05082018.png></center--> |
===The New Custom Date Format Feature=== | ===The New Custom Date Format Feature=== | ||
| Line 328: | Line 326: | ||
<center>[[File:P61-0_4_1_9-61-(9)-05082018.png]]</center> | <center>[[File:P61-0_4_1_9-61-(9)-05082018.png]]</center> | ||
| − | <center><P61-0_4_1_9-61-(9)-05082018.png></center> | + | <!--center><P61-0_4_1_9-61-(9)-05082018.png></center--> |
| − | :a) This new feature allows you to create and edit your own '''Date Formats''' which then become available in the dropdown lists of all '''Format date''' dropdown lists in OnePager Pro and Express 6.1. | + | :a) This new feature allows you to '''create and edit''' your own '''Date Formats''' which then become available in the dropdown lists of all '''Format date''' dropdown lists in OnePager Pro and Express 6.1. |
| − | :b) See the articles on '''Custom Date Formats''' at: [[The Custom Date Format Feature for OnePager Pro for Version 6.1 | The Custom Date Format Feature for OnePager Pro]] 22. | + | :b) See the articles on '''Custom Date Formats''' at: [[The Custom Date Format Feature for OnePager Pro for Version 6.1 | The Custom Date Format Feature for OnePager Pro]] <!--22.5.1-61--> or [[The Custom Date Format Feature for OnePager Express for Version 6.1 | The Custom Date Format Feature for OnePager Express]]. <!--22.5.2-61.--> |
===Managing Working Hours and Non-Working Hours=== | ===Managing Working Hours and Non-Working Hours=== | ||
| − | 33) There are cases where schedules are created down to the '''day''' or '''hour levels'''. OnePager 6.1 supports the creation and editing of '''Daily Curtains''' so that you can graphically highlight days of the week. | + | 33) There are cases where schedules are created down to the '''day''' or '''hour levels'''. OnePager 6.1 supports the '''creation and editing''' of '''Daily Curtains''' so that you can graphically highlight days of the week. |
34) Additionally, there are controls for defining '''Working Hours '''and '''Non-Working Hours''' and applying '''color''' to these '''timespans '''in the '''Graph'''. | 34) Additionally, there are controls for defining '''Working Hours '''and '''Non-Working Hours''' and applying '''color''' to these '''timespans '''in the '''Graph'''. | ||
| Line 343: | Line 341: | ||
<center>[[File:P61-0_4_1_9-61-(10)-05082018.png]]</center> | <center>[[File:P61-0_4_1_9-61-(10)-05082018.png]]</center> | ||
| − | <center><P61-0_4_1_9-61-(10)-05082018.png></center> | + | <!--center><P61-0_4_1_9-61-(10)-05082018.png></center--> |
36) In the illustration above, Monday through Friday are defined as having '''Working Times '''in the '''Set Working Times '''form starting at 0800 hours and ending at 1700 hours. Times may also be expressed in 12 hour format. | 36) In the illustration above, Monday through Friday are defined as having '''Working Times '''in the '''Set Working Times '''form starting at 0800 hours and ending at 1700 hours. Times may also be expressed in 12 hour format. | ||
| Line 350: | Line 348: | ||
<center>[[File:P61-0_4_1_9-61-(10A)-06042018.png]]</center> | <center>[[File:P61-0_4_1_9-61-(10A)-06042018.png]]</center> | ||
| − | <center><P61-0_4_1_9-61-(10A)-06042018.png></center> | + | <!--center><P61-0_4_1_9-61-(10A)-06042018.png></center--> |
:a) Since the '''Show Non-Working Hours '''checkbox is checked in the '''PVP '''form '''Time Axis '''tab’s '''Format '''sub-tab as shown in the illustration above, all that needs to be done to select a '''color''' to represent '''Non-Working Hours''' using the standard '''Color Chooser''', click '''Apply '''or '''OK '''in the '''PVP '''form, and the resulting project view appears as shown below: | :a) Since the '''Show Non-Working Hours '''checkbox is checked in the '''PVP '''form '''Time Axis '''tab’s '''Format '''sub-tab as shown in the illustration above, all that needs to be done to select a '''color''' to represent '''Non-Working Hours''' using the standard '''Color Chooser''', click '''Apply '''or '''OK '''in the '''PVP '''form, and the resulting project view appears as shown below: | ||
<center>[[File:P61-0_4_1_9-61-(10B)-06042018.png]]</center> | <center>[[File:P61-0_4_1_9-61-(10B)-06042018.png]]</center> | ||
| − | <center><P61-0_4_1_9-61-(10B)-06042018.png></center> | + | <!--center><P61-0_4_1_9-61-(10B)-06042018.png></center--> |
| − | :b) To clear the '''Non-Working Hours color''' from the project view, click on the '''Color Chooser '''dropdown as shown above and click on the '''No | + | :b) To clear the '''Non-Working Hours color''' from the project view, click on the '''Color Chooser '''dropdown as shown above and click on the '''No Fill''' checkbox in the '''Color Chooser '''form. Then click the '''Apply '''or '''OK''' button in the '''PVP '''form. Doing so clears the '''color''',''' '''closes the '''Color Chooser '''form, and '''applies''' the edit to the project view. |
38) In OnePager Pro and Express 6.1, Monday through Friday are '''preset''' with '''Working Hours '''defined from 8:00 AM to 5:00 PM each weekday as the default setting from the '''Template''' form and in the '''PVP '''form. Saturday and Sunday are defined with all hours as '''Non-Working Hours'''. | 38) In OnePager Pro and Express 6.1, Monday through Friday are '''preset''' with '''Working Hours '''defined from 8:00 AM to 5:00 PM each weekday as the default setting from the '''Template''' form and in the '''PVP '''form. Saturday and Sunday are defined with all hours as '''Non-Working Hours'''. | ||
| Line 380: | Line 378: | ||
<center>[[File:P61-0_4_1_9-61-(11)-05082018.png]]</center> | <center>[[File:P61-0_4_1_9-61-(11)-05082018.png]]</center> | ||
| − | <center><P61-0_4_1_9-61-(11)-05082018.png></center> | + | <!--center><P61-0_4_1_9-61-(11)-05082018.png></center--> |
:b) Controls are provided to '''Add '''a '''Curtain''', '''Copy''' an existing '''Curtain''' entry to create another '''Curtain '''entry, and to '''Delete''' a selected '''Curtain''' entry. | :b) Controls are provided to '''Add '''a '''Curtain''', '''Copy''' an existing '''Curtain''' entry to create another '''Curtain '''entry, and to '''Delete''' a selected '''Curtain''' entry. | ||
| − | :c) You can also edit most '''Curtain''' properties with the controls found in the ''' | + | :c) You can also '''edit''' most '''Curtain''' properties with the controls found in the '''The Grid''' shown above. |
| − | 43) A sample '''Curtain '''created within the ''' | + | 43) A sample '''Curtain '''created within the '''The Grid''' above looks like this: |
<center>[[File:P61-0_4_1_9-61-(11A)-05082018.png]]</center> | <center>[[File:P61-0_4_1_9-61-(11A)-05082018.png]]</center> | ||
| − | <center><P61-0_4_1_9-61-(11A)-05082018.png></center> | + | <!--center><P61-0_4_1_9-61-(11A)-05082018.png></center--> |
:a) In the entry for the new '''Curtain''', you can click the '''Properties''' button and access the '''Curtain Properties '''form to edit the '''Curtain '''just created as shown here: | :a) In the entry for the new '''Curtain''', you can click the '''Properties''' button and access the '''Curtain Properties '''form to edit the '''Curtain '''just created as shown here: | ||
<center>[[File:P61-0_4_1_9-61-(11B)-05082018.png]]</center> | <center>[[File:P61-0_4_1_9-61-(11B)-05082018.png]]</center> | ||
| − | <center><P61-0_4_1_9-61-(11B)-05082018.png></center> | + | <!--center><P61-0_4_1_9-61-(11B)-05082018.png></center--> |
| − | :b) As in previous OnePager Pro and Express versions, '''Curtains''' can be edited exactly like a manually '''inserted Curtain''' by right-clicking''' '''on the '''Curtain '''itself to access the '''Curtain’s context menu''': | + | :b) As in previous OnePager Pro and Express versions, '''Curtains''' can be '''edited''' exactly like a manually '''inserted Curtain''' by right-clicking''' '''on the '''Curtain '''itself to access the '''Curtain’s context menu''': |
<center>[[File:P61-0_4_1_9-61-(11C)-05082018.png]]</center> | <center>[[File:P61-0_4_1_9-61-(11C)-05082018.png]]</center> | ||
| − | <center><P61-0_4_1_9-61-(11C)-05082018.png></center> | + | <!--center><P61-0_4_1_9-61-(11C)-05082018.png></center--> |
:c) Selecting the '''Properties…''' command accesses the standard '''Curtain Properties '''form shown here: | :c) Selecting the '''Properties…''' command accesses the standard '''Curtain Properties '''form shown here: | ||
<center>[[File:P61-0_4_1_9-61-(11D)-05082018.png]]</center> | <center>[[File:P61-0_4_1_9-61-(11D)-05082018.png]]</center> | ||
| + | <!--center><P61-0_4_1_9-61-(11D)-05082018.png></center--> | ||
| − | + | :d) When there are multiple '''Curtains''' they are all listed in the '''The Grid'''. | |
| − | + | ||
| − | :d) When there are multiple '''Curtains''' they are all listed in the ''' | + | |
:e) '''Curtains '''are '''snapshot-dependent'''. | :e) '''Curtains '''are '''snapshot-dependent'''. | ||
| − | :f) For more information on '''Inserted Curtains''', please see the articles at: [[Creating, Editing, and Managing Time Axis Curtains for OnePager Pro for Version 6.1 | Creating, Editing, and Managing Time Axis Curtains for OnePager Pro]] 22. | + | :f) For more information on '''Inserted Curtains''', please see the articles at: [[Creating, Editing, and Managing Time Axis Daily Curtains for OnePager Pro for Version 6.1 | Creating, Editing, and Managing Time Axis Daily Curtains for OnePager Pro]] <!--22.5.5-61--> or [[Creating, Editing, and Managing Time Axis Daily Curtains for OnePager Express for Version 6.1 | Creating, Editing, and Managing Time Axis Daily Curtains for OnePager Express]]. <!--22.5.6-61.--> |
====Creating and Editing Daily Curtains ==== | ====Creating and Editing Daily Curtains ==== | ||
| Line 424: | Line 421: | ||
<center>[[File:P61-0_4_1_9-61-(11E)-05082018.png]]</center> | <center>[[File:P61-0_4_1_9-61-(11E)-05082018.png]]</center> | ||
| − | <center><P61-0_4_1_9-61-(11E)-05082018.png></center> | + | <!--center><P61-0_4_1_9-61-(11E)-05082018.png></center--> |
:a) If you go to the '''PVP '''form '''Time Axis '''tab’s '''Format '''sub-tab you can assign different colors to Sunday and Saturday in the '''Days of the Week and Non-Working Times '''control group as done below: | :a) If you go to the '''PVP '''form '''Time Axis '''tab’s '''Format '''sub-tab you can assign different colors to Sunday and Saturday in the '''Days of the Week and Non-Working Times '''control group as done below: | ||
<center>[[File:P61-0_4_1_9-61-(11F)-05082018.png]]</center> | <center>[[File:P61-0_4_1_9-61-(11F)-05082018.png]]</center> | ||
| − | <center><P61-0_4_1_9-61-(11F)-05082018.png></center> | + | <!--center><P61-0_4_1_9-61-(11F)-05082018.png></center--> |
:b) When these settings are '''Applied''' to the project view, it looks like this: | :b) When these settings are '''Applied''' to the project view, it looks like this: | ||
<center>[[File:P61-0_4_1_9-61-(11G)-05082018.png]]</center> | <center>[[File:P61-0_4_1_9-61-(11G)-05082018.png]]</center> | ||
| − | <center><P61-0_4_1_9-61-(11G)-05082018.png></center> | + | <!--center><P61-0_4_1_9-61-(11G)-05082018.png></center--> |
| − | :c) '''Daily Curtains''' cannot be manually selected or edited in the project view with a left or right-click. However, the properties of all '''Daily Curtains''' as a group can be edited by accessing the '''PVP''' form '''Time Axis''' tab’s '''Format '''sub-tab’s '''Days of the Week and Non-Working Times''' control group. | + | :c) '''Daily Curtains''' cannot be manually selected or '''edited''' in the project view with a left or right-click. However, the properties of all '''Daily Curtains''' as a group can be '''edited''' by accessing the '''PVP''' form '''Time Axis''' tab’s '''Format '''sub-tab’s '''Days of the Week and Non-Working Times''' control group. |
| − | :d) The '''Transparency percentage '''('''%''') and the '''border color '''for all '''Daily Curtains '''can be set and edited using the '''Daily Curtain Transparency:''' and the '''Daily Curtain Border:''' controls provided. | + | :d) The '''Transparency percentage '''('''%''') and the '''border color '''for all '''Daily Curtains '''can be '''set and edited''' using the '''Daily Curtain Transparency:''' and the '''Daily Curtain Border:''' controls provided. |
| − | :e) '''Daily Curtains''' do '''NOT''' appear as entries in the ''' | + | :e) '''Daily Curtains''' do '''NOT''' appear as entries in the '''The Grid'''. |
| − | :f) '''Daily Curtains''' can be eliminated from the project view by editing their '''color''' selection in the standard OnePager '''Color Chooser '''to '''No Fill'''. | + | :f) '''Daily Curtains''' can be eliminated from the project view by '''editing''' their '''color''' selection in the standard OnePager '''Color Chooser '''to '''No Fill'''. |
:g) '''Daily Curtains''' are '''snapshot-independent''', that is, they appear in all snapshots. | :g) '''Daily Curtains''' are '''snapshot-independent''', that is, they appear in all snapshots. | ||
| Line 450: | Line 447: | ||
46) '''Timespans '''are created whenever you manually '''stretch''' or '''compress '''a '''Time Axis Level Cell''' or a '''Floating Time Axis Level Cell'''. | 46) '''Timespans '''are created whenever you manually '''stretch''' or '''compress '''a '''Time Axis Level Cell''' or a '''Floating Time Axis Level Cell'''. | ||
| − | 47) '''Timespans '''can be '''stretched''' or '''compressed''' manually by selecting '''Time Axis Level Cells''' (or '''Floating Time Axis Level Cells''') and using the handlebars to edit their '''widths'''. Whenever you do this, an entry is made in the ''' | + | 47) '''Timespans '''can be '''stretched''' or '''compressed''' manually by selecting '''Time Axis Level Cells''' (or '''Floating Time Axis Level Cells''') and using the handlebars to '''edit''' their '''widths'''. Whenever you do this, an entry is made in the '''The Grid''' of the '''PVP''' form '''Time Axis '''tab '''Format''' sub-tab. |
====Managing Timespans from the PVP Form Time Axis Tab’s Format Sub-Tab==== | ====Managing Timespans from the PVP Form Time Axis Tab’s Format Sub-Tab==== | ||
| − | 48) The ''' | + | 48) The '''The Grid''' in the '''Format '''sub-tab also has the capability to create, and '''edit''' '''Timespans.''' |
| − | :a) As an example, if you manually select a '''Time Axis Level Cell '''in the '''Middle Level''' and '''stretch '''it as shown below, you get the following entry in the ''' | + | :a) As an example, if you manually select a '''Time Axis Level Cell '''in the '''Middle Level''' and '''stretch '''it as shown below, you get the following entry in the '''The Grid''': |
<center>[[File:P61-0_4_1_9-61-(11H)-05082018.png]]</center> | <center>[[File:P61-0_4_1_9-61-(11H)-05082018.png]]</center> | ||
| − | <center><P61-0_4_1_9-61-(11H)-05082018.png></center> | + | <!--center><P61-0_4_1_9-61-(11H)-05082018.png></center--> |
| − | :b) From the ''' | + | :b) From the '''The Grid''' you can turn the entry '''On''' or '''Off''', '''hide''' or '''show''' the selected '''timespan''', '''edit''' an entry’s '''From/To Dates''', and '''edit''' an entry’s '''Zoom%''' (i.e., '''stretch '''or '''compress '''value). |
| − | :c) To clarify, when a ''' | + | :c) To clarify, when a '''The Grid '''entry is '''On''', the entry is '''enabled''' and is considered as an '''enabled '''rule that OnePager 6.1 '''applies''' to the project view. When a '''The Grid''' entry is '''Off''', the entry is '''disabled''' and OnePager 6.1 does '''not apply''' the rule to the project view. |
| − | :d) For ''' | + | :d) For '''The Grid '''entries that have the '''On '''column checkbox checked ('''enabled''') and the entry’s '''Show '''column’s checkbox is checked (or '''On'''), OnePager 6.1 '''shows''' the '''Curtain''' in the project view. Conversely, if the entry’s '''Show''' column’s checkbox is unchecked (or '''Off'''), the '''Curtain '''is '''hidden'''. |
| − | :e) You can also use the '''Timespan Edit Controls''' below the ''' | + | :e) You can also use the '''Timespan Edit Controls''' below the '''The Grid''' to '''Add''', '''Delete''', or '''Copy''' a selected '''Timespan '''entry. |
:f) '''Timespans '''are '''snapshot-independent'''. | :f) '''Timespans '''are '''snapshot-independent'''. | ||
====Managing Timespans with the Time Axis Level Cell Context Menu==== | ====Managing Timespans with the Time Axis Level Cell Context Menu==== | ||
| − | 49) '''Time Axis Level Cells''' can be selected and edited by right-clicking on the '''Cell''' and using the '''context menu''' as shown below: | + | |
| + | 49) '''Time Axis Level Cells''' can be selected and '''edited''' by right-clicking on the '''Cell''' and using the '''context menu''' as shown below: | ||
<center>[[File:P61-0_4_1_9-61-(11I)-05082018.png]]</center> | <center>[[File:P61-0_4_1_9-61-(11I)-05082018.png]]</center> | ||
| − | <center><P61-0_4_1_9-61-(11I)-05082018.png></center> | + | <!--center><P61-0_4_1_9-61-(11I)-05082018.png></center--> |
:a) The '''Hide cell''' command does just that, '''hides '''the '''Time Axis Level Cell '''and any '''Cells '''in lower level '''Time Axes. ''' | :a) The '''Hide cell''' command does just that, '''hides '''the '''Time Axis Level Cell '''and any '''Cells '''in lower level '''Time Axes. ''' | ||
| Line 482: | Line 480: | ||
<center>[[File:P61-0_4_1_9-61-(11J)-05082018.png]]</center> | <center>[[File:P61-0_4_1_9-61-(11J)-05082018.png]]</center> | ||
| − | <center><P61-0_4_1_9-61-(11J)-05082018.png></center> | + | <!--center><P61-0_4_1_9-61-(11J)-05082018.png></center--> |
:c) The '''Unstretch all cells''' command causes all '''Cells '''to revert back to its original '''width''' along with all associated '''Cells''' in adjacent '''Time Axis Levels'''. | :c) The '''Unstretch all cells''' command causes all '''Cells '''to revert back to its original '''width''' along with all associated '''Cells''' in adjacent '''Time Axis Levels'''. | ||
| Line 488: | Line 486: | ||
:d) The '''Time-axis properties …''' command takes you to the '''PVP '''form '''Time Axis '''tab associated with the '''Time Axis Level''' that the selected '''Cell '''happens to occupy. From the form you can edit '''Global Time Axis Properties'''. | :d) The '''Time-axis properties …''' command takes you to the '''PVP '''form '''Time Axis '''tab associated with the '''Time Axis Level''' that the selected '''Cell '''happens to occupy. From the form you can edit '''Global Time Axis Properties'''. | ||
| − | 50) The '''Insert curtain''' command, when selected, is a convenient way to create a '''Curtain''' whose '''Start/End Dates '''are the '''boundaries''' of the selected '''Time Axis Level Cell'''. | + | 50) The '''Insert curtain''' command, when selected, is a convenient way to create a '''Curtain''' whose '''Start/End Dates '''are the '''boundaries''' of the selected '''Time Axis Level Cell'''. |
:a) As an example, performing these steps creates a basic '''Curtain''' with the same '''Start/End Date''' '''boundaries''' as the selected '''Time Axis Level Cell '''as shown below: | :a) As an example, performing these steps creates a basic '''Curtain''' with the same '''Start/End Date''' '''boundaries''' as the selected '''Time Axis Level Cell '''as shown below: | ||
| Line 497: | Line 495: | ||
<center>[[File:P61-0_4_1_9-61-(11K)-05082018.png]]</center> | <center>[[File:P61-0_4_1_9-61-(11K)-05082018.png]]</center> | ||
| − | <center><P61-0_4_1_9-61-(11K)-05082018.png></center> | + | <!--center><P61-0_4_1_9-61-(11K)-05082018.png></center--> |
| − | :b) If you access the '''PVP''' form and go to the '''Time Axis '''tab and its '''Format''' sub-tab you’ll find an entry in the ''' | + | :b) If you access the '''PVP''' form and go to the '''Time Axis '''tab and its '''Format''' sub-tab you’ll find an entry in the '''The Grid''' for the '''Curtain''' as shown below: |
<center>[[File:P61-0_4_1_9-61-(11L)-05082018.png]]</center> | <center>[[File:P61-0_4_1_9-61-(11L)-05082018.png]]</center> | ||
| − | <center><P61-0_4_1_9-61-(11L)-05082018.png></center> | + | <!--center><P61-0_4_1_9-61-(11L)-05082018.png></center--> |
| − | :c) As with '''Timespans '''in the ''' | + | :c) As with '''Timespans '''in the '''The Grid''', you have controls for turning the '''Curtain On''' and '''Off''', editing the '''Curtain’s From/To Dates''', editing the '''Curtain’s color''', and accessing '''Curtain Properties '''form as shown below: |
<center>[[File:P61-0_4_1_9-61-(11M)-05082018.png]]</center> | <center>[[File:P61-0_4_1_9-61-(11M)-05082018.png]]</center> | ||
| − | <center><P61-0_4_1_9-61-(11M)-05082018.png></center> | + | <!--center><P61-0_4_1_9-61-(11M)-05082018.png></center--> |
| − | :d) You can also use the '''Curtain Edit Controls''' below the ''' | + | :d) You can also use the '''Curtain Edit Controls''' below the '''The Grid''' to '''Add''', '''Delete''', or '''Copy''' a selected '''Curtain '''entry. |
:e) Right-clicking on the '''Curtain''' itself accesses the same '''context menu''' that is associated with all '''Curtains'''. | :e) Right-clicking on the '''Curtain''' itself accesses the same '''context menu''' that is associated with all '''Curtains'''. | ||
| Line 521: | Line 519: | ||
52) '''Non-Linear Time Axis Level Cells''', those that are '''stretched''' or '''compressed''', always appear in all snapshots of a project view. | 52) '''Non-Linear Time Axis Level Cells''', those that are '''stretched''' or '''compressed''', always appear in all snapshots of a project view. | ||
| − | 53) '''Daily Curtains''' and '''Non-Working Hour Curtains''' are all '''snapshot-independent'''. That is''', '''these '''Curtain '''types always appear in all snapshots and any edit to them in the project view are applied to all snapshots. | + | 53) '''Daily Curtains''' and '''Non-Working Hour Curtains''' are all '''snapshot-independent'''. That is''', '''these '''Curtain '''types always appear in all snapshots and any '''edit''' to them in the project view are applied to all snapshots. |
| − | 54) '''Curtains '''inserted manually by right-clicking a '''Time Axis Level Cell(s)''' and '''Curtains''' created by '''Adding a Curtain''' as an entry in the ''' | + | 54) '''Curtains '''inserted manually by right-clicking a '''Time Axis Level Cell(s)''' and '''Curtains''' created by '''Adding a Curtain''' as an entry in the '''The Grid '''are '''snapshot-dependent'''. These '''Curtains '''can''' '''appear in '''all snapshots''', or can be turned '''ON''' or '''OFF '''for each''' '''individual snapshot manually. |
55) '''Curtains''' that are '''inserted''' by using the '''Curtain '''button on the OnePager 6.1 ribbon’s '''Insert '''tab are '''snapshot-dependent'''. These legacy '''Curtains''' can look different through editing in any snapshot. | 55) '''Curtains''' that are '''inserted''' by using the '''Curtain '''button on the OnePager 6.1 ribbon’s '''Insert '''tab are '''snapshot-dependent'''. These legacy '''Curtains''' can look different through editing in any snapshot. | ||
| − | 56) It is a rule that''' Non-Linear Time Axis Level Cells''' are also '''snapshot-independent '''regardless if they are created by manual '''drag and drop''' techniques applied to the '''Time Axis''' or if they are created as a '''Timespans '''entry in the ''' | + | 56) It is a rule that''' Non-Linear Time Axis Level Cells''' are also '''snapshot-independent '''regardless if they are created by manual '''drag and drop''' techniques applied to the '''Time Axis''' or if they are created as a '''Timespans '''entry in the '''The Grid.''' |
| − | 57) The OnePager rules that apply to '''snapshot-independent''' and '''snapshot-dependent''' objects apply to '''Curtains''' and '''Timespans''' | + | 57) The OnePager rules that apply to '''snapshot-independent''' and '''snapshot-dependent''' objects apply to '''Curtains''' and '''Timespans'''. |
==Links to Detailed Articles== | ==Links to Detailed Articles== | ||
| + | |||
| + | <center> | ||
| + | ===OnePager's Time Axis Basic Features for Version 6.1=== | ||
{| class="wikitable" | {| class="wikitable" | ||
| − | | [[Time | + | | [[Showing Different Time Units of Time for OnePager Pro for Version 6.1 | Showing Different Units of Time for OnePager Pro]] <!--22.1.1-61--> |
| − | | [[Time | + | | [[Showing Different Time Units of Time for OnePager Express for Version 6.1 | Showing Different Units of Time for OnePager Express]] <!--22.1.2-61--> |
|- | |- | ||
| − | | [[ | + | | [[Changing the Time Axis Background Color and Fill Pattern for OnePager Pro for Version 6.1 | Changing the Time Axis Background Color and Fill Pattern for OnePager Pro]] <!--22.1.3-61--> |
| + | | [[Changing the Time Axis Background Color and Fill Pattern for OnePager Express for Version 6.1 | Changing the Time Axis Background Color and Fill Pattern for OnePager Express]] <!--22.1.4-61--> | ||
|- | |- | ||
| − | | [[ | + | | [[Labeling Time Axis Levels for OnePager Pro for Version 6.1 | Labeling Time Axis Levels for OnePager Pro]] <!--22.1.5-61--> |
| + | | [[Labeling Time Axis Levels for OnePager Express for Version 6.1 | Labeling Time Axis Levels for OnePager Express]] <!--22.1.6-61--> | ||
|- | |- | ||
| − | | [[ | + | | [[Changing the Time Axis Borders for OnePager Pro for Version 6.1 | Changing the Time Axis Borders for OnePager Pro]] <!--22.1.7-61--> |
| + | | [[Changing the Time Axis Borders for OnePager Express for Version 6.1 | Changing the Time Axis Borders for OnePager Express]] <!--22.1.8-61--> | ||
| + | |} | ||
| + | |||
| + | ===OnePager's Time Axis Intermediate Features for Version 6.1=== | ||
| + | |||
| + | {| class="wikitable" | ||
| + | | [[Using Fiscal Years and Weeks for OnePager Pro for Version 6.1 | Using Fiscal Years and Weeks for OnePager Pro]] <!--22.2.1-61--> | ||
| + | | [[Using Fiscal Years and Weeks for OnePager Express for Version 6.1 | Using Fiscal Years and Weeks for OnePager Express]] <!--22.2.2-61--> | ||
|- | |- | ||
| − | | [[ | + | | [[Labeling the Corner for OnePager Pro for Version 6.1 | Labeling the Corner for OnePager Pro]] <!--22.2.3-61--> |
| + | | [[Labeling the Corner for OnePager Express for Version 6.1 | Labeling the Corner for OnePager Express]] <!--22.2.4-61--> | ||
|- | |- | ||
| − | | [[ | + | | [[Creating Count Up and Down on the Time Axis for OnePager Pro for Version 6.1 | Creating Count Up and Down on the Time Axis for OnePager Pro]] <!--22.2.5-61--> |
| + | | [[Creating Count Up and Down on the Time Axis for OnePager Express for Version 6.1 | Creating Count Up and Down on the Time Axis for OnePager Express]] <!--22.2.6-61--> | ||
| + | |} | ||
| + | |||
| + | ===Using, Editing, and Managing the OnePager Time Axis for Version 6.1=== | ||
| + | |||
| + | {| class="wikitable" | ||
| + | | [[Changing the Project View’s Start/Finish Dates for OnePager Pro for Version 6.1 | Changing the Project View’s Start/Finish Dates for OnePager Pro]] <!--22.3.1-61--> | ||
| + | | [[Changing the Project View’s Start/Finish Dates for OnePager Express for Version 6.1 | Changing the Project View’s Start/Finish Dates for OnePager Express]] <!--22.3.2-61--> | ||
|- | |- | ||
| − | | [[ | + | | [[Showing and Hiding Time Axis Levels and Cells for OnePager Pro for Version 6.1 | Showing and Hiding Time Axis Levels and Cells for OnePager Pro]] <!--22.3.3-61--> |
| + | | [[Showing and Hiding Time Axis Levels and Cells for OnePager Express for Version 6.1 | Showing and Hiding Time Axis Levels and Cells for OnePager Express]] <!--22.3.4-61--> | ||
|- | |- | ||
| − | | [[ | + | | [[Re-Ordering Time Axis Levels for OnePager Pro for Version 6.1 | Re-Ordering Time Axis Levels for OnePager Pro]] <!--22.3.5-61--> |
| − | + | | [[Re-Ordering Time Axis Levels for OnePager Express for Version 6.1 | Re-Ordering Time Axis Levels for OnePager Express]] <!--22.3.6-61--> | |
|- | |- | ||
| − | | [[ | + | | [[The Non-Linear Time Axis Feature for OnePager Pro for Version 6.1 | The Non-Linear Time Axis Feature for OnePager Pro]] <!--22.3.7-61--> |
| − | | [[ | + | | [[The Non-Linear Time Axis Feature for OnePager Express for Version 6.1 | The Non-Linear Time Axis Feature for OnePager Express]] <!--22.3.8-61--> |
|- | |- | ||
| − | | [[ | + | | [[The Floating Time Axis Feature for OnePager Pro for Version 6.1 | The Floating Time Axis Feature for OnePager Pro]] <!--22.3.9-61--> |
| − | | [[ | + | | [[The Floating Time Axis Feature for OnePager Express for Version 6.1 | The Floating Time Axis Feature for OnePager Express]] <!--22.3.10-61--> |
| + | |} | ||
| + | |||
| + | ===Editing the Time Axis for Version 6.1=== | ||
| + | |||
| + | {| class="wikitable" | ||
| + | | [[Editing Time Axes with the Project-View Properties Form for OnePager Pro for Version 6.1 | Editing Time Axes with the Project-View Properties Form for OnePager Pro]] <!--22.4.1-61--> | ||
| + | | [[Editing Time Axes with the Project-View Properties Form for OnePager Express for Version 6.1 | Editing Time Axes with the Project-View Properties Form for OnePager Express]] <!--22.4.2-61--> | ||
|- | |- | ||
| − | | [[ | + | | [[Manual Editing the Time Axis for OnePager Pro for Version 6.1 | Manual Editing the Time Axis for OnePager Pro]] <!--22.4.3-61--> |
| − | + | | [[Manual Editing the Time Axis for OnePager Express for Version 6.1 | Manual Editing the Time Axis for OnePager Express]] <!--22.4.4-61--> | |
| − | + | |} | |
| − | | [[Editing the | + | |
| − | + | ===OnePager's Time Axis Advanced Features for Version 6.1=== | |
| − | + | ||
| − | | | + | {| class="wikitable" |
| − | + | | [[The Custom Date Format Feature for OnePager Pro for Version 6.1 | The Custom Date Format Feature for OnePager Pro]] <!--22.5.1-61--> | |
| − | + | | [[The Custom Date Format Feature for OnePager Express for Version 6.1 | The Custom Date Format Feature for OnePager Express]] <!--22.5.2-61--> | |
| − | + | ||
| − | | | + | |
| − | | [[The | + | |
| − | + | ||
| − | + | ||
| − | + | ||
| − | | [[The | + | |
| − | + | ||
| − | + | ||
| − | + | ||
|- | |- | ||
| − | | [[ | + | | [[Managing Working Hours and Non-Working Hours for OnePager Pro for Version 6.1 | Managing Working Hours and Non-Working Hours for OnePager Pro]] <!--22.5.3-61--> |
| − | | [[ | + | | [[Managing Working Hours and Non-Working Hours for OnePager Express for Version 6.1 | Managing Working Hours and Non-Working Hours for OnePager Express]] <!--22.5.4-61--> |
|- | |- | ||
| − | | [[Managing | + | | [[Creating, Editing, and Managing Time Axis Daily Curtains for OnePager Pro for Version 6.1 | Creating, Editing, and Managing Time Axis Daily Curtains for OnePager Pro]] <!--22.5.5-61--> |
| − | | [[Managing | + | | [[Creating, Editing, and Managing Time Axis Daily Curtains for OnePager Express for Version 6.1 | Creating, Editing, and Managing Time Axis Daily Curtains for OnePager Express]] <!--22.5.6-61--> |
|- | |- | ||
| − | | [[ | + | | [[Managing Inserted Curtains for OnePager Pro for Version 6.1 | Managing Inserted Curtains for OnePager Pro]] <!--22.5.7-61--> |
| − | | [[ | + | | [[Managing Inserted Curtains for OnePager Express for Version 6.1 | Managing Inserted Curtains for OnePager Express]] <!--22.5.8-61--> |
|} | |} | ||
| + | </center> | ||
==Related Links== | ==Related Links== | ||
| − | [[Getting Started with Version 6.1 (Portal) | Getting Started (Portal)]] 3.0.1-61 | + | [[Getting Started with Version 6.1 (Portal) | Getting Started (Portal)]] <!--3.0.1-61--> |
| − | [[Basic Workflows for Version 6.1 (Portal) | Basic Workflows (Portal)]] 7.0.1-61 | + | [[Basic Workflows for Version 6.1 (Portal) | Basic Workflows (Portal)]] <!--7.0.1-61--> |
| − | [[Task/Milestone Links Tab | + | [[Task/Milestone Links Tab for Version 6.1 (OnePager Pro) | Task Links Tab for OnePager Pro]] <!--21.12.1-61--> |
| − | [[Task/Milestone Links Tab | + | [[Task/Milestone Links Tab for Version 6.1 (OnePager Express) | Task Links Tab for OnePager Express]] <!--21.12.2-61--> |
| − | [[Main Tab for Version 6.1 | Main Tab]] 21.1.1-61 | + | [[Main Tab for Version 6.1 | Main Tab]] <!--21.1.1-61--> |
| − | [[Page Layout Tab for Version 6.1 | Page Layout]] 21.8.1-61 | + | [[Page Layout Tab for Version 6.1 | Page Layout]] <!--21.8.1-61--> |
| − | [[Advanced Tab for OnePager Pro for Version 6.1 | Advanced Tab for OnePager Pro]] 21.13.1-61 | + | [[Advanced Tab for OnePager Pro for Version 6.1 | Advanced Tab for OnePager Pro]] <!--21.13.1-61--> |
| − | [[Advanced Tab for OnePager Express for Version 6.1 | Advanced Tab-OnePager Express]] 21.14.1-61 | + | [[Advanced Tab for OnePager Express for Version 6.1 | Advanced Tab-OnePager Express]] <!--21.14.1-61--> |
(0.4.1.9-61) | (0.4.1.9-61) | ||
Latest revision as of 15:11, 8 January 2019
Contents
- 1 Introduction to the OnePager 6.1 Time Axis Upgrade
- 1.1 OnePager Time Axis Upgrade Overview
- 1.2 The New Template and Project-View Properties Time Axis Tab and Its Sub-Tabs
- 1.3 The Reorganized Template and Project-View Properties Main Tab
- 1.4 The Reorganized Template and Project-View Properties Advanced Tab
- 1.5 Globally Editing Project View Time Axis Levels and Cells
- 1.6 The New Non-Linear Time Axis Feature
- 1.7 The New Floating Time Axis Feature
- 1.8 Enhanced Manual Editing of Timespans (Time Axis Level Cells)
- 1.9 The New Custom Date Format Feature
- 1.10 Managing Working Hours and Non-Working Hours
- 1.11 Managing Inserted Curtains
- 1.12 Managing Timespans
- 1.13 Curtains, Timespans, and Snapshots
- 2 Links to Detailed Articles
- 3 Related Links
Introduction to the OnePager 6.1 Time Axis Upgrade
OnePager Pro and Express always provide a representation of the Time Axis with up to three levels that can appear at the top and bottom (optional) of the Graph.
OnePager Time Axis Upgrade Overview
1) The OnePager 6.1 Time Axis Upgrade provides:
- a) New Template and Project-View Properties (PVP) form tabs specifically for Time Axis global controls.
- b) Consolidated controls on the Template and PVP form’s Main tabs and Advanced tabs after Time Axis controls moved to the new Time Axis tabs.
- c) More graphic capabilities for tailoring Time Axis Levels and Cells with user defined variable text formats, background colors and fill patterns, variable Time Axis Level heights, and border formats properties.
- d) A capability for Re-ordering the positions of Time Axis Levels within the project view’s Time Axis areas.
- e) A new feature called the Non-Linear Time Axis that provides the capability to manually stretch or compress the width of Time Axis Level Cells on all Time Axis Levels and thereby use more or less horizontal space in the Graph to cover the same timespans.
- f) A Floating Time Axis feature and associated controls for you to place one, two, or three Time Axis Levels within the project view and edit its properties.
- g) Capabilities for you to define, edit, and use your own Custom Date Formats.
- h) Manual editing controls within the Graph for you to edit Time Axis Level and Cell format properties, Floating Time Axis Level and Cell properties, and the properties of all Daily and Non-Working Hour Curtains.
- i) Controls for showing and hiding Time Axis Levels and Cells.
- j) Consolidated controls for specifying/updating the project view’s Start and Finish Date boundaries, Fiscal Year settings, Count Up/Down settings, and placing Time Axis Levels on top and/or bottom of the project view and in output documents.
- k) New controls on the OnePager 6.1 ribbon’s View tab for editing the project view’s Start/Finish Date boundaries.
- l) Consolidated and enhanced controls for you to specify Curtains related to Days of the Week, Working Hours, and Non-Working Hours.
- m) A central Curtains and Timespans Grid (The Grid) that lists all Curtains and stretched or compressed timespans in the project view and its snapshots.
- n) An upgrade to the presentation of %Complete so that you can accurately display %Complete bars in your project views that match the %Complete bars in Microsoft Project’s Gantt Charts when you configure the Microsoft Project Calendar with appropriate Working and Non-Working Time.
2) The Time Axis Upgrade features in OnePager 6.1 are significant enhancements to previous versions of OnePager so you can be more creative in tailoring your project views to meet the specific needs of schedule presentations.
3) The following sub-sections provide more detail on these features, functions, and controls with some examples.
The New Template and Project-View Properties Time Axis Tab and Its Sub-Tabs
4) Since the Template and PVP form’s Time Axis tabs are almost identical, the PVP form’s Time Axis tab is used in the illustrations below.
Calendar Sub-Tab
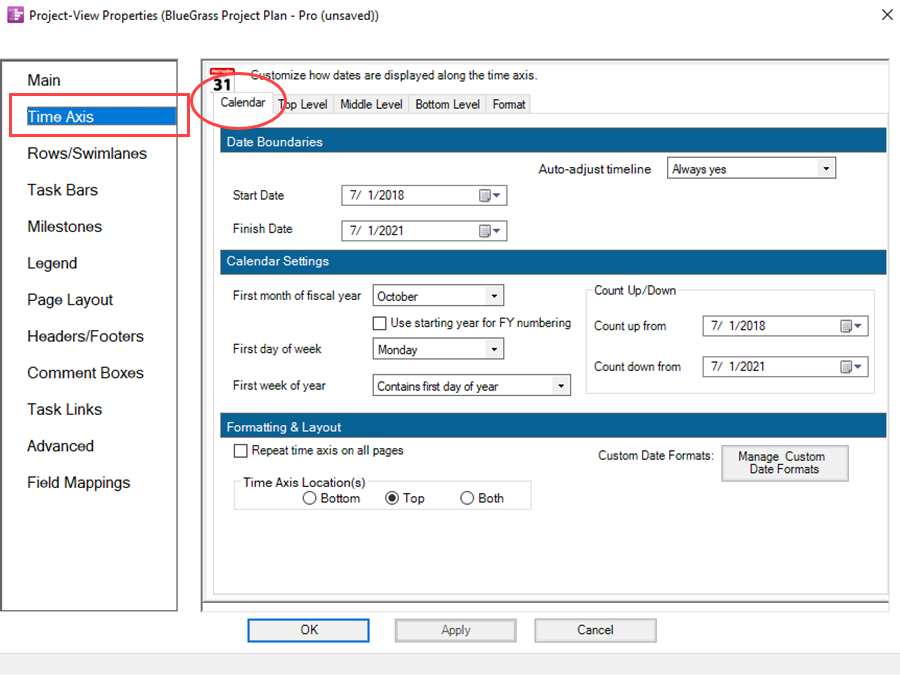
5) The Calendar Sub-Tab looks like this:
Middle Level Sub-Tab
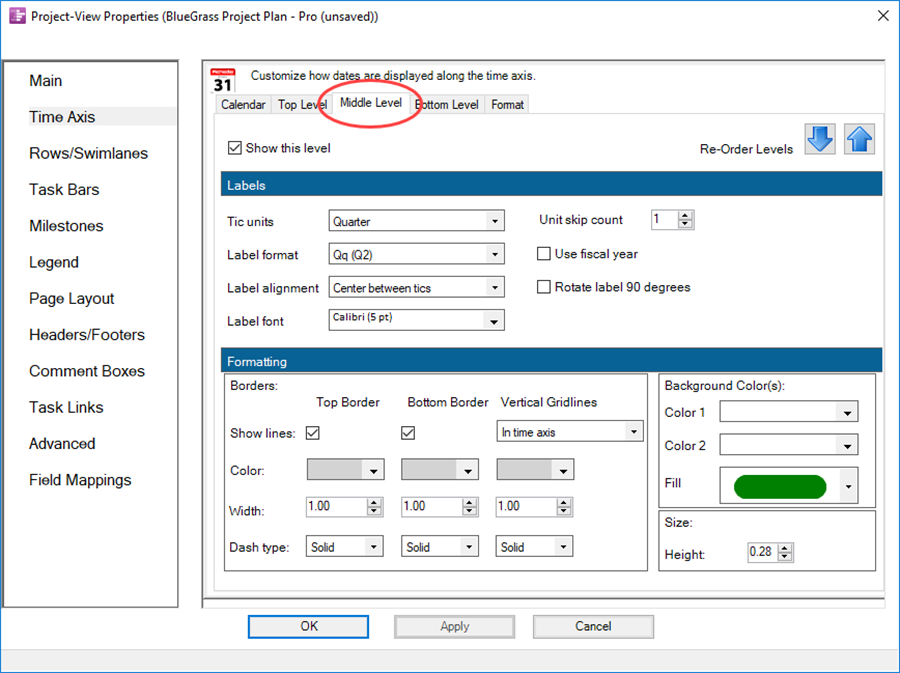
6) The Middle Level Sub-Tab, which is typical of the three such sub-tabs, looks like this:
Format Sub-Tab
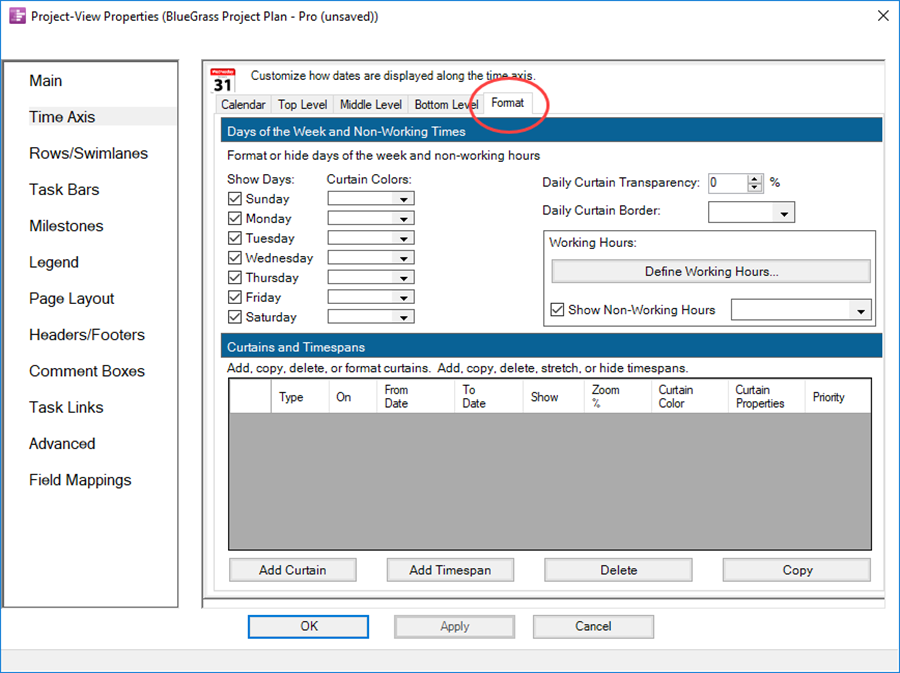
7) The Format Sub-Tab looks like this:
The Reorganized Template and Project-View Properties Main Tab
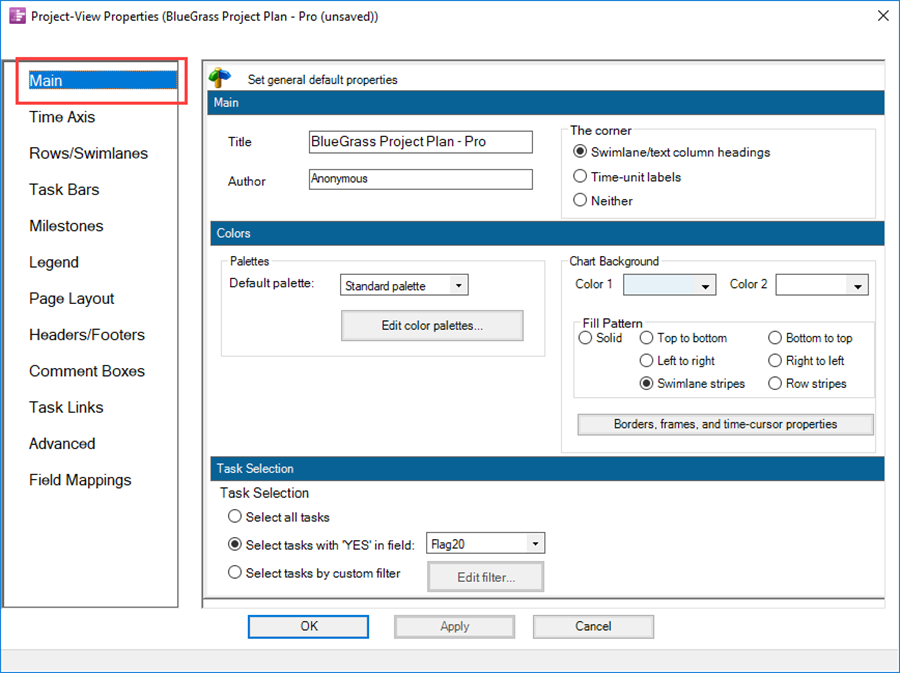
8) Since the reorganized Template and PVP form’s Main tabs are almost identical, the reorganized PVP form’s Main tab is used in the illustration below:
The Reorganized Template and Project-View Properties Advanced Tab
9) Since the updated Template and PVP form’s Advanced tabs are almost identical, the reorganized PVP form’s Advanced tab is used in the illustration below:
Globally Editing Project View Time Axis Levels and Cells
10) Global edits are made in the Template form for all project views created with that Template. Project views can be edited with the Project-View Properties (PVP) form for all editable graphic elements. The examples that follow can be made in either form but most use the PVP form.
11) Below is a sample project view showing some edits in the three Time Axes for level height, cell text color, background colors, and fill patterns:

Editing the Project View’s Start/Finish Date Boundaries
12) In previous OnePager versions setting the Start/Finish Date boundaries for the project view was in the PVP form’s Main tab. These controls are now consolidated in the PVP form’s new Time Axis tab at the Calendar sub-tab as shown here:
- a) The Start Date and Finish Date boundaries can be edited by accessing the Date Picker dropdown as shown below:
- b) Making edits to the Start Date and/or Finish Date boundaries resets the Date Boundaries for the project view.
- c) Another way to edit the project view’s Date Boundaries is to use the Start and Finish Date Calendars now available on the OnePager 6.1 ribbon’s View tab in the Dates group as shown here:

Showing and Hiding Time Axis Levels and Cells
13) Time Axis Level Cells and Floating Time Axis Level Cells can be hidden to create timespan gaps in the timeline. The following example shows the creation of such a timespan gap:
- a) Below is the original Time Axis with all Cells shown:

- b) You can manually select the months of September through November of 2019 (with a CTL+Left-Click) and hide the cells by a right-click on a selected Cell to get to the context menu and the Hide cell command as shown below:

- c) Clicking the Hide cell command results in the project view looking like this:

- d) As the illustration above shows, a three month timespan is hidden in the gap. OnePager 6.1 retains a record of this in the table found in the PVP form Time Axis tab Format sub-tab’s Curtains and Timespans control group as shown below:
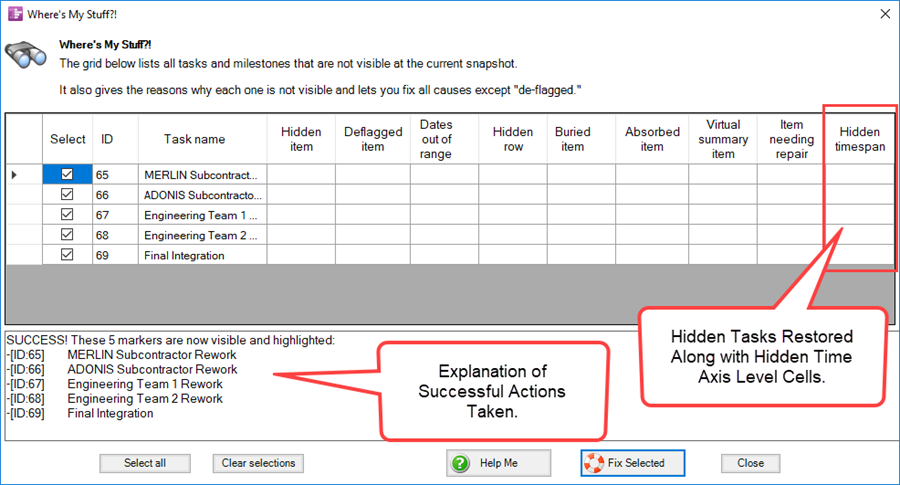
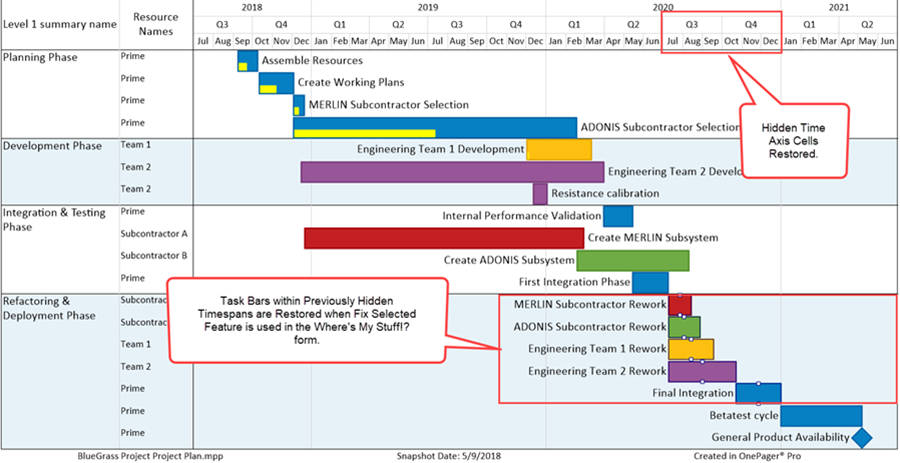
- e) If, in the course of hiding Time Axis Level Cells, tasks/milestones become hidden, entries are made in the Where’s My Stuff!? form as shown in the sequence below:
- i) Select two Quarterly Time Axis Level Cells to be hidden as shown below:
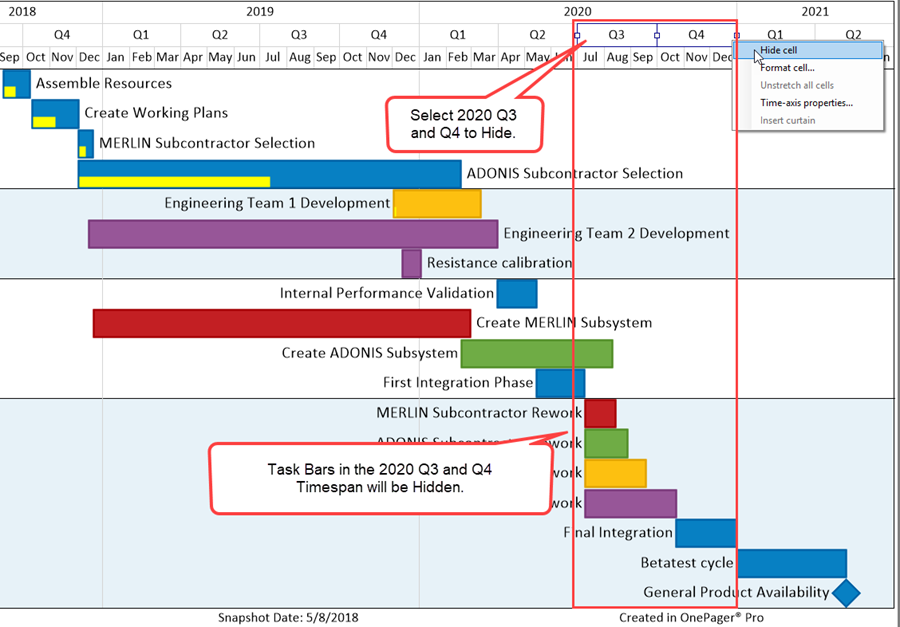
- ii) After hiding the two Quarterly Time Axis Level Cells the project view looks like this in the Where’s My Stuff!? form:
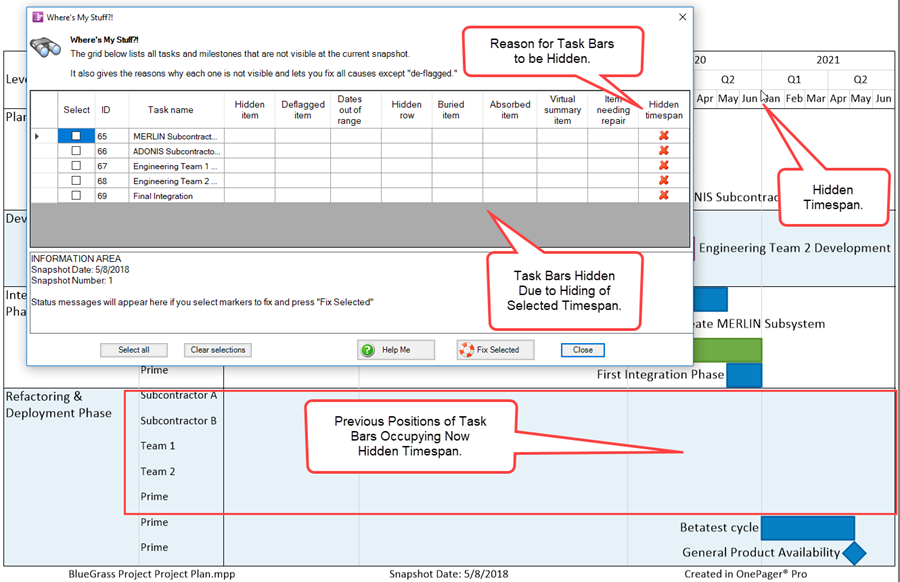
- iv) Clicking the Fix Selected button updates the Where’s My Stuff!? form to look like this:
- v) The action restores the five selected tasks to visibility along with their associated Quarterly Time Axis Level Cells as shown below:
- vi) For more information on the Where’s My Stuff!? form, see the article at: Managing Hidden Tasks and Milestones Using "Where's My Stuff?!".
- f) Hidden Time Axis Level Cells can be restored by using the controls on the OnePager 6.1 ribbon Home tab’s Show/Hide dropdown menu by clicking the Show All Time Axis Cells command as seen here:
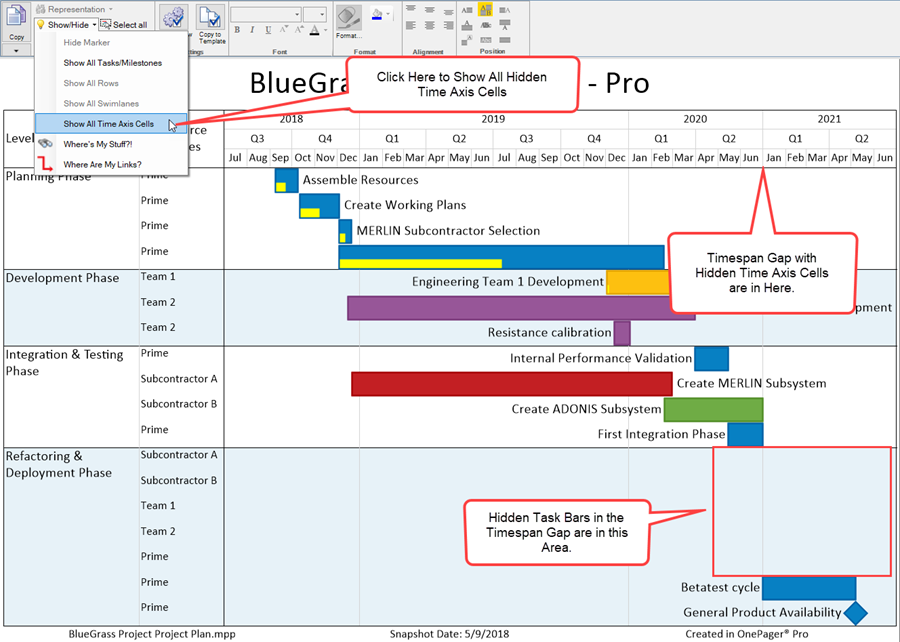
- g) After clicking the Show All Time Axis Cells command, the five hidden month Time Axis Level Cells become shown.
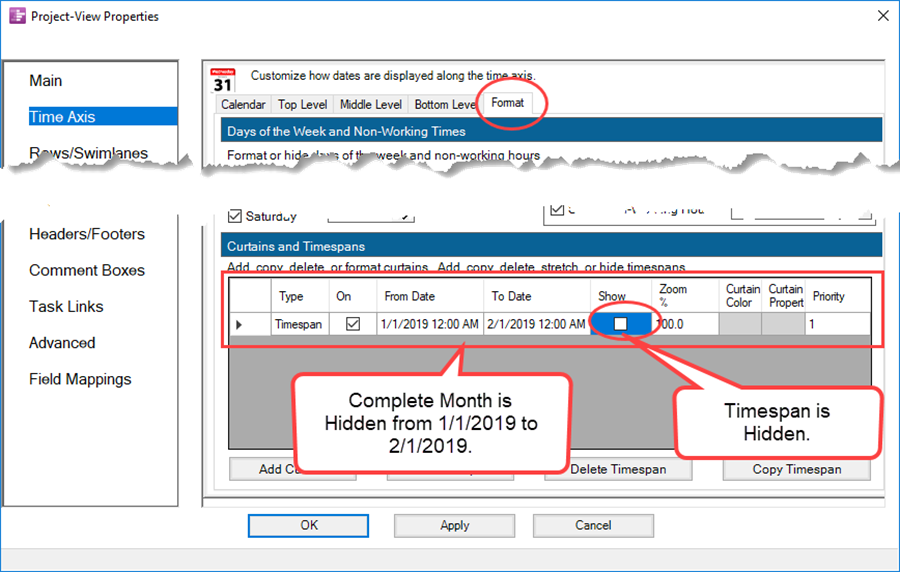
14) The dates used in the The Grid to define the hidden timespan include not only the date for From/To Dates but the time of day as well.
- a) If you just specify dates, OnePager 6.1 assumes that the From Date starts at midnight on that day and the To Date ends a minute before midnight on that day.
- b) To completely specify the timespan for a hidden Time Axis Level Cell it is important to make sure that the timespan is complete.
- c) As an example, to hide the month of January 2019, the From Date should be 1/1/2019 and the To Date should be 2/1/2019 as shown here:
15) Hiding Time Axis Level Cells overrides all other settings that you specify by way of Flagging tasks for import or any specified Conditional Import rules you defined. Although the import takes place, hidden Time Axis Level Cells govern what is shown after import.
Re-ordering Time Axis Levels
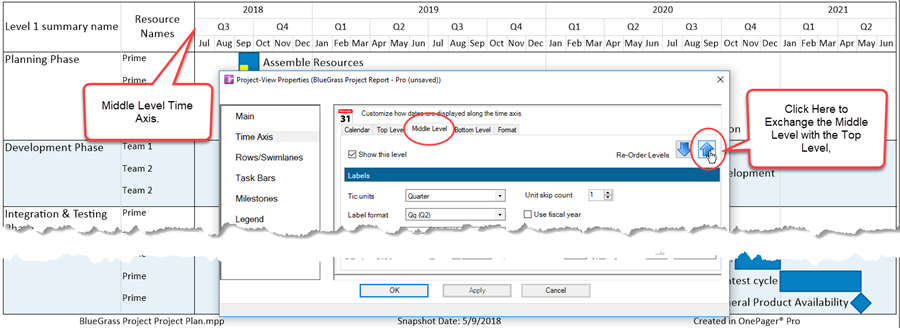
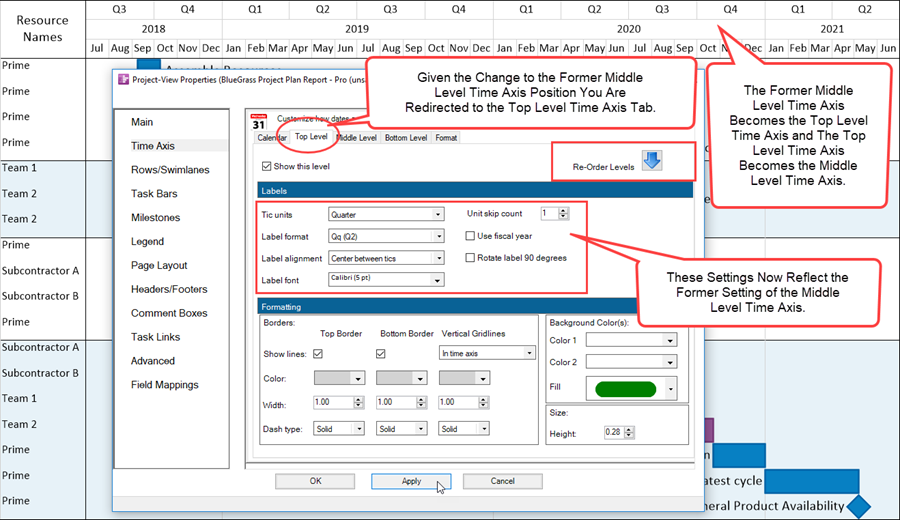
16) In addition to being able to now easily hide Time Axis Levels Cells, you can also Re-order Time Axis Level positions. The following example illustrates this:
- a) Given the project view below where the Top, Middle, and Bottom Time Axis Levels in Year, Quarter, and Month are ordered from top to bottom, you can Re-order the Middle Level to the Top Level by clicking the up arrow in the Re-Order Levels control group:
- b) When you click the Apply or OK button in the PVP form the Top and Middle Levels are Re-ordered as shown here:
Saving Time Axis Level Cell Settings in the Template Form
17) OnePager 6.1 allows you to save the settings for a project view as a new Template with a Template name of your choosing.
- a) This can be done any time after creating or editing a project view by clicking the Copy to Template button on the OnePager Pro or Express 6.1 ribbon’s Home tab as shown below:

- b) For more information on the Copy to Template function, please see the article at: Managing the Current Template.
18) If your project view contains hidden Time Axis Level Cells, these settings are copied to the new Template form and saved.
19) When the Template form you previously saved is used to create a NEW project view, that project view reflects the hidden Time Axis Level Cells you previously created.
- a) In the saved Template form, the hidden Time Axis Level Cells are represented in the The Grid as shown in the example below:
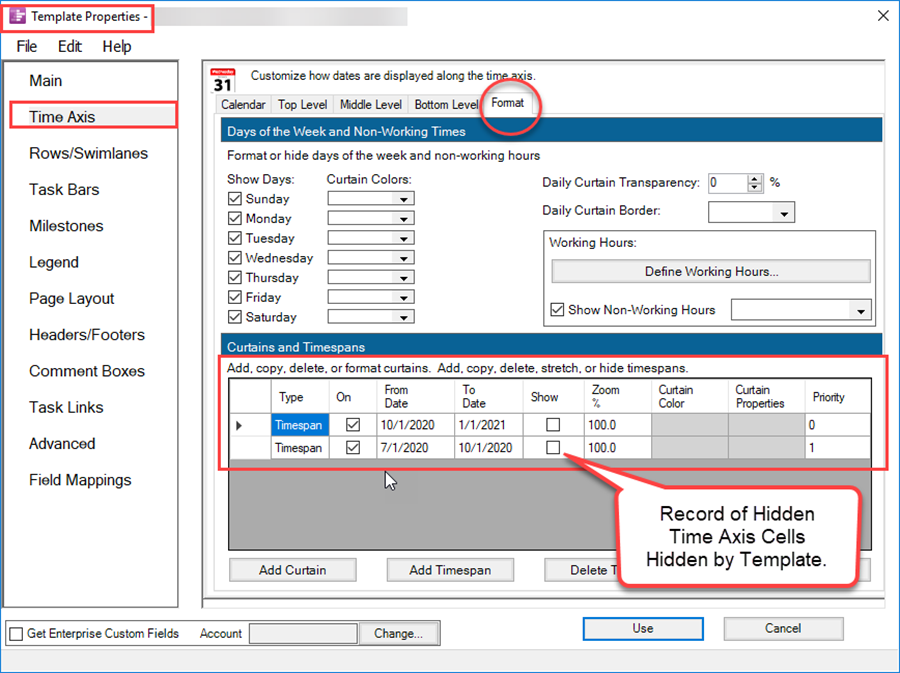
- b) When the above Template form is again used, any Time Axis Level Cells that are between the From Date and To Date are treated as hidden Time Axis Level Cells.
- c) You can also edit the Zoom% value in a project view that is copied to become a new Template. When the saved Template is used again to create a project view, these saved Zoom% values are used on the new project view’s Time Axis Levels.
- d) Subsequent editing any of the corresponding settings in the PVP form’s Time Axis tab’s Format sub-tab does not change the corresponding settings in the Template form.
- e) Settings can be edited in the Template form but the form must be re-saved so that the edited settings are available for subsequent use the next time this Template form is used to represent Hidden Time Axis Level Cells.
The New Non-Linear Time Axis Feature
20) Below is an example of creating a Non-Linear Time Axis representation in the project view in the Bottom Level Time Axis.
- a) First the original Bottom Level Time Axis representation with the Cell to be stretched selected with a left-click is shown here:
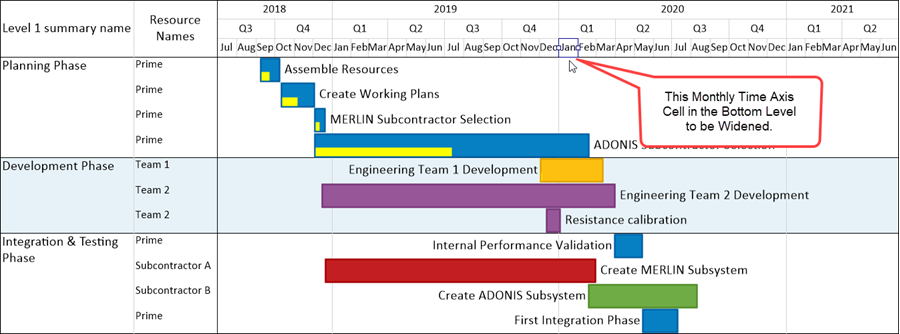
<1--center><P61-0_4_1_9-61-(6)-05082018.png></center-->
- b) After stretching the January 2020 Time Axis Level Cell to the right with a drag and drop action, the project view looks like this:
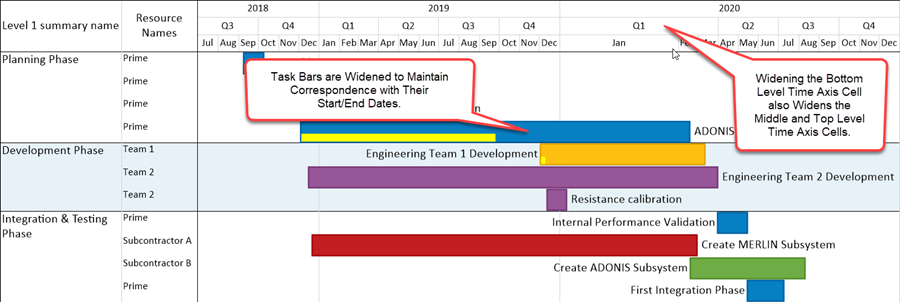
- c) Note that the stretching of the bottom level Time Axis is accompanied by a stretching of the Middle Level and Top Level as shown in the example above.
d) Additionally, any task/milestones within the timespan stretched also appear to be stretched, but their Start/End Dates are not changed.
21) You can select multiple Time Axis Level Cells using the CTL+Left-Click method in a single or in multiple Time Axis Levels.
- a) Selecting a single Time Axis Level Cell in any Time Axis Level allows you to further right-click on the selected Cell, access the Time Axis Level’s context menu, and use any of the commands in the context menu as shown below:

- b) Selecting multiple Time Axis Level Cells in any Time Axis Level and right-clicking on any selected Cells also accesses the context menu where most of the context menu’s command can be used.
22) Selecting multiple Time Axis Level Cells in different Time Axis Levels with the intent of stretching all the selected Cells is not supported.
- a) If this is attempted, OnePager 6.1 only stretches those selected Time Axis Level Cells in the Time Axis Level where you used the mouse to stretch one of the selected Cells.
- b) Time Axis Level Cells in other Time Axis Levels are de-selected before the stretch drag and drop operation is started.
The New Floating Time Axis Feature
23) Below is a sample of an inserted Floating Time Axis:
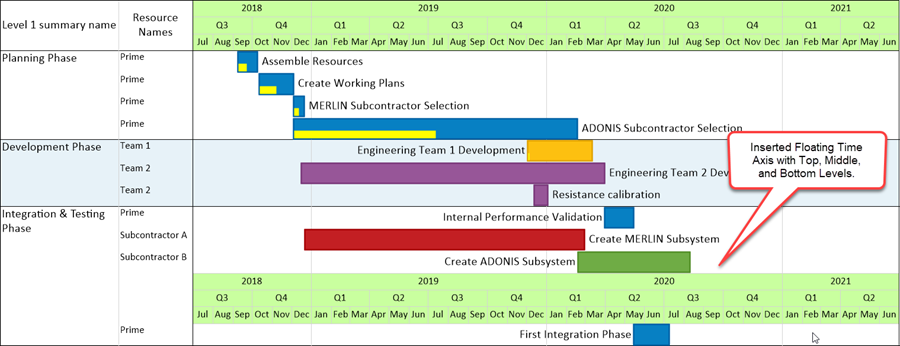
- a) Creating a Floating Time Axis is done by right-clicking in any Row to access the context menu where you want the Floating Time Axis Level to appear either ABOVE or BELOW the selected Row as shown here:
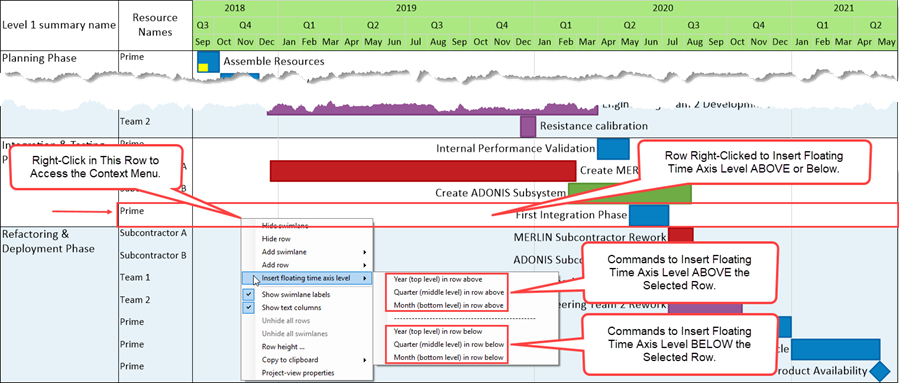
- b) If you click the Insert floating time axis level sub-command to place the Top Level Time Axis ABOVE the selected row, the project view looks like this:
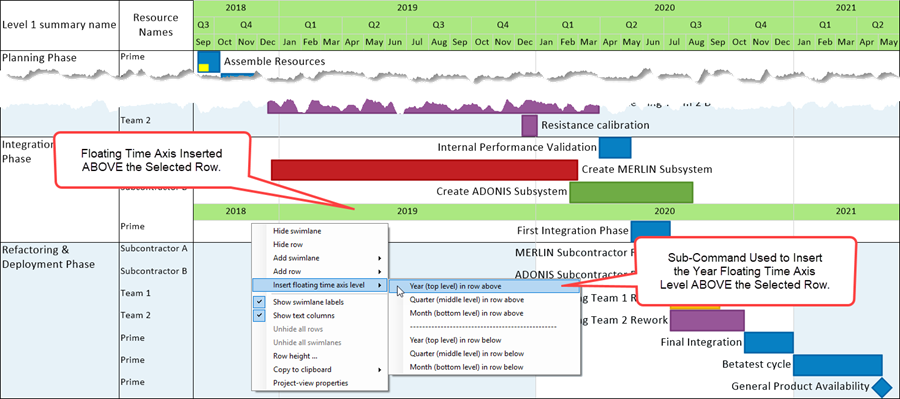
- c) Repeating the process for Inserting the Middle Level Floating Time Axis ABOVE the selected Row creates two levels shown below:
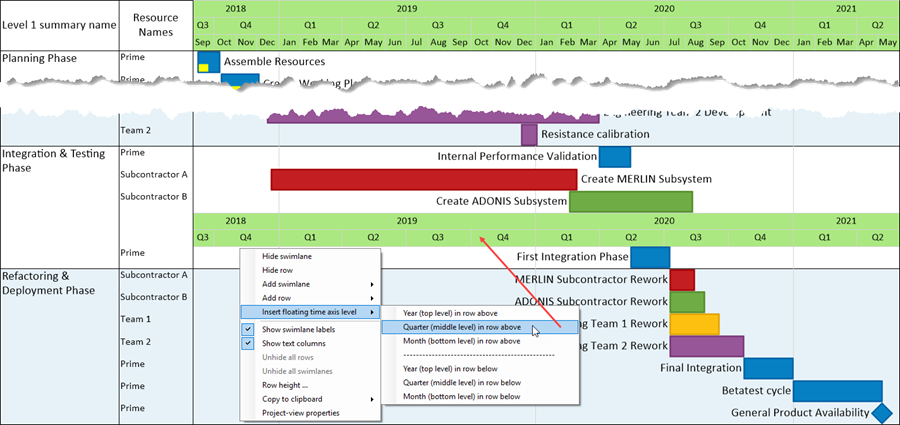
- d) When the repeated action above is completed, all three levels of the Floating Time Axis appear.
- e) The same procedure can be used to Insert Floating Time Axis Levels BELOW the selected Row by accessing the context menu in the desired Row and using the alternate set of sub-commands that place Floating Time Axis Levels BELOW the selected Row.
- f) Several individual or sets of Floating Time Axis Levels can be inserted in the Graph.
24) If you are not sure which Time Axis Level was inserted as a Floating Time Axis, you can always do the following to double-check:
- a) Right-click on any Time Axis Level Cell in the Floating Time Axis in question which accesses the context menu.
- b) Then click the Project-view properties command as shown in the above illustration.
- c) When you do this, the PVP form Time Axis tab is accessed at the Time Axis Level sub-tab belonging to the Floating Time Axis Level you originally right-clicked.
25) Any manual edits made to a Time Axis Level Cell is reflected in the corresponding Floating Time Axis Level Cell with respect to the Cell’s format properties that can be edited in the PVP form Time Axis tab’s three Level sub-tab property setting controls or using the right-click context menu’s Format cell… command.
26) Manual edits made to a Time Axis Level such as editing its height in the PVP form Time Axis Level tabs are not made to the corresponding Floating Time Axis Level.
- a) To edit the height of a Time Axis Level, use the Size sub-group control in the Formatting sub-group controls of the desired PVP form’s Level sub-tabs.
- b) To edit the height of a Floating Time Axis Level, right-click in the desired Floating Time Axis Level’s Row Label, click the context menu’s Row height … command to access the Row height form, and use the controls to edit the row height setting.
- c) Floating Time Axis Levels can differ in height from each other and from Time Axis Levels to meet your visualization needs.
27) Performing edits on the Row in which a Floating Time Axis Level resides either by using the Row’s context menu commands or the Edit Row properties form does not make corresponding edits to the properties of the corresponding Time Axis Level.
28) Only format property edits to individual or multiple Time Axis Level Cells are mirrored in their corresponding Floating Time Axis Level Cells and vice versa.
Enhanced Manual Editing of Timespans (Time Axis Level Cells)
29) By right-clicking on a Time Axis Level Cell it can be edited by using the commands in the context menu as shown here:

30) Right-click in the text label column of a Floating Time Axis Level to edit the Row occupied by a Floating Time Axis Level using the commands in the context menu as shown below:

31) Right-clicking in a Floating Time Axis Level Cell selects the Cell and accesses the context menu to edit the Cell as shown below:

The New Custom Date Format Feature
32) The Top Level Time Axis shown below has a Custom Date Format:
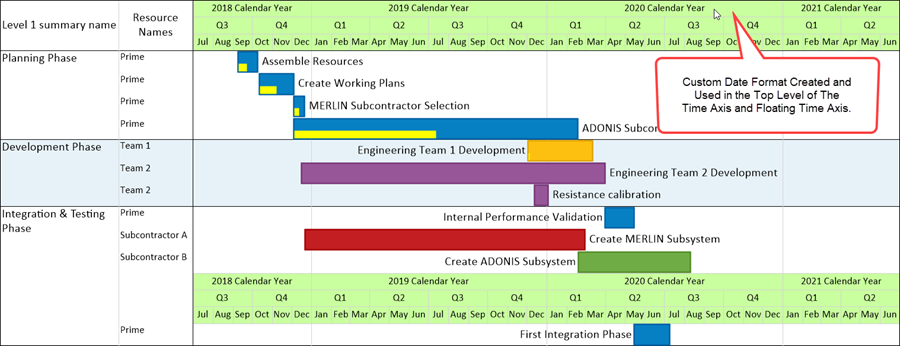
- a) This new feature allows you to create and edit your own Date Formats which then become available in the dropdown lists of all Format date dropdown lists in OnePager Pro and Express 6.1.
- b) See the articles on Custom Date Formats at: The Custom Date Format Feature for OnePager Pro or The Custom Date Format Feature for OnePager Express.
Managing Working Hours and Non-Working Hours
33) There are cases where schedules are created down to the day or hour levels. OnePager 6.1 supports the creation and editing of Daily Curtains so that you can graphically highlight days of the week.
34) Additionally, there are controls for defining Working Hours and Non-Working Hours and applying color to these timespans in the Graph.
35) These controls for managing Daily Curtains and Working Hours/Non-Working Hours are in the PVP form Time Axis tab’s Format sub-tab and look like this:
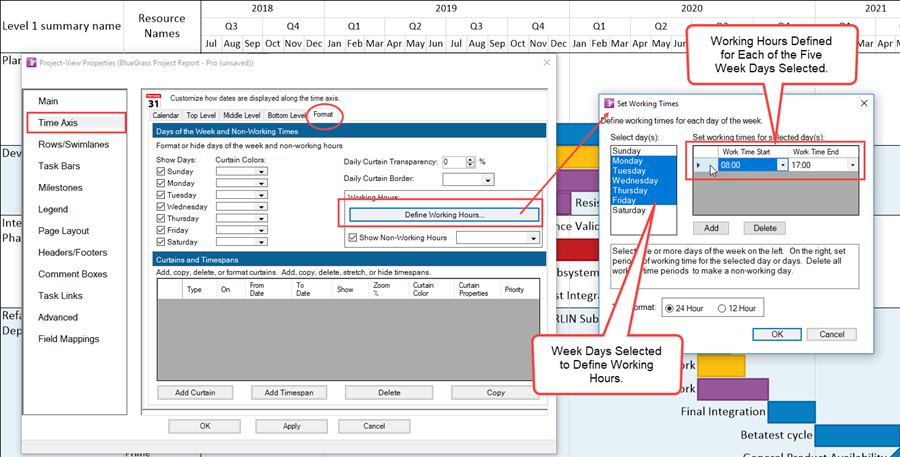
36) In the illustration above, Monday through Friday are defined as having Working Times in the Set Working Times form starting at 0800 hours and ending at 1700 hours. Times may also be expressed in 12 hour format.
37) Using these settings as an example of highlighting Non-Working Hours, if you create a project view that is two weeks in duration it can look something like this:

- a) Since the Show Non-Working Hours checkbox is checked in the PVP form Time Axis tab’s Format sub-tab as shown in the illustration above, all that needs to be done to select a color to represent Non-Working Hours using the standard Color Chooser, click Apply or OK in the PVP form, and the resulting project view appears as shown below:
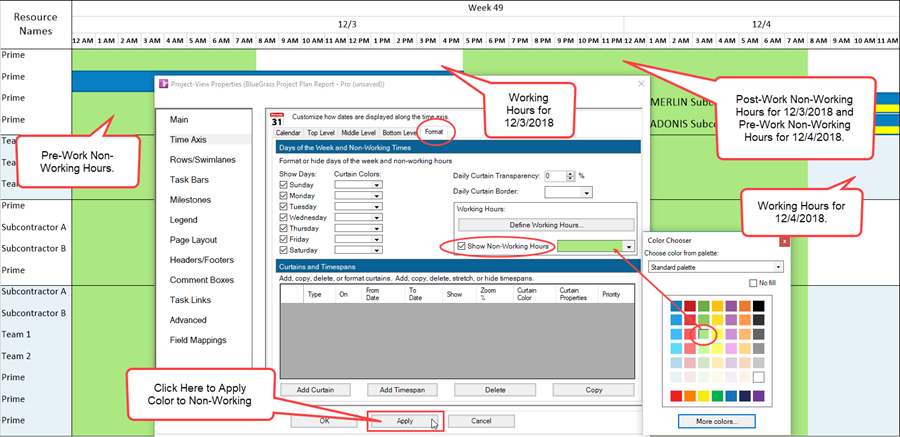
- b) To clear the Non-Working Hours color from the project view, click on the Color Chooser dropdown as shown above and click on the No Fill checkbox in the Color Chooser form. Then click the Apply or OK button in the PVP form. Doing so clears the color, closes the Color Chooser form, and applies the edit to the project view.
38) In OnePager Pro and Express 6.1, Monday through Friday are preset with Working Hours defined from 8:00 AM to 5:00 PM each weekday as the default setting from the Template form and in the PVP form. Saturday and Sunday are defined with all hours as Non-Working Hours.
39) Caution: If you uncheck the Show Non-Working Hours checkbox, the project view hides all Non-Working Hours.
- a) Taking this action can cause the project view’s width to contract as hiding Non-Working Hours causes timespans representing days in the Time Axis to be shorter across the entire project view’s timeline.
- b) Rechecking the Show Non-Working Hours checkbox restores all these hidden timespans to the project view from the project view’s Start Date to Finish Date boundaries.
Managing Inserted Curtains
40) In previous version of OnePager Pro and Express Curtains could only be inserted from the OnePager Insert ribbon using the Curtains button which accessed the Curtains Properties form where the desired Curtain’s format properties are established.
41) The Curtains feature in OnePager Pro and Express 6.1 is enhanced to provide an additional way to create and manage Curtains and provide a means edit them.
Inserting and Managing Curtains
42) In addition to being able to insert manual Curtains using the Curtain button on the OnePager 6.1 ribbon’s Insert tab, OnePager Pro and Express version 6.1 adds a new capability to insert Curtains from within the PVP/Template form’s Time Axis tab.
- a) The PVP form Time Axis tab’s Format sub-tab shown below:
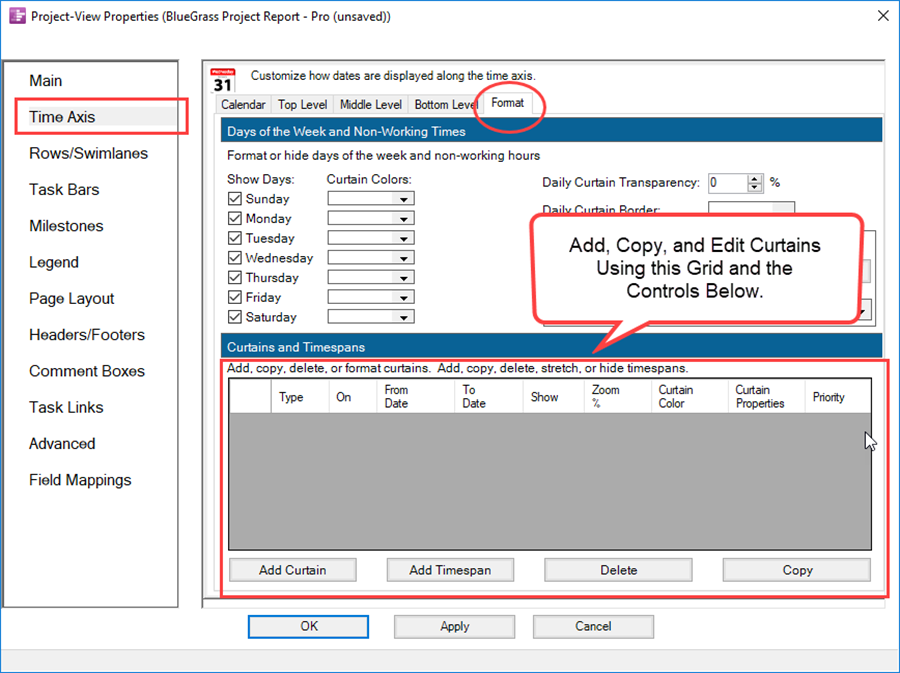
- b) Controls are provided to Add a Curtain, Copy an existing Curtain entry to create another Curtain entry, and to Delete a selected Curtain entry.
- c) You can also edit most Curtain properties with the controls found in the The Grid shown above.
43) A sample Curtain created within the The Grid above looks like this:
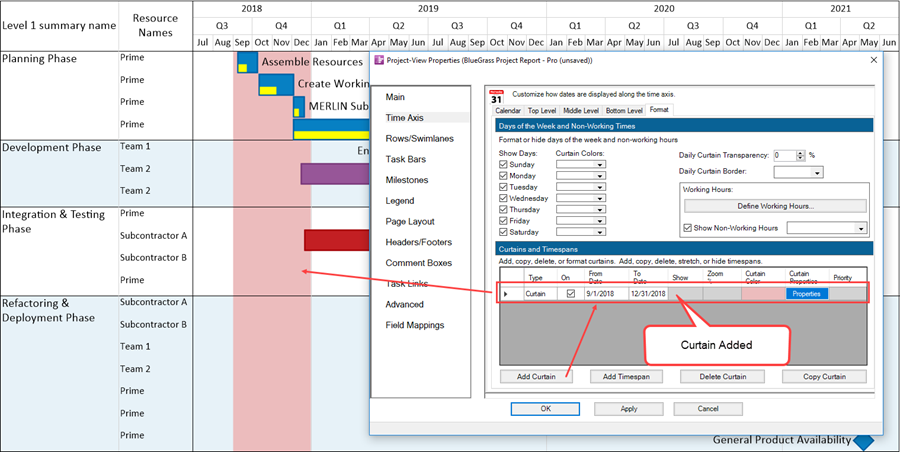
- a) In the entry for the new Curtain, you can click the Properties button and access the Curtain Properties form to edit the Curtain just created as shown here:
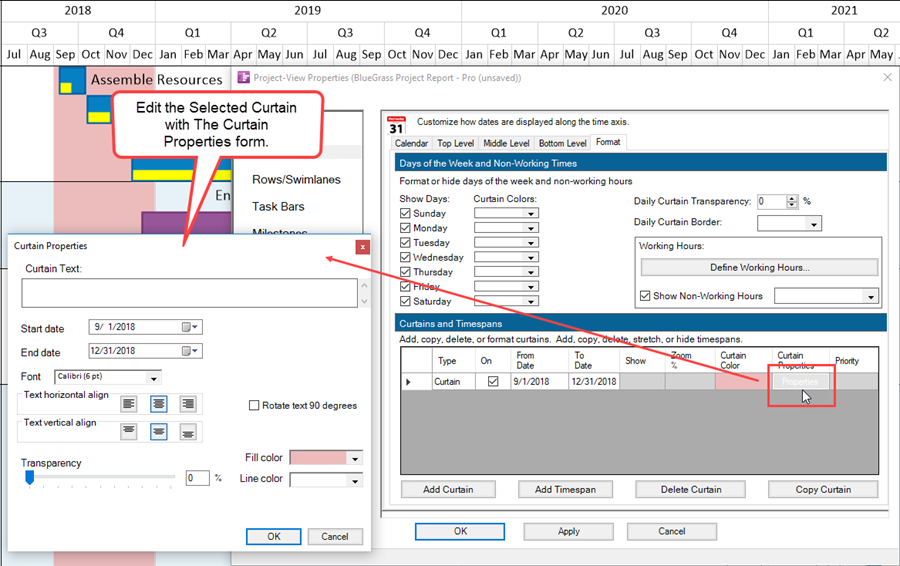
- b) As in previous OnePager Pro and Express versions, Curtains can be edited exactly like a manually inserted Curtain by right-clicking on the Curtain itself to access the Curtain’s context menu:
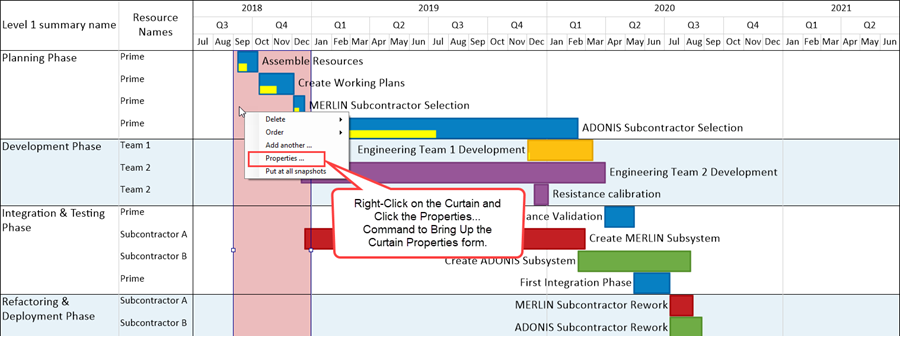
- c) Selecting the Properties… command accesses the standard Curtain Properties form shown here:
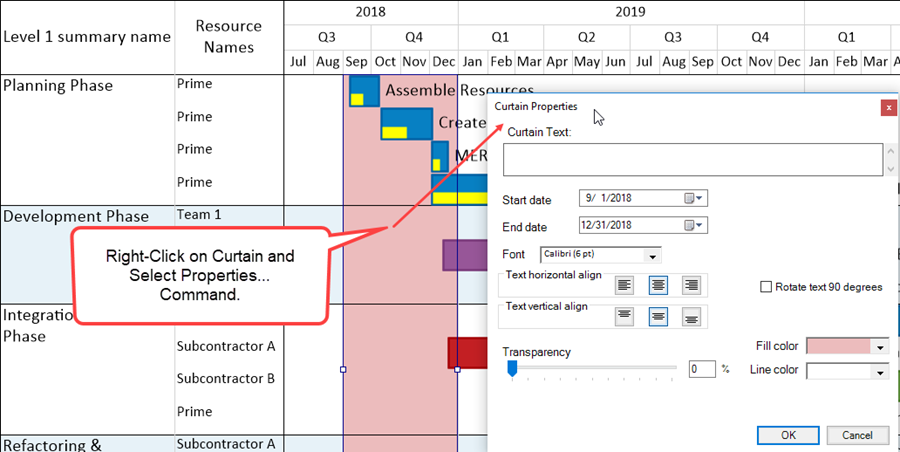
- d) When there are multiple Curtains they are all listed in the The Grid.
- e) Curtains are snapshot-dependent.
- f) For more information on Inserted Curtains, please see the articles at: Creating, Editing, and Managing Time Axis Daily Curtains for OnePager Pro or Creating, Editing, and Managing Time Axis Daily Curtains for OnePager Express.
Creating and Editing Daily Curtains
44) OnePager Pro and Express 6.1 have a new feature called Daily Curtains that allows you to add colored Curtains throughout the project view for specific days of the week.
- a) This new feature is useful when it is important to visualize a particular day or days in a week that have special meaning.
- b) The most common usage is to display Daily Curtains for weekend days.
45) Typically, Daily Curtains are used in project views where the timeline is short, say two weeks or less as shown below:
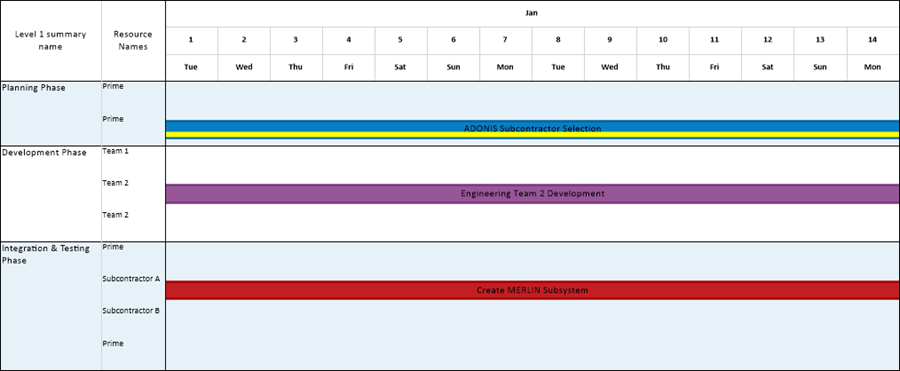
- a) If you go to the PVP form Time Axis tab’s Format sub-tab you can assign different colors to Sunday and Saturday in the Days of the Week and Non-Working Times control group as done below:
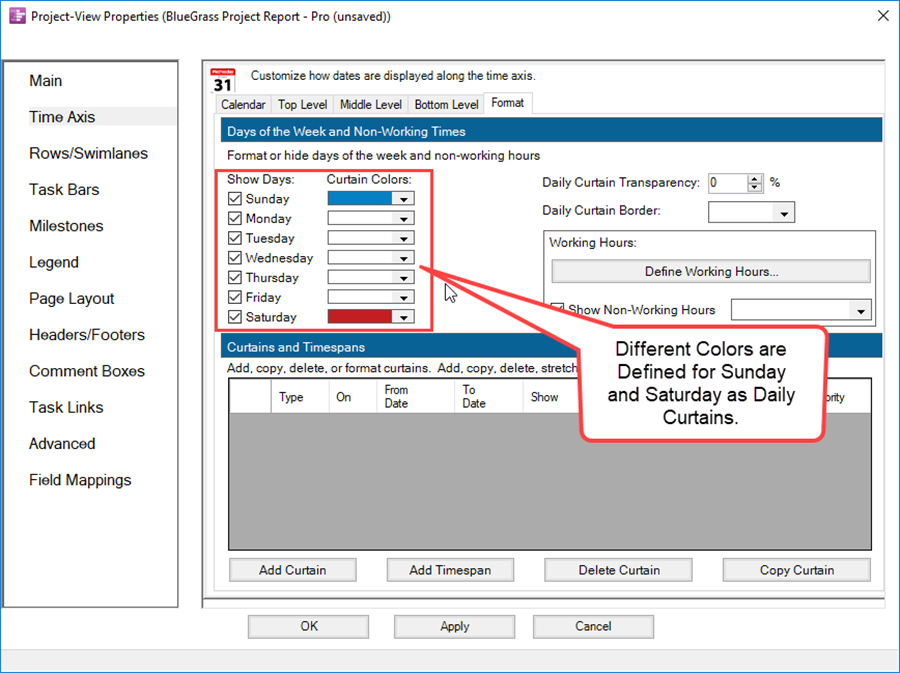
- b) When these settings are Applied to the project view, it looks like this:
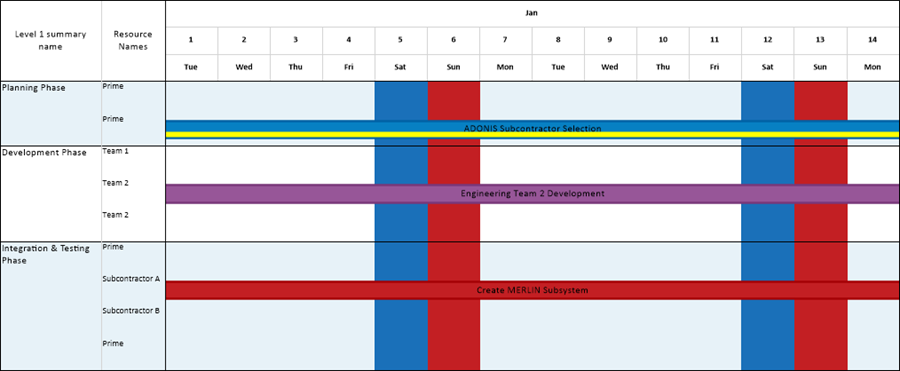
- c) Daily Curtains cannot be manually selected or edited in the project view with a left or right-click. However, the properties of all Daily Curtains as a group can be edited by accessing the PVP form Time Axis tab’s Format sub-tab’s Days of the Week and Non-Working Times control group.
- d) The Transparency percentage (%) and the border color for all Daily Curtains can be set and edited using the Daily Curtain Transparency: and the Daily Curtain Border: controls provided.
- e) Daily Curtains do NOT appear as entries in the The Grid.
- f) Daily Curtains can be eliminated from the project view by editing their color selection in the standard OnePager Color Chooser to No Fill.
- g) Daily Curtains are snapshot-independent, that is, they appear in all snapshots.
Managing Timespans
46) Timespans are created whenever you manually stretch or compress a Time Axis Level Cell or a Floating Time Axis Level Cell.
47) Timespans can be stretched or compressed manually by selecting Time Axis Level Cells (or Floating Time Axis Level Cells) and using the handlebars to edit their widths. Whenever you do this, an entry is made in the The Grid of the PVP form Time Axis tab Format sub-tab.
Managing Timespans from the PVP Form Time Axis Tab’s Format Sub-Tab
48) The The Grid in the Format sub-tab also has the capability to create, and edit Timespans.
- a) As an example, if you manually select a Time Axis Level Cell in the Middle Level and stretch it as shown below, you get the following entry in the The Grid:
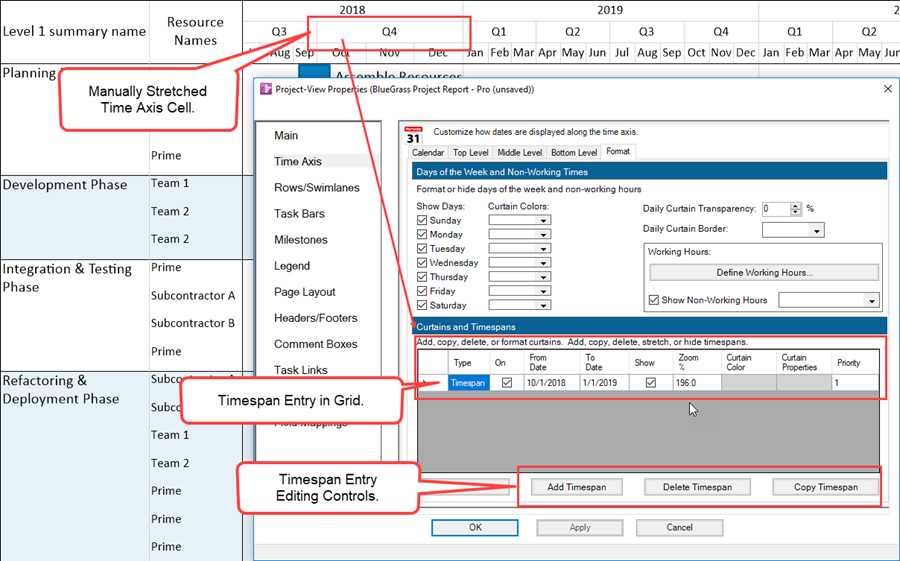
- b) From the The Grid you can turn the entry On or Off, hide or show the selected timespan, edit an entry’s From/To Dates, and edit an entry’s Zoom% (i.e., stretch or compress value).
- c) To clarify, when a The Grid entry is On, the entry is enabled and is considered as an enabled rule that OnePager 6.1 applies to the project view. When a The Grid entry is Off, the entry is disabled and OnePager 6.1 does not apply the rule to the project view.
- d) For The Grid entries that have the On column checkbox checked (enabled) and the entry’s Show column’s checkbox is checked (or On), OnePager 6.1 shows the Curtain in the project view. Conversely, if the entry’s Show column’s checkbox is unchecked (or Off), the Curtain is hidden.
- e) You can also use the Timespan Edit Controls below the The Grid to Add, Delete, or Copy a selected Timespan entry.
- f) Timespans are snapshot-independent.
Managing Timespans with the Time Axis Level Cell Context Menu
49) Time Axis Level Cells can be selected and edited by right-clicking on the Cell and using the context menu as shown below:

- a) The Hide cell command does just that, hides the Time Axis Level Cell and any Cells in lower level Time Axes.
- b) The Format cell… command accesses the Time Axis Cell Properties form shown here:
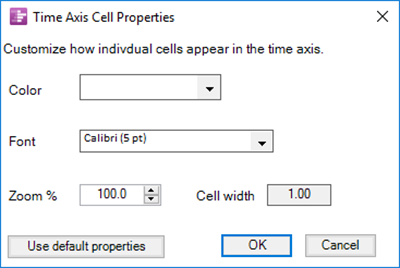
- c) The Unstretch all cells command causes all Cells to revert back to its original width along with all associated Cells in adjacent Time Axis Levels.
- d) The Time-axis properties … command takes you to the PVP form Time Axis tab associated with the Time Axis Level that the selected Cell happens to occupy. From the form you can edit Global Time Axis Properties.
50) The Insert curtain command, when selected, is a convenient way to create a Curtain whose Start/End Dates are the boundaries of the selected Time Axis Level Cell.
- a) As an example, performing these steps creates a basic Curtain with the same Start/End Date boundaries as the selected Time Axis Level Cell as shown below:
- i) Select a Time Axis Level Cell under which you want to insert a Curtain by right-clicking the Cell to access the context menu.
- ii) Click the Insert curtain command at the bottom of the context menu.
- iii) The result of this action is shown in the illustration below:
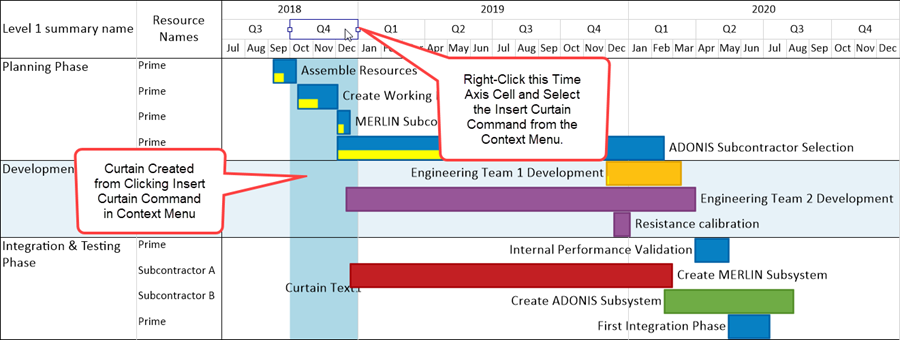
- b) If you access the PVP form and go to the Time Axis tab and its Format sub-tab you’ll find an entry in the The Grid for the Curtain as shown below:
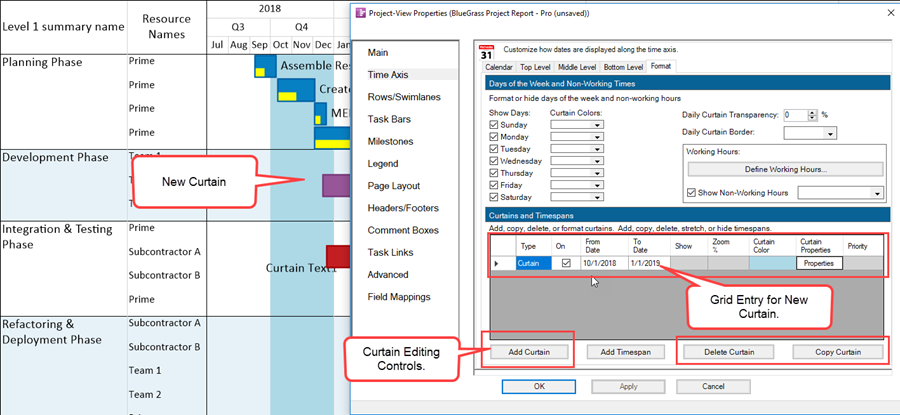
- c) As with Timespans in the The Grid, you have controls for turning the Curtain On and Off, editing the Curtain’s From/To Dates, editing the Curtain’s color, and accessing Curtain Properties form as shown below:
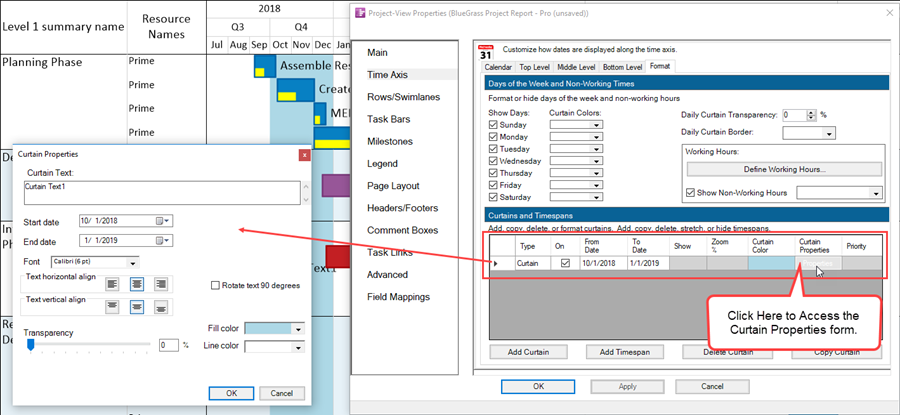
- d) You can also use the Curtain Edit Controls below the The Grid to Add, Delete, or Copy a selected Curtain entry.
- e) Right-clicking on the Curtain itself accesses the same context menu that is associated with all Curtains.
- f) Curtains inserted by using the Time Axis Level Cell’s context menu are snapshot-dependent.
Curtains, Timespans, and Snapshots
51) All Curtains created by whatever means by OnePager 6.1 can appear in all snapshots of the project view with the exceptions noted below.
52) Non-Linear Time Axis Level Cells, those that are stretched or compressed, always appear in all snapshots of a project view.
53) Daily Curtains and Non-Working Hour Curtains are all snapshot-independent. That is, these Curtain types always appear in all snapshots and any edit to them in the project view are applied to all snapshots.
54) Curtains inserted manually by right-clicking a Time Axis Level Cell(s) and Curtains created by Adding a Curtain as an entry in the The Grid are snapshot-dependent. These Curtains can appear in all snapshots, or can be turned ON or OFF for each individual snapshot manually.
55) Curtains that are inserted by using the Curtain button on the OnePager 6.1 ribbon’s Insert tab are snapshot-dependent. These legacy Curtains can look different through editing in any snapshot.
56) It is a rule that Non-Linear Time Axis Level Cells are also snapshot-independent regardless if they are created by manual drag and drop techniques applied to the Time Axis or if they are created as a Timespans entry in the The Grid.
57) The OnePager rules that apply to snapshot-independent and snapshot-dependent objects apply to Curtains and Timespans.
Links to Detailed Articles
OnePager's Time Axis Basic Features for Version 6.1
OnePager's Time Axis Intermediate Features for Version 6.1
Using, Editing, and Managing the OnePager Time Axis for Version 6.1
Editing the Time Axis for Version 6.1
OnePager's Time Axis Advanced Features for Version 6.1
Related Links
Task Links Tab for OnePager Pro
Task Links Tab for OnePager Express
(0.4.1.9-61)