Difference between revisions of "Testing Article1"
| Line 1: | Line 1: | ||
==Overview== | ==Overview== | ||
| − | + | There may be some occasions where a chart has too much detail and, for a particular schedule discussion and presentation, it is necessary to '''hide''' one or more '''swimlane levels '''yet retain the '''swimlane''' in the chart. '''Hiding '''and '''unhiding swimlane levels '''is done using the controls in the '''Template Properties '''and '''Chart Properties '''form’s '''Rows/Swimlanes''' tab as discussed in this article. When '''swimlane levels''' are '''hidden''', their '''parent swimlane levels''', if any, are unchanged; their '''lower swimlane level cells '''are unchanged; and their '''rows''' remain '''unhidden'''. '''Hiding''' '''swimlane levels''' may have an impact on the '''width dimensions''' of the chart. | |
| − | + | This article discusses the methods for '''hiding''' and '''unhiding''' '''swimlane levels '''and their '''swimlane level cell labels''' in the chart. | |
| − | + | ==Hiding and Unhiding Swimlane Levels Using the Chart Properties Form’s Rows/Swimlanes Tab’s Controls== | |
| − | + | The '''Template Properties''' and the '''Chart Properties''' forms are used to '''hide '''and '''unhide swimlane levels''' without changing the '''swimlane sorting''' in the chart. It may be advantageous to initially create a chart '''Template''' that defines all three possible '''swimlane levels''' and later, using the controls in the '''Chart Properties '''form, as discussed in this article, '''hide '''one or more '''swimlane levels''' to improve the presentation attributes of your chart. In most cases '''swimlane level visibility''', '''row grouping''', and '''swimlane sort settings''' are first established in the '''Template Properties '''form’s '''Rows/Swimlanes '''tab. These setting are used by OnePager to create the initial chart and establish the settings in the chart’s '''Chart Properties''' form. | |
| − | + | '''Hiding '''and '''unhiding swimlane levels '''can be done by changing the setting of one checkbox for the '''swimlane level''' you desire to '''hide''' or '''unhide''' as described in the procedures and examples provided below. | |
| − | ==Swimlane | + | ===Hiding Swimlane Levels - Examples=== |
| − | + | To show how '''hiding''' an entire '''swimlane level''' changes the configuration of a chart, let’s start with a three '''swimlane level''' chart with two '''text columns''' for each''' row''' as shown here: | |
<center>[[File:P70-12_11_1-(2)-07102020.png]]</center> | <center>[[File:P70-12_11_1-(2)-07102020.png]]</center> | ||
<!--<center>P70-12_11_1-(2)-07102020.png</center>--> | <!--<center>P70-12_11_1-(2)-07102020.png</center>--> | ||
| − | + | Next, let’s show how to '''hide''' a '''swimlane level''' using the '''Chart Properties''' form’s '''Rows/Swimlanes''' tab’s controls as follows. | |
| − | + | To '''hide''' the '''Left#1 swimlane level '''in the above chart, access the '''Chart Properties''' form at the '''Rows/Swimlanes''' tab, navigate to the '''Swimlanes''' control group, click on the '''Left#1 '''tab, and then click the '''Swimlane Formatting… '''button to access the '''Swimlane Formatting – Left #1 '''form as shown below: | |
| − | + | ||
| − | + | <center>[[File:P70-12_5_1-(1)-07232020.png]]</center> | |
| + | <!--<center>P70-12_5_1-(1)-07232020.png</center>--> | ||
| − | + | To '''hide''' the '''Left#1 swimlane level''', go to the '''Swimlane Text '''control group in the '''Swimlane Formatting – Left #1 '''form, and uncheck the '''Label by''' checkbox to '''OFF''' as shown below: | |
| − | + | ||
| − | + | <center>[[File: P70-12_5_1-(2)-07232020.png]]</center> | |
| + | <!--<center>P70-12_5_1-(2)-07232020.png</center>--> | ||
| − | + | After unchecking the '''Label by''' checkbox to '''OFF''', click the '''OK '''button on the above form and the '''OK '''button on the '''Chart Properties '''form. The chart now looks like this: | |
| − | : | + | <center>[[File: P70-12_5_1-(3)-07232020.png]]</center> |
| + | <!--<center>P70-12_5_1-(3)-07232020.png</center>--> | ||
| − | + | Using this same method, we can additionally '''hide''' the '''Left#3 swimlane level''' by navigating through the '''Chart Properties '''form to the '''Swimlane Formatting – Left #3 '''form’s '''Swimlane Text '''control group and unchecking its '''Label by''' checkbox to '''OFF '''to get the result below: | |
| − | :4) | + | <center>[[File:P70-12_5_1-(4)-07232020.png]]</center> |
| + | <!--<center>P70-12_5_1-(4)-07232020.png</center>--> | ||
| − | The | + | The chart configuration above shows only the '''Left#2 swimlane level'''. |
| − | == | + | ===Unhiding Swimlane Levels=== |
| − | + | When '''swimlane levels '''are '''hidden''' using the procedure discussed above, the procedure for '''unhiding '''these '''hidden swimlane levels''' requires rechecking their associated '''Label by''' checkbox back to '''ON '''in their respective '''Swimlane Formatting – Left #n '''form. When '''swimlane levels''' are '''unhidden''' using this procedure, they are placed in the chart in their original position and the '''grouping''' and '''sorting''' of '''rows''' in the '''graph area '''remains unchanged unless '''rows''' and/or '''swimlanes '''were manually '''dragged and dropped''' into different positions in the '''graph'''. | |
| − | + | ||
| − | + | ||
| − | + | ||
| − | + | ||
| − | + | ||
| − | + | ||
| − | + | ||
| − | + | ||
| − | + | ||
| − | + | ||
| − | + | ||
| − | + | ||
| − | + | ||
| − | + | ||
| − | + | ||
| − | + | ||
| − | + | ||
| − | + | ||
| − | + | ||
| − | + | ||
| − | + | ||
| − | + | ||
| − | + | ||
| − | + | ||
| − | + | ||
| − | + | ||
| − | + | ||
| − | + | ||
| − | + | ||
| − | + | ||
| − | + | ||
| − | + | ||
| − | + | ||
| − | + | ||
| − | + | ||
| − | + | ||
| − | + | ||
| − | + | ||
| − | + | ||
| − | + | ||
| − | + | ||
| − | + | ||
| − | + | ||
| − | + | ||
| − | + | ||
| − | + | ||
| − | + | ||
| − | + | ||
| − | + | ||
| − | + | ||
| − | + | ||
| − | + | ||
| − | + | ||
| − | + | ||
| − | + | ||
| − | + | ||
| − | + | ||
| − | + | ||
| − | + | ||
| − | + | ||
| − | + | ||
| − | + | ||
| − | + | ||
| − | + | ||
| − | + | ||
| − | + | ||
| − | + | ||
| − | + | ||
| − | + | ||
| − | + | ||
| − | + | ||
| − | + | ||
| − | + | ||
| − | + | ||
| − | + | ||
| − | + | ||
| − | + | ||
| − | + | ||
| − | + | ||
| − | + | ||
| − | + | ||
| − | + | ||
| − | + | ||
| − | + | ||
| − | + | ||
| − | + | ||
| − | + | ||
| − | + | ||
| − | + | ||
| − | + | ||
| − | + | ||
| − | + | ||
| − | + | ||
| − | + | ||
| − | + | ||
| − | + | ||
==Related Links== | ==Related Links== | ||
| Line 157: | Line 63: | ||
[[Editing Text Columns or Swimlane Labels for Version 7.0 | Editing Text Columns or Swimlane Labels]] <!--12.3.1-70--> | [[Editing Text Columns or Swimlane Labels for Version 7.0 | Editing Text Columns or Swimlane Labels]] <!--12.3.1-70--> | ||
| + | |||
| + | [[Hiding and Unhiding Rows and Swimlanes for Version 7.0 | Hiding and Unhiding Rows and Swimlanes]] <!--12.13.1-70--> | ||
[[Resizing the Height of Rows for Version 7.0 | Resizing the Height of Rows]] <!--12.11.1-70--> | [[Resizing the Height of Rows for Version 7.0 | Resizing the Height of Rows]] <!--12.11.1-70--> | ||
| Line 172: | Line 80: | ||
[[Managing Templates for Version 7.0 (Portal) | Managing Templates (Portal)]] <!--24.0.1-70--> | [[Managing Templates for Version 7.0 (Portal) | Managing Templates (Portal)]] <!--24.0.1-70--> | ||
| − | (12. | + | (12.5.1-70) |
[[Category:Version 7.0]] | [[Category:Version 7.0]] | ||
Revision as of 18:10, 14 January 2021
Contents
Overview
There may be some occasions where a chart has too much detail and, for a particular schedule discussion and presentation, it is necessary to hide one or more swimlane levels yet retain the swimlane in the chart. Hiding and unhiding swimlane levels is done using the controls in the Template Properties and Chart Properties form’s Rows/Swimlanes tab as discussed in this article. When swimlane levels are hidden, their parent swimlane levels, if any, are unchanged; their lower swimlane level cells are unchanged; and their rows remain unhidden. Hiding swimlane levels may have an impact on the width dimensions of the chart.
This article discusses the methods for hiding and unhiding swimlane levels and their swimlane level cell labels in the chart.
Hiding and Unhiding Swimlane Levels Using the Chart Properties Form’s Rows/Swimlanes Tab’s Controls
The Template Properties and the Chart Properties forms are used to hide and unhide swimlane levels without changing the swimlane sorting in the chart. It may be advantageous to initially create a chart Template that defines all three possible swimlane levels and later, using the controls in the Chart Properties form, as discussed in this article, hide one or more swimlane levels to improve the presentation attributes of your chart. In most cases swimlane level visibility, row grouping, and swimlane sort settings are first established in the Template Properties form’s Rows/Swimlanes tab. These setting are used by OnePager to create the initial chart and establish the settings in the chart’s Chart Properties form.
Hiding and unhiding swimlane levels can be done by changing the setting of one checkbox for the swimlane level you desire to hide or unhide as described in the procedures and examples provided below.
Hiding Swimlane Levels - Examples
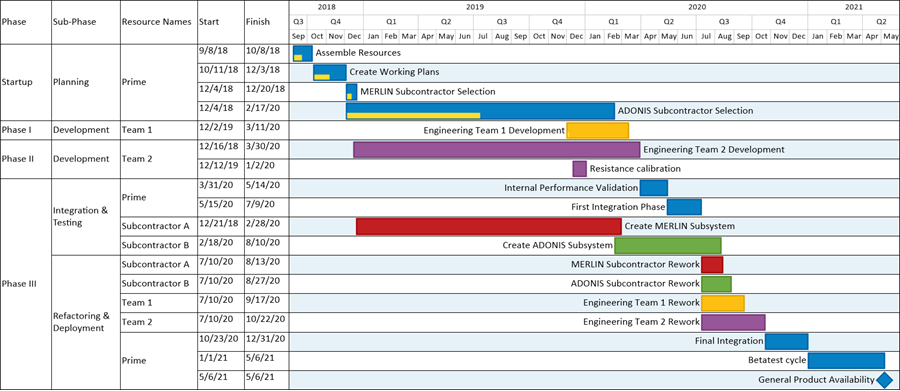
To show how hiding an entire swimlane level changes the configuration of a chart, let’s start with a three swimlane level chart with two text columns for each row as shown here:
Next, let’s show how to hide a swimlane level using the Chart Properties form’s Rows/Swimlanes tab’s controls as follows.
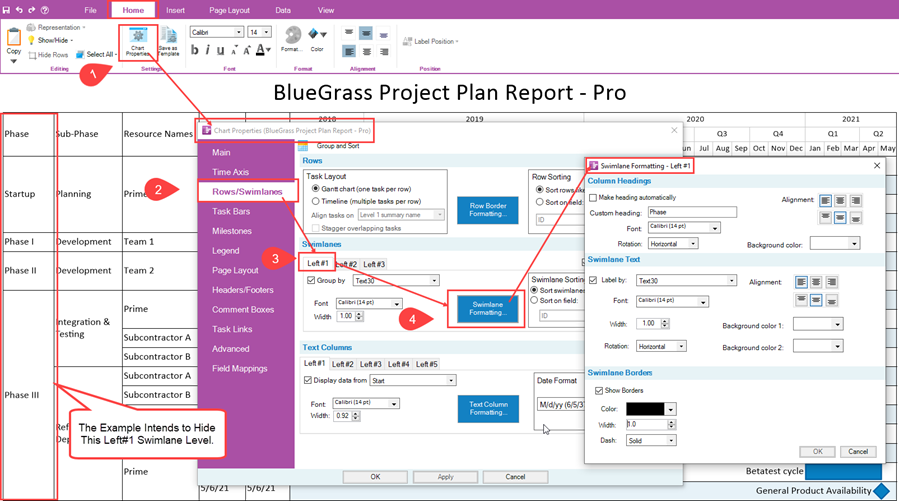
To hide the Left#1 swimlane level in the above chart, access the Chart Properties form at the Rows/Swimlanes tab, navigate to the Swimlanes control group, click on the Left#1 tab, and then click the Swimlane Formatting… button to access the Swimlane Formatting – Left #1 form as shown below:
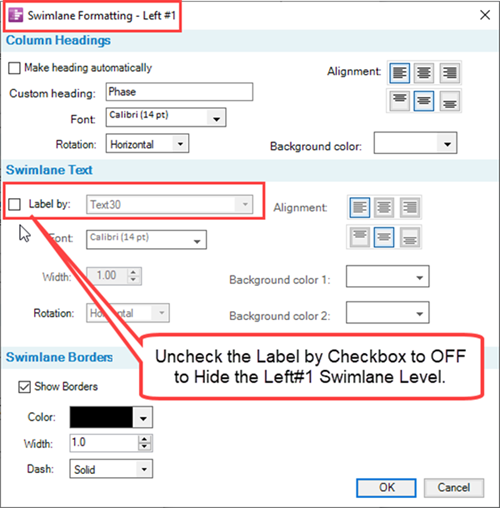
To hide the Left#1 swimlane level, go to the Swimlane Text control group in the Swimlane Formatting – Left #1 form, and uncheck the Label by checkbox to OFF as shown below:
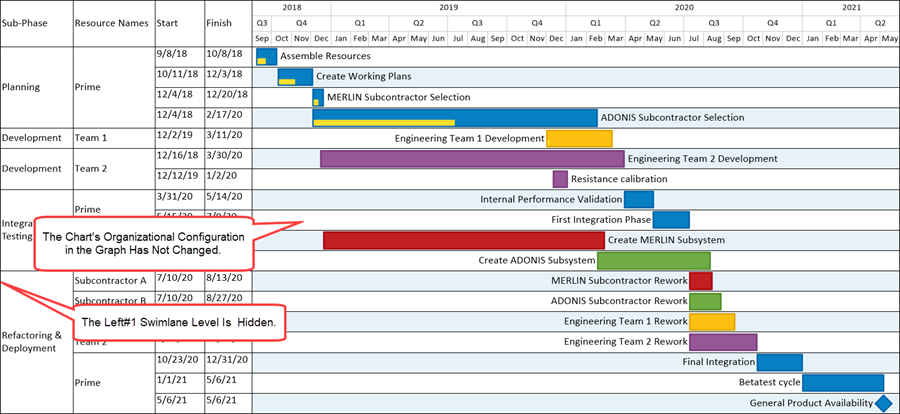
After unchecking the Label by checkbox to OFF, click the OK button on the above form and the OK button on the Chart Properties form. The chart now looks like this:
Using this same method, we can additionally hide the Left#3 swimlane level by navigating through the Chart Properties form to the Swimlane Formatting – Left #3 form’s Swimlane Text control group and unchecking its Label by checkbox to OFF to get the result below:
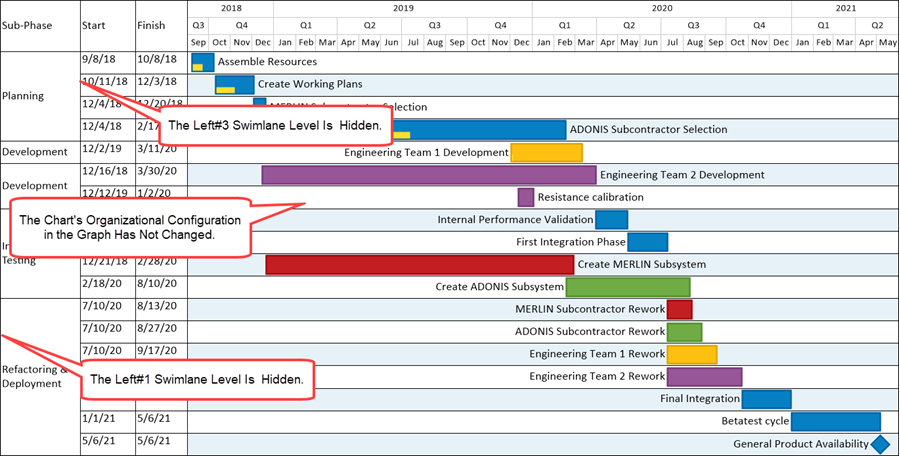
The chart configuration above shows only the Left#2 swimlane level.
Unhiding Swimlane Levels
When swimlane levels are hidden using the procedure discussed above, the procedure for unhiding these hidden swimlane levels requires rechecking their associated Label by checkbox back to ON in their respective Swimlane Formatting – Left #n form. When swimlane levels are unhidden using this procedure, they are placed in the chart in their original position and the grouping and sorting of rows in the graph area remains unchanged unless rows and/or swimlanes were manually dragged and dropped into different positions in the graph.
Related Links
Manual Editing Task/Milestone Shapes and Text Labels (Portal)
Creating and Editing Rows and Swimlanes (Portal)
About OnePager's Rows and Swimlanes
Collecting, Formatting, and Sorting Task/Milestones into Rows
Creating, Formatting, and Sorting Swimlanes Levels
Creating and Formatting Text Columns
Editing Text Columns or Swimlane Labels
Hiding and Unhiding Rows and Swimlanes
Zebra Striping for Rows and Swimlanes for OnePager Pro
Zebra Striping for Rows and Swimlanes for OnePager Express
Editing with the Chart Properties form (Portal)
(12.5.1-70)