Difference between revisions of "Testing Article1"
| Line 1: | Line 1: | ||
==Overview== | ==Overview== | ||
| − | + | In the context of this article, '''adding a row''' or '''adding a swimlane''' means making the '''addition''' manually to an existing chart. This is done through the use of the '''add''' commands found in the three right-click '''context menus''' you have available in the chart as shown below. | |
| − | + | ===Swimlane Level Right-Click Context Menu=== | |
| − | + | The '''swimlane level''' right-click '''context menu''' looks like this: | |
| − | <center> | + | <center>[[File:P70-12_16_1-(1A)-07282020.png]]</center> |
| − | + | <!--<center>P70-12_16_1-(1A)-07282020.png</center>--> | |
| − | + | ||
| − | + | ||
| − | + | ||
| − | + | ||
| − | + | ||
| − | </center> | + | |
| − | + | The '''swimlane level '''right-click '''context menu '''contains a command for '''adding swimlane Above or Below''' an existing '''swimlane''' as shown here: | |
| − | + | <center>[[File:P70-12_16_1-(1)-07242020.png]]</center> | |
| + | <!--<center>P70-12_16_1-(1)-07242020.png</center>--> | ||
| − | + | Additionally, the '''swimlane level''' right-click '''context menu''' has commands for '''Add row to swimlane At top of swimlane or At bottom of swimlane''' as shown here: | |
| − | + | <center>[[File:P70-12_16_1-(1A)-07242020.png]]</center> | |
| + | <!--<center>P70-12_16_1-(1A)-07242020.png</center>--> | ||
| − | + | ===Text Column Right-Click Context Menu=== | |
| − | + | The '''text column''' right-click '''context menu''' looks like this: | |
| − | + | ||
| − | + | <center>[[File:P70-12_16_1-(2A)-07282020.png]]</center> | |
| + | <!--<center>P70-12_16_1-(2A)-07282020.png</center>--> | ||
| − | + | The '''text column''' right-click '''context menu''' with its '''Add row Above or Below '''commands/sub-commands is shown below: | |
| − | + | ||
| − | + | <center>[[File:P70-12_16_1-(2)-07242020.png]]</center> | |
| + | <!--<center>P70-12_16_1-(2)-07242020.png</center>--> | ||
| − | + | ===Open Space Right-Click Context Menu=== | |
| − | + | ||
| − | + | The '''open space '''right-click '''context menu''' looks like this: | |
| − | <center>[[File:P70- | + | <center>[[File:P70-12_16_1-(3B)-07282020.png]]</center> |
| − | <!--<center> P70- | + | <!--<center>P70-12_16_1-(3B)-07282020.png</center>--> |
| − | + | The '''open space '''right-click context menu has an '''Add swimlane Above or Below '''command/sub-commands as shown here: | |
| − | <center>[[File:P70- | + | <center>[[File:P70-12_16_1-(3)-07242020.png]]</center> |
| − | <!--<center> P70- | + | <!--<center>P70-12_16_1-(3)-07242020.png</center>--> |
| − | + | The '''open space''' right-click '''context menu''' also has an '''Add row Above or Below '''command/sub-commands as shown below: | |
| − | + | <center>[[File:P70-12_16_1-(3A)-07242020.png]]</center> | |
| + | <!--<center>P70-12_16_1-(3A)-07242020.png</center>--> | ||
| − | + | In using any of the right-click '''context menus''' shown in the illustrations above, it is important to place the mouse cursor in the desired selection area before performing the right-click. To be able to use the '''swimlane level''' right-click '''context menu''', at least one '''swimlane level''' must be present in the chart. Likewise, to use the '''text column''' right-click '''context menu''', at least one '''text column''' must be present in the chart. The '''swimlane level '''and '''text column '''right-click '''context menus''' can be used after selecting '''multiple swimlane level cells''' or '''multiple text column cells'''. The '''open space '''right-click '''context menu''' can only be used to select one '''row''' in the '''graph area''' and the command generally applies to the selected '''row''' or to the '''swimlane levels''' to which the selected '''row''' has membership. | |
| − | + | ||
| − | + | This article provides instruction on the use of these three right-click context menus with examples. | |
| − | + | Please use the '''links''' in the '''Contents Box''' above quickly jump to a particular topic. | |
| − | + | ||
| − | + | ==Using the Swimlane Level Right-Click Context Menu== | |
| − | == | + | ===Adding Swimlanes Above or Below Existing Swimlane === |
| − | + | '''Maverick''' '''swimlanes''' can be '''added''' to the chart at any '''swimlane level''' using the '''swimlane level''' right-click '''context menu’s''' '''Add swimlane''' command. You have two options within the selected '''swimlane''' as to where to place the '''added row''': (1) '''Above''' or (2) '''Below''' the selected '''swimlane'''. A single '''swimlane''' is added to the selected '''swimlane''' in the specified '''position'''. The '''added swimlane''' consists of one '''row''' '''empty''' of any task bars/milestone symbols, there are no '''labels''' in any '''text column cells''' associated with the '''added row''', and there is no '''label''' in the '''swimlane level cell or cells''' created with the new '''row'''. | |
| − | === | + | =====Selecting a Single Swimlane Level Cell - Example===== |
| − | + | The following sequence of illustrations show how a '''swimlane''' can be '''added''' to a '''Left#2 swimlane level '''using the '''Above '''sub-command: | |
| − | + | :1) Right-click in the desired '''swimlane level cell''' to access the '''swimlane level''' right-click '''context menu''' as shown here: | |
| − | + | ||
| − | + | <center>[[File:P70-12_16_1-(4)-07242020.png]]</center> | |
| + | <!--<center>P70-12_16_1-(4)-07242020.png</center>--> | ||
| − | + | :2) Next, move the mouse over to the '''Add swimlane''' command which automatically accesses the two sub-command as shown here: | |
| − | + | ||
| − | + | <center>[[File:P70-12_16_1-(5)-07242020.png]]</center> | |
| + | <!--<center>P70-12_16_1-(5)-07242020.png</center>--> | ||
| − | + | :3) Select the '''Above''' sub-command by moving the mouse to the '''Above''' sub-command as shown below: | |
| − | + | ||
| − | + | <center>[[File:P70-12_16_1-(6)-07242020.png]]</center> | |
| + | <!--<center>P70-12_16_1-(6)-07242020.png</center>--> | ||
| − | + | :4) When the '''Add swimlane/Above''' command/sub-command is clicked, OnePager places a '''blank row above''' the selected '''swimlane level cell''' consisting of '''blank text column cells''', if any, and '''blank Left#2''' and '''Left#3 swimlane level cells''' as shown here: | |
| − | + | ||
| − | + | <center>[[File:P70-12_16_1-(7)-07242020.png]]</center> | |
| + | <!--<center>P70-12_16_1-(7)-07242020.png</center>--> | ||
| − | + | A similar result is achieved when the selected command/sub-command combination is '''Add swimlane/Below'''. | |
| − | + | ||
| − | === | + | =====Selecting Multiple Swimlane Levels Cell - Example===== |
| − | + | '''Swimlanes''' can be '''added''' to multiple '''swimlane level cells''' by selecting multiple '''swimlane level cells''' in the same '''swimlane''' as shown below: | |
| − | <center>[[File:P70- | + | <center>[[File:P70-12_16_1-(8)-07242020.png]]</center> |
| − | <!--<center> P70- | + | <!--<center>P70-12_16_1-(8)-07242020.png</center>--> |
| − | + | When the command/sub-command is clicked, OnePager places three '''empty swimlanes''' into the chart as shown here: | |
| − | <center>[[File:P70- | + | <center>[[File:P70-12_16_1-(9)-07242020.png]]</center> |
| − | <!--<center> P70- | + | <!--<center>P70-12_16_1-(9)-07242020.png</center>--> |
| − | The same | + | The added '''swimlanes''' in this case have the same initial properties as with the case where only one new '''swimlane''' was added '''Above''' or '''Below''' the selected '''swimlane level cell'''. |
| − | == | + | ===Adding Row to Swimlane At Top or Bottom of an Existing Swimlane === |
| − | + | '''Maverick''' '''rows''' can be added to the chart at any '''swimlane level''' using the '''swimlane level '''right-click '''context menu’s''' command. You have two options within the selected '''swimlane''' as to where to place the added '''row''': (1) '''At top of swimlane''' or (2) '''At bottom of swimlane'''. A single '''row''' is added to the selected '''swimlane''' in the specified '''position'''. The '''added row''' is '''empty''' of any task bars/milestone symbols, there are no '''labels''' in any '''text column cells''' associated with the '''added row''', and there is no '''label''' in the '''swimlane level cell''' created with the new '''row'''. | |
| − | + | =====Selecting a Single Swimlane Level Cell - Example===== | |
| − | + | ||
| − | + | The following sequence of illustrations show how a '''row''' can be '''added''' to a '''Left#2 swimlane level '''using the '''top of swimlane '''sub-command: | |
| − | + | :1) Right-click in the desired '''swimlane level cell''' to access the b right-click '''context menu''' as shown here: | |
| − | + | <center>[[File:P70-12_16_1-(4)-07242020.png]]</center> | |
| + | <!--<center>P70-12_16_1-(4)-07242020.png</center>--> | ||
| − | + | :2) Next, move the mouse over to the '''Add row to swimlane''' command which automatically accesses the two sub-command as shown here: | |
| − | + | ||
| − | + | <center>[[File:P70-12_16_1-(10)-07272020.png]]</center> | |
| + | <!--<center>P70-12_16_1-(10)-07272020.png</center>--> | ||
| − | + | :3) Select the '''At top of swimlane''' sub-command by moving the mouse to the '''At top of swimlane''' sub-command as shown below: | |
| − | + | <center>[[File:P70-12_16_1-(11)-07272020.png]]</center> | |
| + | <!--<center>P70-12_16_1-(11)-07272020.png</center>--> | ||
| − | + | :4) When the '''Add row to swimlane/At top of swimlane''' command/sub-command is clicked, OnePager places a '''blank row at the top of''' '''the selected''' '''swimlane level cell''' that is '''empty''' of task bars/milestone symbols and with '''blank text column cells''', if any, as shown here: | |
| − | + | <center>[[File:P70-12_16_1-(12)-07272020.png]]</center> | |
| + | <!--<center>P70-12_16_1-(12)-07272020.png</center>--> | ||
| − | + | In the case illustrated above, the new '''row''' becomes the '''top row''' of the selected '''swimlane '''shown in the above chart portion. The '''row''' added '''at the top''' of the selected '''swimlane level cell''' in the above example is a member of all three '''swimlane levels'''. A similar result is achieved when the selected command/sub-command combination is '''Add row to swimlane/At bottom of swimlane'''. | |
| − | + | ||
| − | + | =====Selecting Multiple Swimlane Levels Cells - Example===== | |
| + | |||
| + | '''Rows''' can be added to '''multiple swimlane level cells''' by selecting '''multiple swimlane level cells''' in the same '''swimlane '''as shown below: | ||
| + | |||
| + | <center>[[File:P70-12_16_1-(13)-07272020.png]]</center> | ||
| + | <!--<center>P70-12_16_1-(13)-07272020.png</center>--> | ||
| + | |||
| + | When the command/sub-command is clicked, OnePager places three empty rows into the chart as shown here: | ||
| + | |||
| + | <center>[[File:P70-12_16_1-(14)-07272020.png]]</center> | ||
| + | <!--<center>P70-12_16_1-(14)-07272020.png</center>--> | ||
| + | |||
| + | In the case illustrated above, the new '''rows''' become the '''top row''' of each of the three '''swimlane levels''' '''shown''' in the above chart portion. The '''row''' added '''at the top''' of the selected '''swimlane level cells''' in the above example is a member of all three '''swimlane levels'''. A similar result is achieved when the selected command/sub-command combination is '''Add row to swimlane/At bottom of swimlane'''. | ||
| + | |||
| + | ==Using the Text Column Right-Click Context Menu== | ||
| + | |||
| + | ===Adding Rows Above or Below an Existing Row === | ||
| + | |||
| + | '''Maverick''' '''rows''' can be added to the chart from any '''text column cell '''using the '''text column''' right-click '''context menu’s''' '''Add row''' command. Rows are selected from their associated text column cells. Therefore, there must be at least one '''text column''' defined and showing for '''rows''' in the chart. | ||
| + | |||
| + | You have two options within the selected '''text column cell (row)''' as to where to place the added '''row''': (1) '''Above''' or (2) '''Below''' the selected '''text column cell'''. A single '''row''' is added to the selected '''text column (row)''' in the specified '''position'''. The '''added row''' is '''empty''' of any task bars/milestone symbols and there are no '''labels''' in any '''text column cells''' associated with the '''added row'''. | ||
| + | |||
| + | ====Adding a New Row Above an Existing Swimlane - Example==== | ||
| + | |||
| + | =====Selecting a Single Text Column Cell - Example===== | ||
| + | |||
| + | The following sequence of illustrations show how a '''row''' can be '''added above or below''' a selected '''text column cell '''using the '''Add row/Above '''command/sub-command: | ||
| + | |||
| + | :1) Right-click in the desired '''text column cell''' to access the '''text column''' right-click '''context menu''' as shown here: | ||
| + | |||
| + | <center>[[File:P70-12_16_1-(15)-07272020.png]]</center> | ||
| + | <!--<center>P70-12_16_1-(15)-07272020.png</center>--> | ||
| + | |||
| + | :2) Next, move the mouse over to the '''Add row''' command which automatically accesses the two sub-command as shown here: | ||
| + | |||
| + | <center>[[File:P70-12_16_1-(16)-07272020.png]]</center> | ||
| + | <!--<center>P70-12_16_1-(16)-07272020.png</center>--> | ||
| + | |||
| + | :3) Select the '''Above''' sub-command by moving the mouse to the '''Above''' sub-command as shown below: | ||
| + | |||
| + | <center>[[File:P70-12_16_1-(17)-07272020.png]]</center> | ||
| + | <!--<center>P70-12_16_1-(17)-07272020.png</center>--> | ||
| + | |||
| + | :4) When the '''Add row/Above''' command/sub-command is clicked, OnePager places a '''blank row above''' the selected '''text column cell''' as shown here: | ||
| + | |||
| + | <center>[[File:P70-12_16_1-(18)-07272020.png]]</center> | ||
| + | <!--<center>P70-12_16_1-(18)-07272020.png</center>--> | ||
| + | |||
| + | A similar result is achieved when the selected command/sub-command combination is '''Add row/Below'''. | ||
| + | |||
| + | The '''added row''' is '''empty''' of any task bars/milestone symbols and there are no '''labels''' in any '''text column cells''' associated with the '''added row'''. | ||
| + | |||
| + | =====Selecting Multiple Text Column Cells- Example===== | ||
| + | |||
| + | '''Rows''' can be added to multiple '''text column cells''' '''(rows) '''by selecting multiple '''text column cells''' in the same '''text column''' as shown below: | ||
| + | |||
| + | <center>[[File:P70-12_16_1-(19)-07272020.png]]</center> | ||
| + | <!--<center>P70-12_16_1-(19)-07272020.png</center>--> | ||
| + | |||
| + | When the command/sub-command is clicked, OnePager places three '''empty rows''' into the chart as shown here: | ||
| + | |||
| + | <center>[[File:P70-12_16_1-(20)-07272020.png]]</center> | ||
| + | <!--<center>P70-12_16_1-(20)-07272020.png</center>--> | ||
| + | |||
| + | The added '''rows''' in this case have the same initial properties as with the case where only one new '''row''' was added '''Above''' or '''Below''' the selected '''text column cell'''. The '''added rows''' are '''empty''' of any task bars/milestone symbols and there are no '''labels''' in any '''text column cells''' associated with the '''added rows'''. | ||
| + | |||
| + | ==Using the Open Space Right-Click Context Menu== | ||
| + | |||
| + | The '''open space '''right-click '''context menu''' contains serval commands that are also found in the '''swimlane level''' and '''text column''' right-click '''context menus '''as shown below: | ||
| + | |||
| + | <center>[[File:P70-12_16_1-(3B)-07282020.png]]</center> | ||
| + | <!--<center>P70-12_16_1-(3B)-07282020.png</center>--> | ||
| + | |||
| + | In particular the '''open space''' right-click '''context menu''' is useful for '''adding swimlanes''' and/or '''adding rows''' when neither '''swimlane level cells''' nor '''text column cells''' are visible in the chart. To do either of these operations, place the mouse cursor in the nearest '''row''' where you want the added '''swimlane''' or '''row''', click either the '''Add swimlane/Above or Below''' command/sub-command or the '''Add row/Above or Below''' command/sub-command, and OnePager places a '''single empty swimlane/row''' in the desired position. It is only possible to '''add one swimlane''' or '''add one row at a time''' using the '''open space''' right-click '''context menu''' and the '''Add swimlane''' or '''Add row''' commands. | ||
| + | |||
| + | The '''open space '''right-click '''context menu''' looks like this in a chart where '''swimlane levels''' and '''text columns''' are not shown: | ||
| + | |||
| + | <center>[[File:P70-12_16_1-(21)-07272020.png]]</center> | ||
| + | <!--<center>P70-12_16_1-(21)-07272020.png</center>--> | ||
| + | |||
| + | ===Adding Swimlanes Above or Below an Existing Row === | ||
| + | |||
| + | As mentioned above, using the '''open space''' right-click '''context menu''' to '''Add swimlane/Above''' or '''Below''' involves the same steps as using the '''swimlane level''' right-click '''context menu’s Add swimlane/Above''' or '''Below''' commands/sub-commands when '''swimlane level cells''' are '''shown''' in the chart. The '''open space''' right-click '''context menu''' commands can be used when '''swimlane level cells''' are '''shown''' in the chart and the '''added swimlane''' becomes a member of the '''lowest level swimlane''' being '''shown'''. | ||
| + | |||
| + | When '''swimlane levels''' are '''shown''' in the chart, the process to '''Add swimlane/Above''' or '''Below''' is the same as the steps demonstrated in the example at: [[Adding a Row or Swimlane for Version 7.0#Adding a New Swimlane Above an Existing Swimlane - Example | Adding a New Swimlane Above an Existing Swimlane - Example]] <!-12.16.1-70--> | ||
| + | |||
| + | Keep in mind that only '''one swimlane''' can be '''added at a time''' when the '''open space''' right-click '''context menu''' is used for this purpose. It is not possible to make multiple selections with the '''open space''' right-click '''context menu '''using any of the multiple selections methods. When multiple right-clicks are performed in '''open space''', the '''open space''' right-click '''context menu''' is placed at the point of the '''last right-click'''. | ||
| + | |||
| + | ===Adding Rows Above or Below an Existing Row=== | ||
| + | |||
| + | As mentioned above, using the '''open space''' right-click '''context menu''' to '''Add row/Above''' or '''Below''' involves the same steps as using the '''text column''' right-click '''context menu’s Add row/Above''' or '''Below''' commands/sub-commands when '''text column cells''' are '''shown''' in the chart. The '''open space''' right-click '''context menu''' commands can be used when '''text column cells''' are '''shown''' in the chart and the '''added row''' becomes a member of the '''lowest level swimlane''' being '''shown'''. | ||
| + | |||
| + | When '''swimlane levels''' are '''shown''' in the chart, the process to '''Add row/Above''' or '''Below''' is the same as the steps demonstrated in the example at: [[Adding a Row or Swimlane for Version 7.0#Adding a New Row at the Top of an Existing Swimlane - Example | Adding a New Row at the Top of an Existing Swimlane - Example]] <!-12.16.1-70--> | ||
| + | |||
| + | Keep in mind that only '''one row''' can be '''added at a time''' when the '''open space''' right-click '''context menu''' is used for this purpose. It is not possible to make multiple selections with the '''open space''' right-click '''context menu'''. When multiple right-clicks are performed in '''open space''', the '''open space''' right-click '''context menu''' is placed at the point of the '''last right-click'''. | ||
==Related Links== | ==Related Links== | ||
| − | [[Manual Editing Task/Milestone Shapes and Text Labels for Version 7.0 (Portal) | Manual Editing Task/Milestone Shapes and Text Labels (Portal)]] <! | + | [[Manual Editing Task/Milestone Shapes and Text Labels for Version 7.0 (Portal) | Manual Editing Task/Milestone Shapes and Text Labels (Portal)]] <!-9.0.1-70--> |
| + | |||
| + | [[Creating and Editing Rows and Swimlanes for Version 7.0 (Portal) | Creating and Editing Rows and Swimlanes (Portal)]] <!-12.0.1-70--> | ||
| − | [[ | + | [[About OnePager's Rows and Swimlanes | About OnePager's Rows and Swimlanes]] <!-12.0.2-70--> |
| − | [[ | + | [[Collecting, Formatting, and Sorting Task/Milestones into Rows for Version 7.0 | Collecting, Formatting, and Sorting Task/Milestones into Rows]] <!-12.01.1-70--> |
| − | [[ | + | [[Creating, Formatting, and Sorting Swimlanes Levels for Version 7.0 | Creating, Formatting, and Sorting Swimlanes Levels]] <!-12.02.1-70--> |
| − | [[Creating | + | [[Creating and Formatting Text Columns for Version 7.0 | Creating and Formatting Text Columns]] <!-12.03.1-70--> |
| − | [[ | + | [[Row and Swimlane Borders for Version 7.0 | Row and Swimlane Borders]] <!-12.04.1-70--> |
| − | [[ | + | [[Editing Text Columns or Swimlane Labels for Version 7.0 | Editing Text Columns or Swimlane Labels]] <!-12.3.1-70--> |
| − | [[ | + | [[Resizing the Width of Text Columns and Swimlanes for Version 7.0 | Resizing the Width of Text Columns and Swimlanes]] <!-12.8.1-70--> |
| − | [[Resizing the | + | [[Resizing the Height of Rows for Version 7.0 | Resizing the Height of Rows]] <!-12.11.1-70--> |
| − | [[ | + | [[Hiding and Unhiding Rows and Swimlanes for Version 7.0 | Hiding and Unhiding Rows and Swimlanes]] <!-12.13.1-70--> |
| − | [[Editing Row Properties for Version 7.0 | Editing Row Properties]] <! | + | [[Editing Row Properties for Version 7.0 | Editing Row Properties]] <!-12.22.1-70--> |
| − | [[Editing Swimlane Properties for Version 7.0 | Editing Swimlane Properties]] <! | + | [[Editing Swimlane Properties for Version 7.0 | Editing Swimlane Properties]] <!-12.23.1-70--> |
| − | [[Zebra Striping for Rows and Swimlanes for OnePager Pro for Version 7.0 | Zebra Striping for Rows and Swimlanes for OnePager Pro]] <! | + | [[Zebra Striping for Rows and Swimlanes for OnePager Pro for Version 7.0 | Zebra Striping for Rows and Swimlanes for OnePager Pro]] <!-12.24.1-70--> |
| − | [[Zebra Striping for Rows and Swimlanes for OnePager Express for Version 7.0 | Zebra Striping for Rows and Swimlanes for OnePager Express]] <! | + | [[Zebra Striping for Rows and Swimlanes for OnePager Express for Version 7.0 | Zebra Striping for Rows and Swimlanes for OnePager Express]] <!-12.24.2-70--> |
| − | [[Editing with the Chart Properties form for Version 7.0 (Portal) | Editing with the Chart Properties form (Portal)]] <! | + | [[Editing with the Chart Properties form for Version 7.0 (Portal) | Editing with the Chart Properties form (Portal)]] <!-21.0.1-70--> |
| − | [[Managing Templates for Version 7.0 (Portal) | Managing Templates (Portal)]] <! | + | [[Managing Templates for Version 7.0 (Portal) | Managing Templates (Portal)]] <!-24.0.1-70--> |
| − | (12. | + | (12.16.1-70) |
[[Category:Version 7.0]] | [[Category:Version 7.0]] | ||
Revision as of 15:41, 18 January 2021
Contents
Overview
In the context of this article, adding a row or adding a swimlane means making the addition manually to an existing chart. This is done through the use of the add commands found in the three right-click context menus you have available in the chart as shown below.
Swimlane Level Right-Click Context Menu
The swimlane level right-click context menu looks like this:
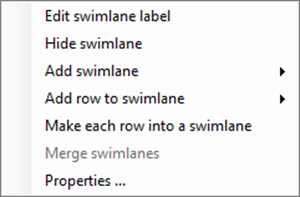
The swimlane level right-click context menu contains a command for adding swimlane Above or Below an existing swimlane as shown here:

Additionally, the swimlane level right-click context menu has commands for Add row to swimlane At top of swimlane or At bottom of swimlane as shown here:

Text Column Right-Click Context Menu
The text column right-click context menu looks like this:
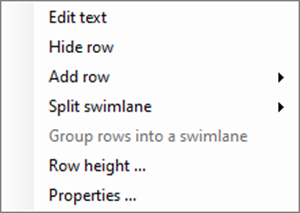
The text column right-click context menu with its Add row Above or Below commands/sub-commands is shown below:

Open Space Right-Click Context Menu
The open space right-click context menu looks like this:
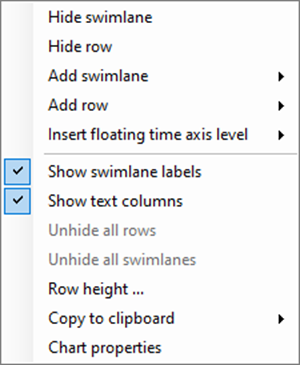
The open space right-click context menu has an Add swimlane Above or Below command/sub-commands as shown here:
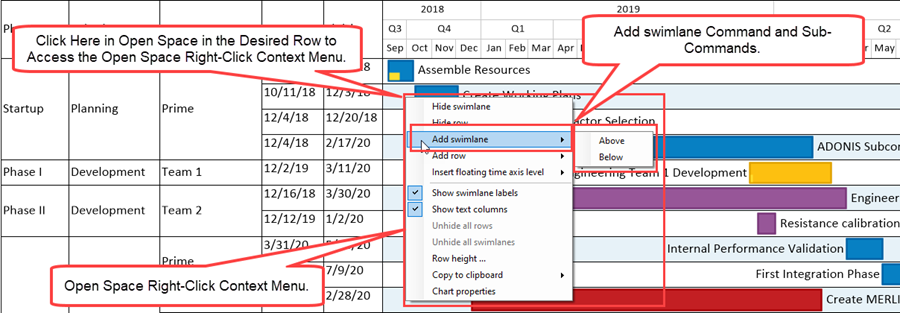
The open space right-click context menu also has an Add row Above or Below command/sub-commands as shown below:
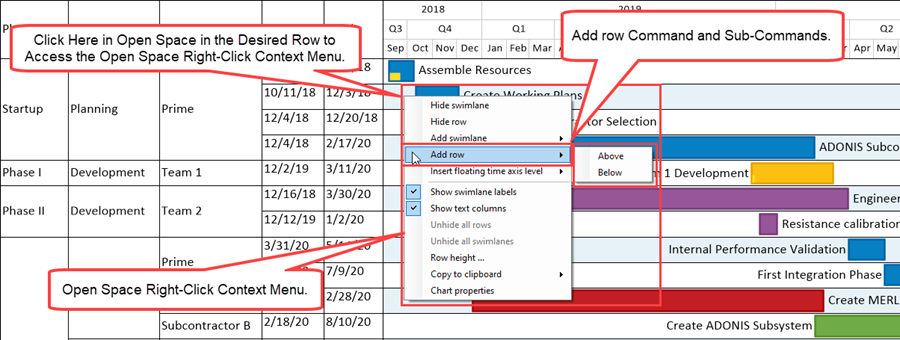
In using any of the right-click context menus shown in the illustrations above, it is important to place the mouse cursor in the desired selection area before performing the right-click. To be able to use the swimlane level right-click context menu, at least one swimlane level must be present in the chart. Likewise, to use the text column right-click context menu, at least one text column must be present in the chart. The swimlane level and text column right-click context menus can be used after selecting multiple swimlane level cells or multiple text column cells. The open space right-click context menu can only be used to select one row in the graph area and the command generally applies to the selected row or to the swimlane levels to which the selected row has membership.
This article provides instruction on the use of these three right-click context menus with examples.
Please use the links in the Contents Box above quickly jump to a particular topic.
Using the Swimlane Level Right-Click Context Menu
Adding Swimlanes Above or Below Existing Swimlane
Maverick swimlanes can be added to the chart at any swimlane level using the swimlane level right-click context menu’s Add swimlane command. You have two options within the selected swimlane as to where to place the added row: (1) Above or (2) Below the selected swimlane. A single swimlane is added to the selected swimlane in the specified position. The added swimlane consists of one row empty of any task bars/milestone symbols, there are no labels in any text column cells associated with the added row, and there is no label in the swimlane level cell or cells created with the new row.
Selecting a Single Swimlane Level Cell - Example
The following sequence of illustrations show how a swimlane can be added to a Left#2 swimlane level using the Above sub-command:
- 1) Right-click in the desired swimlane level cell to access the swimlane level right-click context menu as shown here:

- 2) Next, move the mouse over to the Add swimlane command which automatically accesses the two sub-command as shown here:
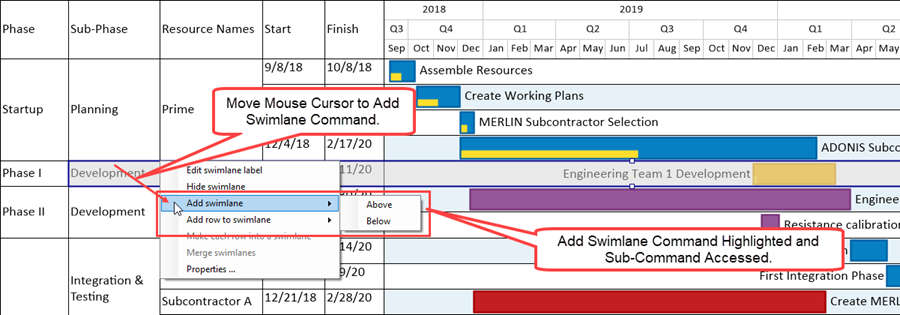
- 3) Select the Above sub-command by moving the mouse to the Above sub-command as shown below:
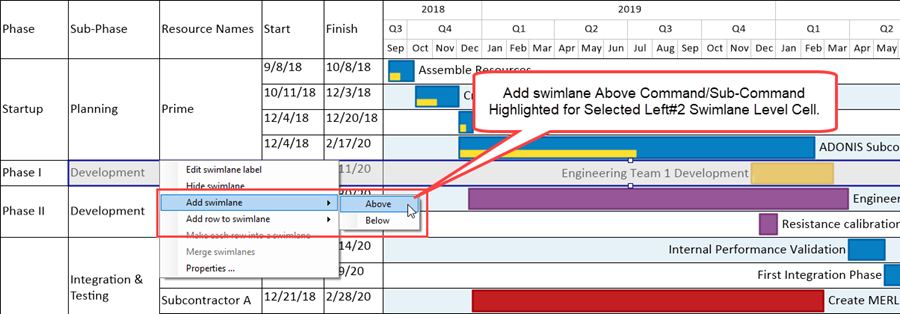
- 4) When the Add swimlane/Above command/sub-command is clicked, OnePager places a blank row above the selected swimlane level cell consisting of blank text column cells, if any, and blank Left#2 and Left#3 swimlane level cells as shown here:
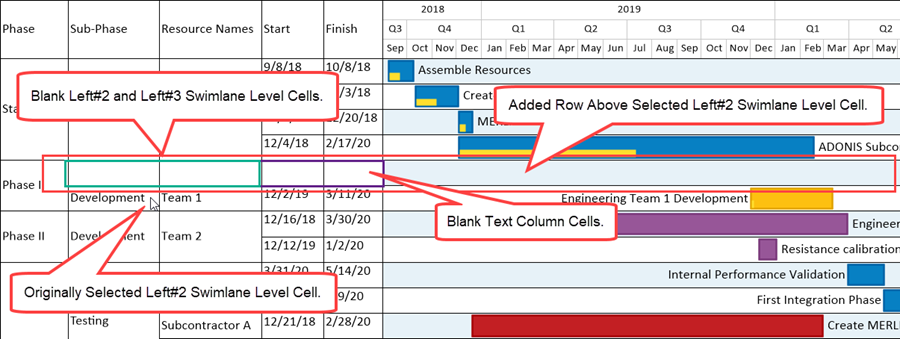
A similar result is achieved when the selected command/sub-command combination is Add swimlane/Below.
Selecting Multiple Swimlane Levels Cell - Example
Swimlanes can be added to multiple swimlane level cells by selecting multiple swimlane level cells in the same swimlane as shown below:
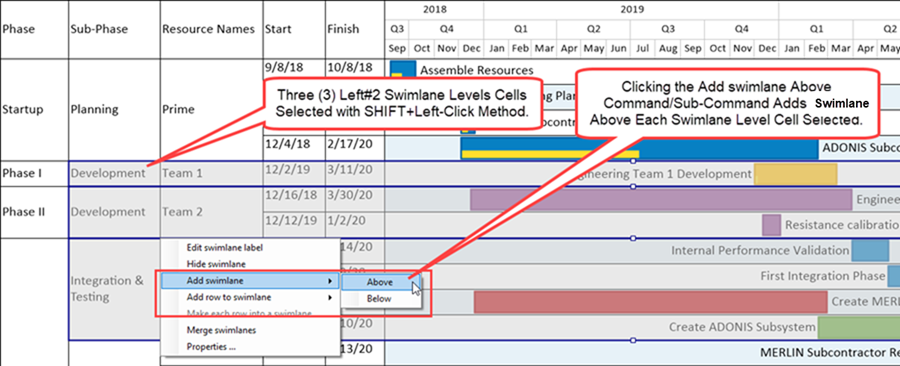
When the command/sub-command is clicked, OnePager places three empty swimlanes into the chart as shown here:
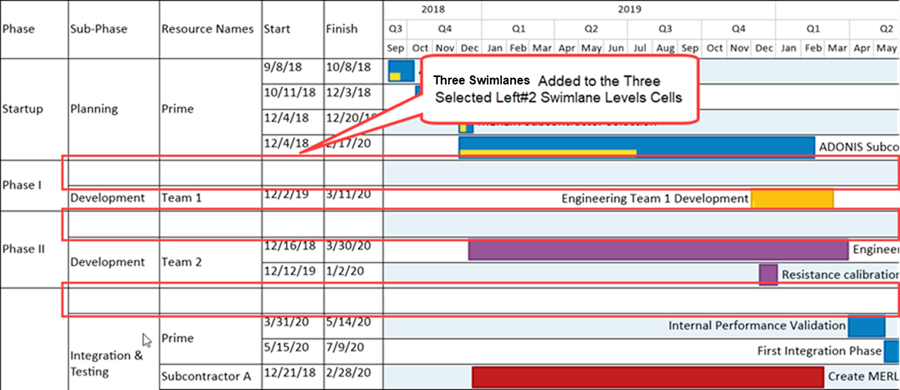
The added swimlanes in this case have the same initial properties as with the case where only one new swimlane was added Above or Below the selected swimlane level cell.
Adding Row to Swimlane At Top or Bottom of an Existing Swimlane
Maverick rows can be added to the chart at any swimlane level using the swimlane level right-click context menu’s command. You have two options within the selected swimlane as to where to place the added row: (1) At top of swimlane or (2) At bottom of swimlane. A single row is added to the selected swimlane in the specified position. The added row is empty of any task bars/milestone symbols, there are no labels in any text column cells associated with the added row, and there is no label in the swimlane level cell created with the new row.
Selecting a Single Swimlane Level Cell - Example
The following sequence of illustrations show how a row can be added to a Left#2 swimlane level using the top of swimlane sub-command:
- 1) Right-click in the desired swimlane level cell to access the b right-click context menu as shown here:

- 2) Next, move the mouse over to the Add row to swimlane command which automatically accesses the two sub-command as shown here:
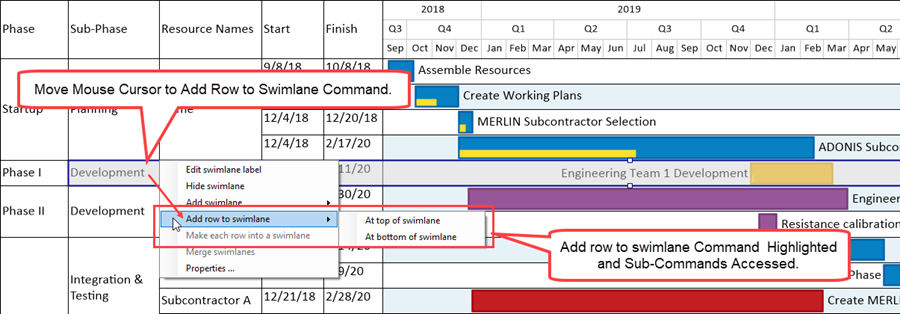
- 3) Select the At top of swimlane sub-command by moving the mouse to the At top of swimlane sub-command as shown below:
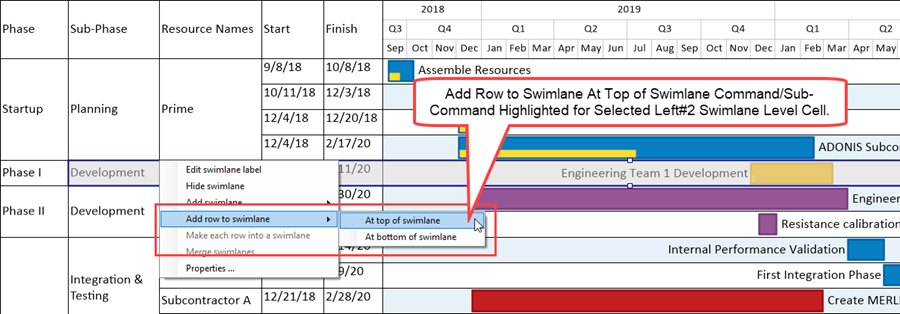
- 4) When the Add row to swimlane/At top of swimlane command/sub-command is clicked, OnePager places a blank row at the top of the selected swimlane level cell that is empty of task bars/milestone symbols and with blank text column cells, if any, as shown here:
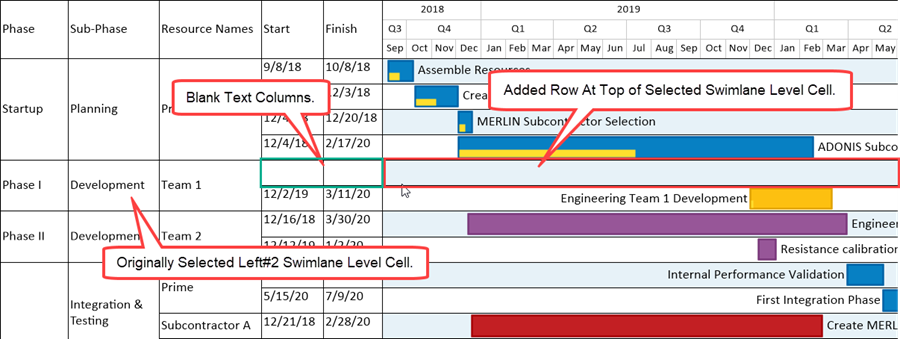
In the case illustrated above, the new row becomes the top row of the selected swimlane shown in the above chart portion. The row added at the top of the selected swimlane level cell in the above example is a member of all three swimlane levels. A similar result is achieved when the selected command/sub-command combination is Add row to swimlane/At bottom of swimlane.
Selecting Multiple Swimlane Levels Cells - Example
Rows can be added to multiple swimlane level cells by selecting multiple swimlane level cells in the same swimlane as shown below:
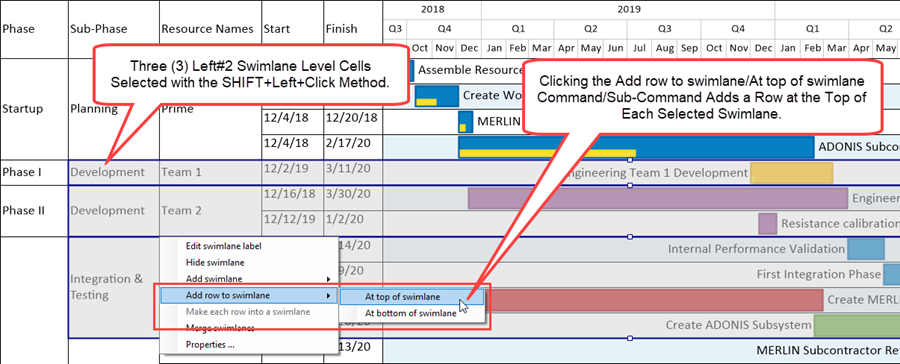
When the command/sub-command is clicked, OnePager places three empty rows into the chart as shown here:
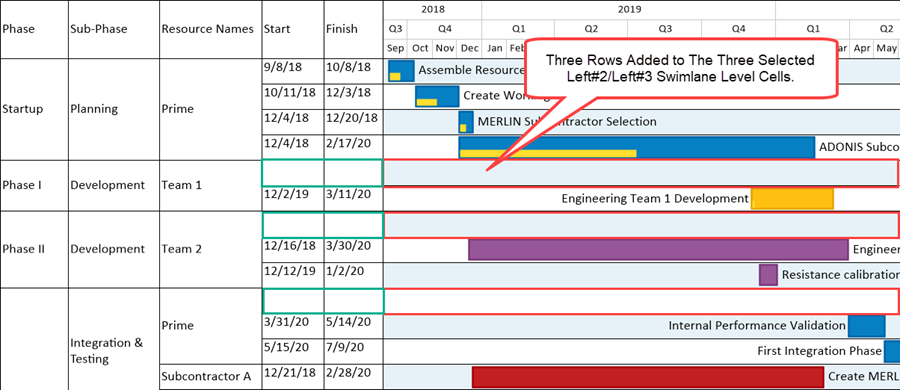
In the case illustrated above, the new rows become the top row of each of the three swimlane levels shown in the above chart portion. The row added at the top of the selected swimlane level cells in the above example is a member of all three swimlane levels. A similar result is achieved when the selected command/sub-command combination is Add row to swimlane/At bottom of swimlane.
Using the Text Column Right-Click Context Menu
Adding Rows Above or Below an Existing Row
Maverick rows can be added to the chart from any text column cell using the text column right-click context menu’s Add row command. Rows are selected from their associated text column cells. Therefore, there must be at least one text column defined and showing for rows in the chart.
You have two options within the selected text column cell (row) as to where to place the added row: (1) Above or (2) Below the selected text column cell. A single row is added to the selected text column (row) in the specified position. The added row is empty of any task bars/milestone symbols and there are no labels in any text column cells associated with the added row.
Adding a New Row Above an Existing Swimlane - Example
Selecting a Single Text Column Cell - Example
The following sequence of illustrations show how a row can be added above or below a selected text column cell using the Add row/Above command/sub-command:
- 1) Right-click in the desired text column cell to access the text column right-click context menu as shown here:

- 2) Next, move the mouse over to the Add row command which automatically accesses the two sub-command as shown here:

- 3) Select the Above sub-command by moving the mouse to the Above sub-command as shown below:

- 4) When the Add row/Above command/sub-command is clicked, OnePager places a blank row above the selected text column cell as shown here:
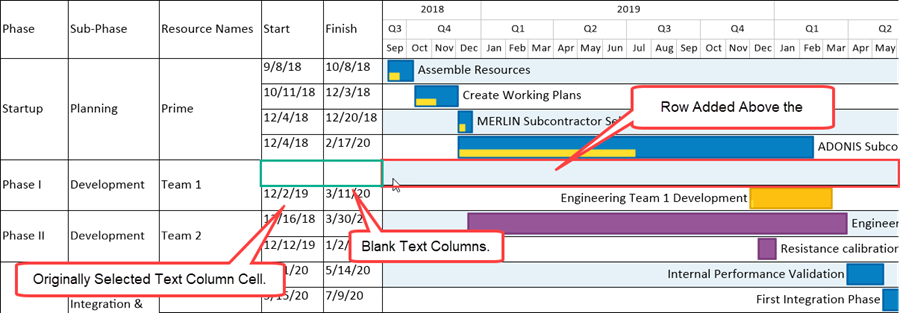
A similar result is achieved when the selected command/sub-command combination is Add row/Below.
The added row is empty of any task bars/milestone symbols and there are no labels in any text column cells associated with the added row.
Selecting Multiple Text Column Cells- Example
Rows can be added to multiple text column cells (rows) by selecting multiple text column cells in the same text column as shown below:
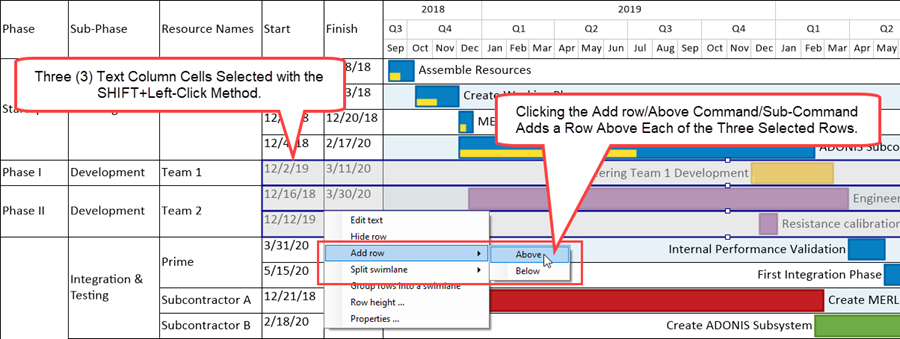
When the command/sub-command is clicked, OnePager places three empty rows into the chart as shown here:
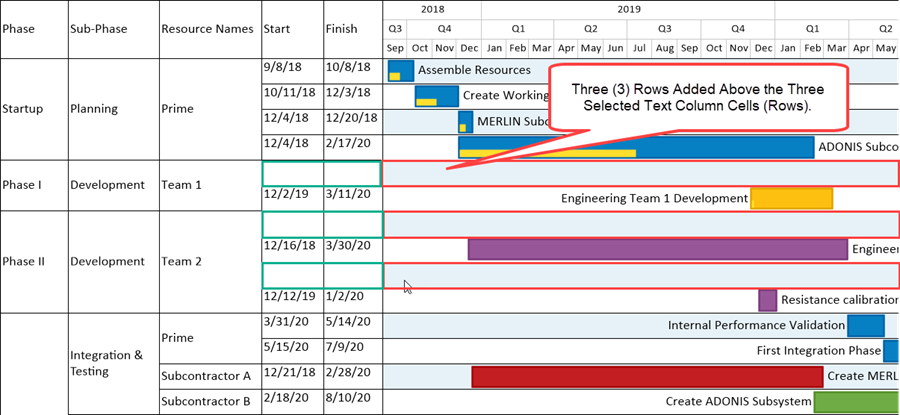
The added rows in this case have the same initial properties as with the case where only one new row was added Above or Below the selected text column cell. The added rows are empty of any task bars/milestone symbols and there are no labels in any text column cells associated with the added rows.
Using the Open Space Right-Click Context Menu
The open space right-click context menu contains serval commands that are also found in the swimlane level and text column right-click context menus as shown below:

In particular the open space right-click context menu is useful for adding swimlanes and/or adding rows when neither swimlane level cells nor text column cells are visible in the chart. To do either of these operations, place the mouse cursor in the nearest row where you want the added swimlane or row, click either the Add swimlane/Above or Below command/sub-command or the Add row/Above or Below command/sub-command, and OnePager places a single empty swimlane/row in the desired position. It is only possible to add one swimlane or add one row at a time using the open space right-click context menu and the Add swimlane or Add row commands.
The open space right-click context menu looks like this in a chart where swimlane levels and text columns are not shown:
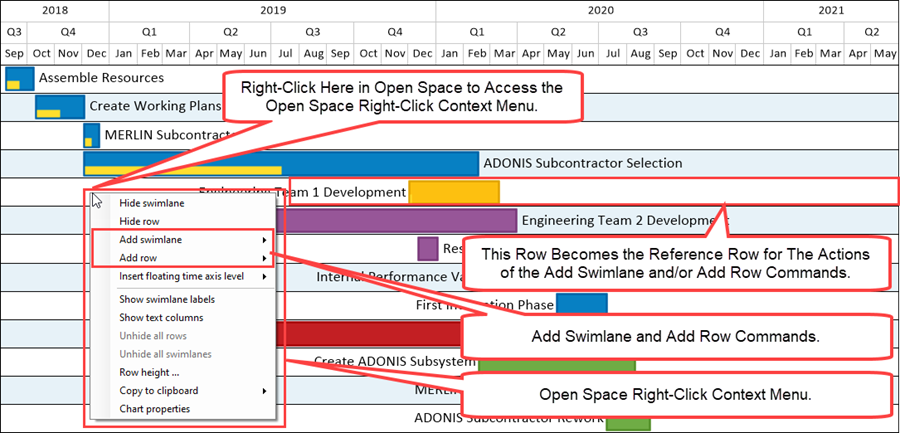
Adding Swimlanes Above or Below an Existing Row
As mentioned above, using the open space right-click context menu to Add swimlane/Above or Below involves the same steps as using the swimlane level right-click context menu’s Add swimlane/Above or Below commands/sub-commands when swimlane level cells are shown in the chart. The open space right-click context menu commands can be used when swimlane level cells are shown in the chart and the added swimlane becomes a member of the lowest level swimlane being shown.
When swimlane levels are shown in the chart, the process to Add swimlane/Above or Below is the same as the steps demonstrated in the example at: Adding a New Swimlane Above an Existing Swimlane - Example <!-12.16.1-70-->
Keep in mind that only one swimlane can be added at a time when the open space right-click context menu is used for this purpose. It is not possible to make multiple selections with the open space right-click context menu using any of the multiple selections methods. When multiple right-clicks are performed in open space, the open space right-click context menu is placed at the point of the last right-click.
Adding Rows Above or Below an Existing Row
As mentioned above, using the open space right-click context menu to Add row/Above or Below involves the same steps as using the text column right-click context menu’s Add row/Above or Below commands/sub-commands when text column cells are shown in the chart. The open space right-click context menu commands can be used when text column cells are shown in the chart and the added row becomes a member of the lowest level swimlane being shown.
When swimlane levels are shown in the chart, the process to Add row/Above or Below is the same as the steps demonstrated in the example at: Adding a New Row at the Top of an Existing Swimlane - Example <!-12.16.1-70-->
Keep in mind that only one row can be added at a time when the open space right-click context menu is used for this purpose. It is not possible to make multiple selections with the open space right-click context menu. When multiple right-clicks are performed in open space, the open space right-click context menu is placed at the point of the last right-click.
Related Links
Manual Editing Task/Milestone Shapes and Text Labels (Portal) <!-9.0.1-70-->
Creating and Editing Rows and Swimlanes (Portal) <!-12.0.1-70-->
About OnePager's Rows and Swimlanes <!-12.0.2-70-->
Collecting, Formatting, and Sorting Task/Milestones into Rows <!-12.01.1-70-->
Creating, Formatting, and Sorting Swimlanes Levels <!-12.02.1-70-->
Creating and Formatting Text Columns <!-12.03.1-70-->
Row and Swimlane Borders <!-12.04.1-70-->
Editing Text Columns or Swimlane Labels <!-12.3.1-70-->
Resizing the Width of Text Columns and Swimlanes <!-12.8.1-70-->
Resizing the Height of Rows <!-12.11.1-70-->
Hiding and Unhiding Rows and Swimlanes <!-12.13.1-70-->
Editing Row Properties <!-12.22.1-70-->
Editing Swimlane Properties <!-12.23.1-70-->
Zebra Striping for Rows and Swimlanes for OnePager Pro <!-12.24.1-70-->
Zebra Striping for Rows and Swimlanes for OnePager Express <!-12.24.2-70-->
Editing with the Chart Properties form (Portal) <!-21.0.1-70-->
Managing Templates (Portal) <!-24.0.1-70-->
(12.16.1-70)